Logic Pro User Guide for Mac
- Welcome
- What’s new in Logic Pro
-
- What is Logic Pro for Mac?
- Logic Pro project basics
- Undo and redo edits
- Download additional sound packs
- How to get help
-
- Tracks overview
-
- Create tracks
- Create tracks using drag and drop
- Create tracks using existing channel strips
- Assign tracks to different channel strips
- Choose the default region type for software instrument tracks
- Select tracks
- Duplicate tracks
- Rename tracks
- Change track icons
- Change track colors
- Reorder tracks
- Zoom tracks
- Replace or double drum sounds
- Control timing with the groove track
- Use selection-based processing
- Edit track parameters
-
- Overview
-
- Before recording software instruments
- Play software instruments
- Record software instruments
- Record additional software instrument takes
- Overdub software instrument recordings
- Spot erase software instrument recordings
- Use Note Repeat
- Replace software instrument recordings
- Record to multiple software instrument tracks
- Record multiple MIDI devices to multiple tracks
- Record software instruments and audio simultaneously
- Use step input recording techniques
- Record MIDI messages from another music app
- Route MIDI internally to software instrument tracks
- Use the metronome
-
- Arranging overview
-
- Regions overview
- Select regions
- Select parts of regions
- Cut, copy, and paste regions
- Move regions
- Add or remove gaps
- Delay region playback
- Loop regions
- Repeat regions
- Resize regions
- Mute and solo regions
- Time stretch regions
- Reverse audio regions
- Split regions
- Demix MIDI regions
- Join regions
- Create regions in the Tracks area
- Change the gain of audio regions in the Tracks area
- Normalize audio regions in the Tracks area
- Create aliases of MIDI regions
- Convert repeated MIDI regions to loops
- Change the color of regions
- Convert a MIDI region into a pattern region in Logic Pro for Mac
- Replace a MIDI region with a Session Player region in Logic Pro for Mac
- Convert audio regions to samples for a sampler instrument
- Rename regions
- Delete regions
-
- Chords overview
- Add and delete chords
- Select chords
- Cut, copy, and paste chords
- Move and resize chords
- Loop chords on the Chord track
- Transpose chords
- Edit chords
- Work with chord groups
- Use chord progressions
- Change the chord rhythm
- Choose which chords a Session Player region follows
- Analyze the key signature of a range of chords
- Analyze the chords in audio or MIDI regions in Logic Pro for Mac
- Extract vocal and instrumental stems with Stem Splitter
- Create groove templates
-
- Overview
-
- Add notes
- Select notes
- Snap items to the grid
- Move notes
- Copy notes
- Change the pitch of notes
- Resize notes
- Edit note velocity
- Quantize the timing of notes
- Quantize the pitch of notes
- Change note articulations
- Lock the position of events
- Mute notes
- Change note color
- View note labels
- Delete notes
- Time stretch notes
- View multiple MIDI regions
- Split chords
- Automation/MIDI area in the Piano Roll Editor
- Open other editors
-
- Session Players overview
- The Session Player Editor
- Choose a Session Player type and style
- Chords and Session Players
- Choose Session Player presets
- Regenerate a Session Player performance
- Follow rhythm of chords and other tracks
- Work with Drummer multi-channel kits
- Convert Session Player regions into MIDI or pattern regions
-
- Logic Pro for Mac advanced editors overview
-
- Audio File Editor overview
- Play audio files in the Audio File Editor
- Navigate audio files in the Audio File Editor
-
- Audio File Editor edit commands
- Edit audio files with transient markers
- Use the Audio File Editor Pencil tool
- Trim or silence audio files
- Remove DC offset
- Set audio file levels
- Normalize audio files
- Fade audio files
- Reverse audio and invert phase
- Audio File Editor Loop commands
- Undo Audio File Editor edits
- Backup audio files
- Use an external sample editor
-
- Mixing overview
- Set channel strip input format
- Set channel strip pan or balance positions
- Mute and solo channel strips
- Reorder channel strips in the Mixer
-
- Plug-ins overview
- Add, remove, move, and copy plug-ins
- Search for plug-ins in the Mixer
- Insert a plug-in on a track using drag and drop
- Activate plug-ins on inactive channel strips
- Use the Channel EQ
- Work in the plug-in window
- Work with plug-in settings
- Work with plug-in latencies
- Work with Audio Units in Logic Pro for Mac
- Use MPE with software instruments
- Use the Plug-in Manager
- Work with channel strip settings
- Surround panning
- Use the I/O Labels window
- Undo and redo Mixer and plug-in adjustments
-
- Smart Controls overview
- Show Smart Controls for master effects
- Choose a Smart Control layout
- Automatic MIDI controller assignment
- Map screen controls automatically
- Map screen controls
- Edit mapping parameters
- Use parameter mapping graphs
- Open the plug-in window for a screen control
- Rename a screen control
- Use articulation IDs to change articulations
- Assign hardware controls to screen controls
- Compare Smart Control edits with saved settings
- Use the Arpeggiator
- Automate screen control movements
-
- Live Loops overview
- Start and stop cells
- Work with Live Loops cells
- Change loop settings for cells
- How the Live Loops grid and Tracks area interact
- Edit cells
- Edit scenes
- Work in the Cell Editor
- Bounce cells
- Record a Live Loops performance
- Change Live Loops grid settings
- Control Live Loops with other devices
-
- Global changes overview
- Control transposition with the Pitch Source parameter
-
- Tempo overview
-
- Smart Tempo overview
- Use free tempo recording
- Choose the Project Tempo mode
- Choose the Smart Tempo setting
- Use Smart Tempo with multitrack audio
- Work in the Smart Tempo Editor
- Improve the tempo analysis using hints
- Correct tempo analysis results using beat markers
- Protect Smart Tempo edits by locking a range
- Match audio recordings to the project tempo
- Match the project tempo to an audio region
- Use audio file tempo information
- Sync audio to a video hit point
- Record tempo changes
- Use the Tempo Interpreter
- Use the tempo fader
- Control project volume
-
- Overview
- Add notes to a score
-
- Part box overview
- View score symbols
- Select score symbols
- Add notes and rests
- Add notes and symbols to multiple regions
- Add key and time signature changes
- Change the clef sign
- Add dynamic marks, slurs, and crescendi
- Change note heads
- Add symbols to notes
- Add trills, ornaments, and tremolo symbols
- Add sustain pedal markings
- Add chord symbols
- Add chord grids and tablature symbols
- Add bar lines, repeats, and coda signs
- Add page and line break symbols
-
- Select notes
- Move and copy notes
- Change note pitch, duration, and velocity
- Change note articulations
- Quantize the timing of notes
- Restrict note input to the current key
- Control how ties are displayed
- Add and edit tuplets
- Override display quantization using tuplets
- Add grace notes and independent notes
- Delete notes
- Use automation in the Score Editor
-
- Staff styles overview
- Assign staff styles to tracks
- Staff Style window
- Create and duplicate staff styles
- Edit staff styles
- Edit staff, voice, and assign parameters
- Add and delete staffs or voices in the Staff Style window in Logic Pro for Mac
- Copy staffs or voices in the Staff Style window in Logic Pro for Mac
- Copy staff styles between projects
- Delete staff styles
- Assign notes to voices and staffs
- Display polyphonic parts on separate staffs
- Change the staff assignment of score symbols
- Beam notes across staffs
- Use mapped staff styles for drum notation
- Predefined staff styles
- Share a score
-
-
- Key commands overview
- Browse, import, and save key commands
- Assign key commands
- Copy and print key commands
-
- Global Commands
- Global Control Surfaces Commands
- Various Windows
- Windows Showing Audio Files
- Main Window Tracks and Various Editors
- Various Editors
- Views Showing Time Ruler
- Views Showing Automation
- Main Window Tracks
- Live Loops Grid
- Mixer
- MIDI Environment
- Piano Roll
- Score Editor
- Event Editor
- Step Editor
- Step Sequencer
- Project Audio
- Audio File Editor
- Smart Tempo Editor
- Library
- Sampler
- Drum Machine Designer
- Step Input Keyboard
- Smart Controls
- Tool Menu
- Control Surface Install Window
-
- Logic Pro projects
- Various windows
- Controller Assignments window
- Control bar
- Tracks area
- Global tracks
- Automation
- Live Loops grid
- Mixer
- MIDI Environment
- Piano Roll Editor
- Score Editor
- Event List
- Step Editor
- Step Sequencer
- Flex Time
- Audio File Editor
- Smart Tempo Editor
- Surround Panner
- Channel EQ
- Space Designer
- Sampler
- Touch Bar shortcuts
-
-
- Working with your control surface
- Connect control surfaces
- Add a control surface to Logic Pro for Mac
- Automatic assignment for USB MIDI controllers
- Grouping control surfaces
- Control Surfaces settings overview
- Modal dialog display
- Tips for using your control surface
- Supported control surfaces
- Software and firmware for Logic Pro for Mac
-
-
- Environment overview
- Common object parameters
- Customize the Environment
-
-
- Fader objects overview
- Use fader objects
- Play back fader movements
- Work with object groups
- Fader styles
- Fader functions: MIDI events
- Fader functions: range, value as
- Fader functions: filter
- Vector fader
- Special faders overview
- Cable switchers
- Meta event faders
- SysEx faders
- Work with SysEx messages
- Special functions
- Ornament objects
- MMC record buttons
- Keyboard objects
- Monitor objects
- Channel splitter object
- Physical input objects
- Physical input objects
- MIDI click objects
-
-
- Use MIDI plug-ins
-
- Arpeggiator overview
- Arpeggiator control parameters
- Note order parameters overview
- Note order variations
- Note order inversions
- Arpeggiator pattern parameters overview
- Use Live mode
- Use Grid mode
- Arpeggiator options parameters
- Arpeggiator keyboard parameters
- Use keyboard parameters
- Assign controllers
- Modifier controls
- Note Repeater controls
- Randomizer controls
-
- Use Scripter
- Use the Script Editor
- Scripter API overview
- MIDI processing functions overview
- HandleMIDI function
- ProcessMIDI function
- GetParameter function
- SetParameter function
- ParameterChanged function
- Reset function
- JavaScript objects overview
- Use the JavaScript Event object
- Use the JavaScript TimingInfo object
- Use the Trace object
- Use the MIDI event beatPos property
- Use the JavaScript MIDI object
- Create Scripter controls
- Transposer controls
- Record MIDI to Track
-
-
- Alchemy overview
- Alchemy interface overview
- Alchemy Name bar
- Alchemy file locations
-
- Alchemy source overview
- Source master controls
- Import browser
- Source subpage controls
- Source filter controls
- Source filter use tips
- Source elements overview
- Additive element controls
- Additive element effects
- Spectral element controls
- Spectral element effects
- Pitch correction controls
- Formant filter controls
- Granular element controls
- Sampler element controls
- VA element controls
- Wide unison mode
- Source modulations
- Morph controls
- Alchemy master voice section
- Alchemy Extended parameters
-
- ES2 overview
- ES2 interface overview
- ES2 integrated effects processor controls
- Use ES2 in Surround mode
- Extended parameters
-
-
- Sample Alchemy overview
- Interface overview
- Add source material
- Edit mode
- Play modes
- Source overview
- Synthesis modes
- Granular controls
- Additive effects
- Additive effect controls
- Spectral effect
- Spectral effect controls
- Filter module
- Lowpass, bandpass, and highpass filters
- Comb PM filter
- Downsampler filter
- FM filter
- Envelope generators
- Mod Matrix
- Modulation routing
- Motion mode
- Trim mode
- More menu
-
- Sculpture overview
- Sculpture interface
- Global parameters
- Amplitude envelope parameters
- Use the Waveshaper
- Filter parameters
- Output parameters
- Use surround range and diversity
- Define MIDI controllers
- Extended parameters
-
- Studio Piano
-
- Ultrabeat overview
- Ultrabeat interface
- Synthesizer section overview
- Filter section controls
- Distortion circuit controls
- Glossary
- Copyright and trademarks
Audio Devices settings in Logic Pro for Mac
Logic Pro for Mac automatically recognizes any installed Core Audio hardware and uses the default settings as defined in the Audio MIDI Setup utility (/Applications/Utilities/Audio MIDI Setup). However, you may want to optimize the settings for your individual hardware setup, particularly if you use several audio interfaces or a multiple input/output device.
In Logic Pro, the Audio settings contain the following Devices settings:
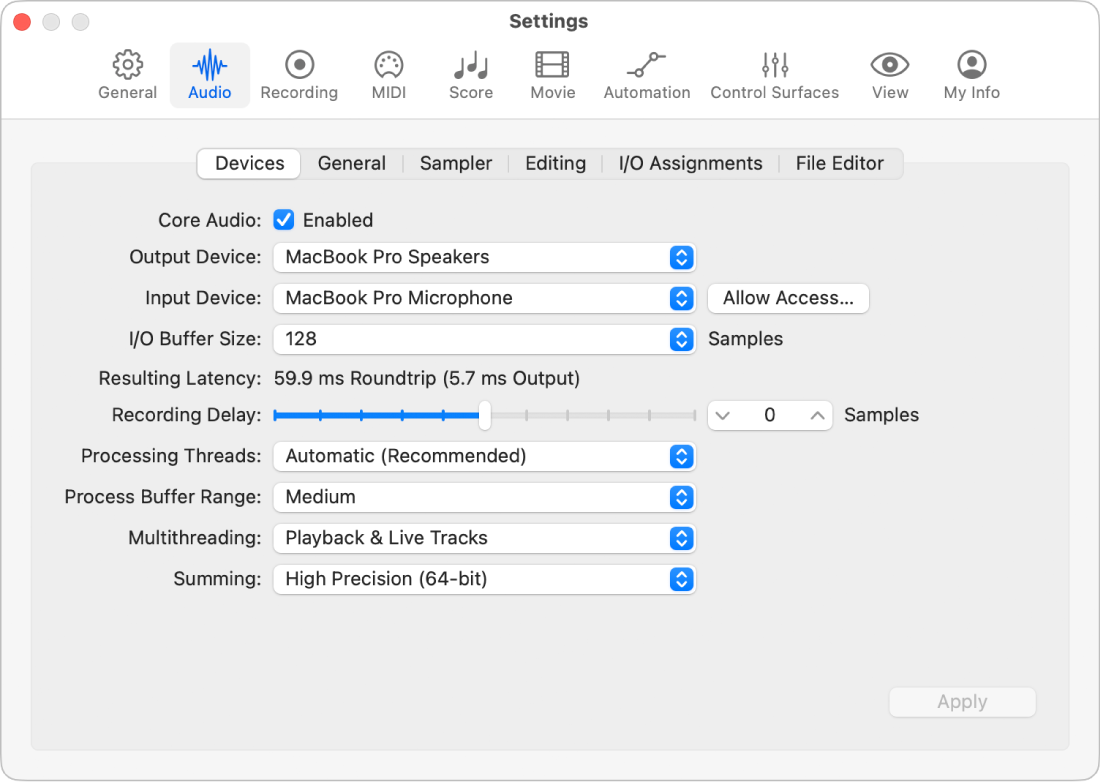
Core Audio Enabled checkbox: The Core Audio driver in Logic Pro has to be turned on to record and play back audio in your project. The following happens if the checkbox is unselected:
You won’t hear any audio on the audio inputs or during playback.
All audio effect and software instrument plug-ins loaded on channel strips are turned off, as indicated by an orange triangle on an active plug-in slot.
You can’t open any plug-in windows.
Plug-in menus don’t list any audio effect and software instrument plug-ins.
Aux channel strips not assigned to a track are hidden from the Mixer.
You can still use your project to record and play back MIDI.
Output Device pop-up menu: Use to choose between any installed Core Audio device, including the internal sound hardware. This also includes aggregate audio devices, consisting of several audio interfaces. See the Audio MIDI Setup Help for information on aggregate devices.
Tip: To play your project through a HomePod speaker or any AirPlay-supported device, open the Audio Devices window in the Audio MIDI Setup utility, click the
 button in the lower left corner, and choose a device from the Connect AirPlay Device submenu. The AirPlay device is added in the sidebar and also appears in the Logic Pro Output Device pop-up menu.
Input Device pop-up menu: Use to choose between any installed Core Audio device, including the internal sound hardware. When you select an output device that also provides inputs, the Input Device pop-up menu changes accordingly. If choosing a different input device, you’ll be advised to use a common Word Clock for both audio devices in order to ensure the best sound quality.
Note: The selected audio devices are stored with the project. If the selected device isn't available on a computer when you open the project, a dialog provides the option to select the previously used audio device, or choose a different one from the Audio settings.
Allow Access button: Click to open System Settings > Privacy & Security > Microphone. The Logic Pro switch determines whether Logic Pro can receive audio signals from the device selected in the Input Device pop-up menu. You have to restart Logic Pro when changing the status. The button is only displayed if the Logic Pro switch is set to off in the System Settings.
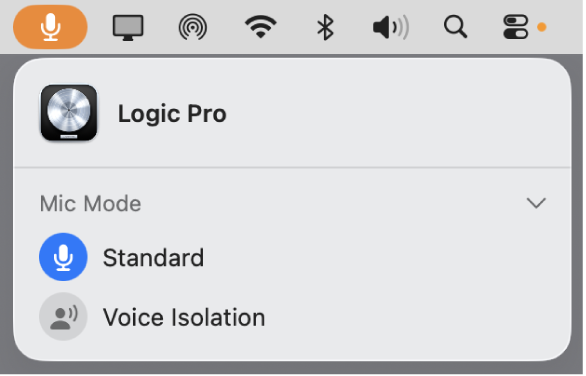
Note: If the switch in System Settings is in the on position and you launch Logic Pro, the orange Mic Mode icon appears in the main menu, and the Control Center displays an orange dot. Mic Mode is set to Standard by default, but you can click the Mic Mode icon and choose Voice Isolation if you want to filter out background noise on channels 1–2 of your hardware audio interface. Because Voice Isolation can degrade input quality, if you try to record audio, an alert pops up to remind you that Voice Isolation is turned on.
I/O Buffer Size pop-up menu: Determines the size of a special memory location (referred to as an I/O buffer) that the audio stream passes through when transmitted between your computer’s processor and your audio device. The smaller the buffer size, the less latency you encounter when you monitor while recording using a microphone or a software instrument.
Some points to note:
As the value is reduced, a higher strain is placed on your computer’s processor or processors.
There may be a point where the selected I/O buffer size is too small for your computer, and begins to affect playback. This usually takes the form of clicks, pops, and crackles in your audio.
To minimize latency during recording, you should aim for the lowest possible I/O buffer size value that doesn’t introduce clicks, pops, and crackles.
During mixing, choose the largest buffer size, which allows you to run more processor-intensive plug-ins.
Some plug-ins in your project are automatically reloaded in the background when you choose a different buffer size.
Tip: If you often switch the I/O buffer size between a higher value (for mixing) and a lower value (for recording), you can display the I/O buffer size in the custom control bar display by selecting the Sample Rate / Buffer Size checkbox in the “Customize Control Bar and Display” dialog. The display then shows the current I/O buffer size, which you can click to choose a different setting from the pop-up menu. See Customize the control bar.
Resulting Latency (Roundtrip/Output) display: Displays the resulting roundtrip and output latency for the I/O buffer size.
Tip: With Quick Help turned off, move the pointer over the display to show a help tag that gives the acoustic distance calculated for the current latency.
Recording Delay slider: Delays the recording of audio by a certain fixed value, helping you to compensate for any delays that are caused by the audio driver.
Note: You should not normally need to touch this setting.
Processing Threads pop-up menu: Choose the maximum number of processing threads used, or have the number of threads set automatically. Automatic is the default setting, and is recommended except when you use other CPU-intensive applications simultaneously with Logic Pro.
The number of threads you choose in the Processing Threads pop-up menu can be seen in the Performance Meter window. To open it, first choose the Custom Display option in the control bar to show the Performance Meter, which indicates the combined CPU load. Then double-click the Performance Meter to open the Performance Meter window, which shows an individual meter for each processing thread.
Note: The options in the Processing Threads pop-up menu show the number of threads (the sequence of instructions) and the number of cores (the processing units within a CPU that execute those instructions). All the applications running on your computer share its processing power, but by choosing a higher number from this pop-up menu, you allocate more of your computer’s processing power to Logic Pro.
Process Buffer Range pop-up menu: Choose the sample size of the process buffer used to compute mixes and effects when playing back tracks that aren’t in Live mode. The options are Small (512 samples), Medium (1024 samples), and Large (2048 samples). During playback, those tracks can be processed in advance without creating additional latency.
Multithreading pop-up menu: Determines whether multithreading is set for playback tracks only, or for playback and live tracks, which makes everything more responsive.
Note: A live track is the focused track or the tracks that have the Record Enable button
 or Input Monitoring button set to their on position. A track and all its plug-ins are processed by a single thread. With a live track, not only all its plug-ins but also all channel strips that are part of its signal flow (for example, Send Return tracks) have to be processed by a single thread, which could lead to CPU spikes that you can monitor in the Performance Meter window.
Summing pop-up menu: Determines whether the Logic Pro audio engine uses double precision (64-bit) or standard precision (32-bit) buffers when summing audio. This setting applies to the Mixer, where the audio signals of all channel strips are summed together to the output channel strip. Higher precision results in greater accuracy during data processing and, therefore, delivers better-sounding results.
Apply button: Reloads the audio driver with any adjustments made to settings in this window.