Logic Pro User Guide for iPad
- Welcome
-
- What is Logic Pro?
- Working areas
- Work with the menu bar
- Work with function buttons
- Work with numeric values
- Undo and redo edits in Logic Pro for iPad
-
- Intro to tracks
- Create tracks
- Create tracks using drag and drop
- Choose the default region type for a software instrument track
- Select tracks
- Duplicate tracks
- Reorder tracks
- Rename tracks
- Change track icons
- Change track colors
- Use the tuner on an audio track
- Show the output track in the Tracks area
- Delete tracks
- Edit track parameters
- How to get help
-
- Intro to recording
-
- Before recording software instruments
- Record software instruments
- Record additional software instrument takes
- Record to multiple software instrument tracks
- Record multiple MIDI devices to multiple tracks
- Record software instruments and audio simultaneously
- Merge software instrument recordings
- Spot erase software instrument recordings
- Replace software instrument recordings
- Route MIDI internally to software instrument tracks
- Record with Low Latency Monitoring mode
- Use the metronome
- Use the count-in
-
- Intro to arranging
-
- Intro to regions
- Select regions
- Cut, copy, and paste regions
- Move regions
- Remove gaps between regions
- Delay region playback
- Trim regions
- Loop regions
- Repeat regions
- Mute regions
- Split and join regions
- Stretch regions
- Separate a MIDI region by note pitch
- Bounce regions in place
- Change the gain of audio regions
- Normalize audio regions in the Tracks area in Logic Pro for iPad
- Create regions in the Tracks area
- Convert a MIDI region to a Session Player region or a pattern region
- Replace a MIDI region with a Session Player region in Logic Pro for iPad
- Rename regions
- Change the color of regions
- Delete regions
-
- Intro to chords
- Add and delete chords
- Select chords
- Cut, copy, and paste chords
- Move and resize chords
- Loop chords on the Chord track
- Color chords on the Chord track
- Edit chords
- Work with chord groups
- Use chord progressions
- Change the chord rhythm
- Choose which chords a Session Player region follows
- Analyze the key signature of a range of chords
- Use Chord ID to analyze the chords in an audio or MIDI region
- Create fades on audio regions
- Extract vocal and instrumental stems with Stem Splitter
- Access mixing functions using the Fader
-
- Intro to Step Sequencer
- Use Step Sequencer with Drum Machine Designer
- Chords and pitch in Step Sequencer
- Record Step Sequencer patterns live
- Step record Step Sequencer patterns
- Load and save patterns
- Modify pattern playback
- Edit steps
- Edit rows
- Edit Step Sequencer pattern, row, and step settings in the inspector
- Customize Step Sequencer
-
- Intro to mixing
-
- Channel strip types
- Channel strip controls
- Peak level display and clipping
- Set channel strip volume
- Set channel strip input format
- Set the output for a channel strip
- Set channel strip pan position
- Mute and solo channel strips
- Reorder channel strips
- Replace a patch on a channel strip using drag and drop
- Work with plug-ins in the Mixer
- Search for plug-ins in the Mixer
-
-
- Effect plug-ins overview
-
- Instrument plug-ins overview
-
- ES2 overview
-
- Modulation overview
- Use the Mod Pad
-
- Vector Envelope overview
- Use Vector Envelope points
- Use Vector Envelope solo and sustain points
- Set Vector Envelope segment times
- Vector Envelope XY pad controls
- Vector Envelope Actions menu
- Vector Envelope loop controls
- Vector Envelope point transition shapes
- Vector Envelope release phase behavior
- Use Vector Envelope time scaling
- Modulation source reference
- Via modulation source reference
- Use macro controls
-
- Sample Alchemy overview
- Interface overview
- Add source material
- Save a preset
- Edit mode
- Play modes
- Source overview
- Synthesis modes
- Granular controls
- Additive effects
- Additive effect controls
- Spectral effect
- Spectral effect controls
- Filter module
- Low, bandpass, and highpass filters
- Comb PM filter
- Downsampler filter
- FM filter
- Envelope generators
- Mod Matrix
- Modulation routing
- Motion mode
- Trim mode
- More menu
- Sampler
- Studio Piano
- Copyright and trademarks
Modulator MIDI plug-in envelope in Logic Pro for iPad

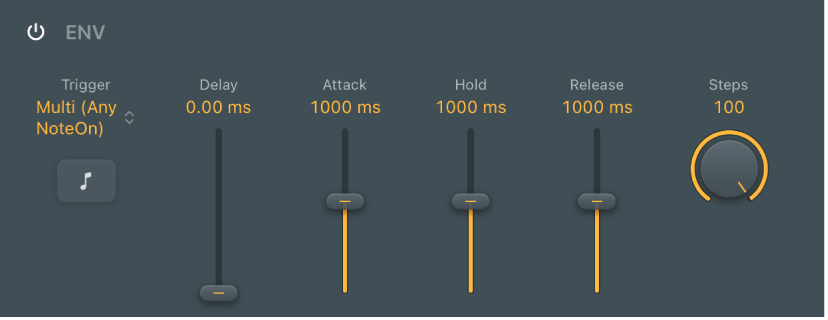
Envelope parameters
On/Off button: Turn the envelope on or off.
Trigger pop-up menu: Determine if the envelope is triggered by the LFO or by incoming MIDI note on messages.
Single: After all notes have been released, the envelope is re-triggered by the first MIDI note on message it receives.
Note: This means that legato playing does not reset the envelope, so keep this in mind during performances.
Multi: The envelope is re-triggered by each received MIDI note on message.
LFO: The envelope is retriggered when the LFO reaches its (positive) peak value. See Modulator MIDI plug-in LFO.
Note: The envelope ignores incoming LFO triggers if it is currently completing an envelope pass.
Sync button: Synchronize the envelope with project grid values. This snaps ADSR values to project bars, beats, and so on.
Delay slider and field: Delay the onset of the envelope. Ranges from 0 to 10 seconds.
Attack slider and field: Set the time required to reach the sustain level. Ranges from 0 to 10 seconds.
Hold slider and field: Set the sustain level and duration. Ranges from 0 to 10 seconds.
Release slider and field: Set the time required for the envelope to fall to a value of zero after the sustain phase of the envelope has finished. Ranges from 0 to 10 seconds.
Steps slider and field: Determine the number of steps per envelope pass. By default, the envelope produces a smoothed continuous stream of controller events, but you can use this parameter to create a stepped controller signal that is similar to the output of a Sample and Hold circuit. When you set a manual step rate, the envelope time can be changed without altering the number of steps.
ENV to LFO Rate knob and field: Set the maximum amount of LFO modulation (LFO depth). The LFO rate can be modulated by the Attack, Hold, and Release parameters (see above).
ENV to LFO Amp knob and field: Set the maximum amount of LFO output modulation. This lets you fade the LFO in or out with the envelope.

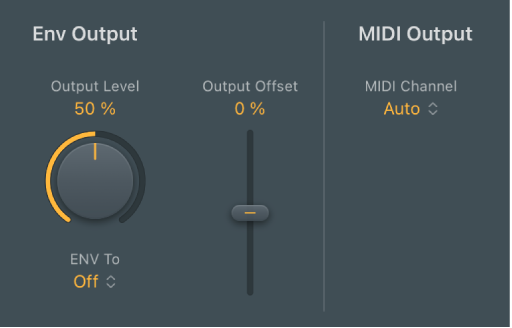
Env Output parameters
Output Level knob: Scale the envelope output level.
ENV To pop-up menu: Choose a continuous controller number, aftertouch, or pitch bend as the envelope output target. You can also learn a plug-in parameter.
Output Offset slider: Set a positive or negative offset in order to tailor the output for the intended target.
MIDI Channel pop-up menu: Choose a MIDI output channel.
Note: This applies to both the LFO and envelope.
Assign a MIDI event to a plug-in parameter
You can assign and send MIDI events to plug-ins in the same channel strip, allowing you to control parameters without using MIDI CC messages.
In Logic Pro, choose -Learn Plug-in Parameter- from the ENV To pop-up menu.
Tap the parameter in the target plug-in.
Download this guide: PDF