
Giv dit skrivebord et tilpasset udseende
Der er flere måder, hvorpå du kan give skrivebordet - baggrundsområdet på skærmen - et specielt udseende.
Skift billedet, der vises på skrivebordet
I Skrivebord kan du vælge det billede, der vises på skrivebordet. Mac leveres med masser af skrivebordsbilleder, du kan vælge mellem, men du kan også bruge dine egne billeder eller vælge en dækkende farve.
Tip: Hvis du hurtigt vil bruge et billede, som du har i programmet Fotos, skal du vælge billedet i Fotos, klikke på knappen Del ![]() på værktøjslinjen i Fotos og derefter vælge Indstil skrivebordsbillede.
på værktøjslinjen i Fotos og derefter vælge Indstil skrivebordsbillede.
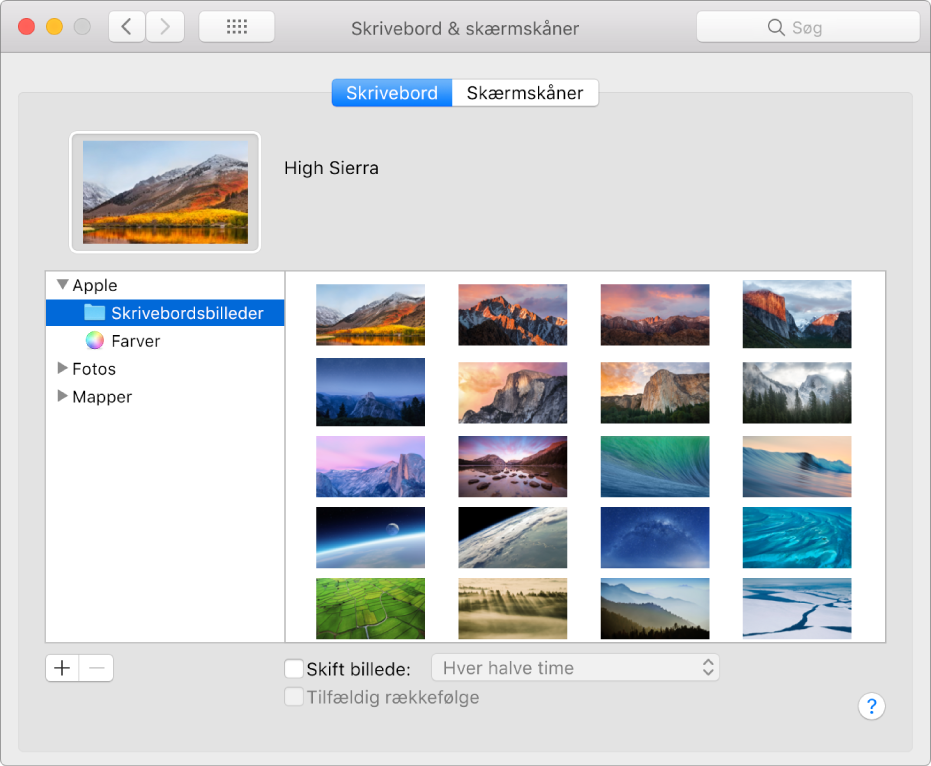
Vælg Apple > Systemindstillinger, klik på Skrivebord & skærmskåner, og klik derefter på Skrivebord.
Finde et billede eller en farve til venstre:
Billeder og farver, der følger med Mac: Klik på infotrekanten ved siden af Apple, og vælg Skrivebordsbilleder eller Farver.
Dine billeder: Klik på infotrekanten ved siden af Fotos (eller iPhoto, hvis det er tilgængeligt). Hvis dine billeder er i mappen Billeder eller i en anden mappe, skal du klikke på trekanten ved siden af Mapper og vælge en mappe.
Du tilføjer en mappe ved at klikke på knappen Tilføj
 , navigere til og vælge mappen og derefter klikke på Vælg.
Hvis du ikke kan se noget, når du vælger mappen, der indeholder dine billeder, har billederne muligvis ikke det rigtige arkivformat – JPEG, PICT, TIFF eller PNG. Du ændrer et billedes format ved at åbne det i programmet Billedfremviser og derefter arkivere det i det nye format. Hvis billeder er uskarpe, kan du prøve at bruge større billeder, f.eks. 1024 x 768 pixel.
I højre side skal du derefter klikke på det billede, du vil bruge.
Skrivebordet ændres med det samme, så du kan se, hvordan billedet ser ud. Når du bruger et af dine egne billeder, kan du vælge, om det skal fylde hele skærmen, centreres eller organiseres på anden måde. Du kan nemt prøve dig frem med forskellige billeder, som du organiserer på forskellige måder, indtil du er tilfreds.
Hvis du ikke kan lægge dig fast på ét bestemt billede, kan du angive, at billederne i en mappe skal bruges på skift. Vælg afkrydsningsfeltet “Skift billede”, og vælg derefter, hvor ofte billedet skal skifte, f.eks. hver time. Det kan få betydning for visse programmers ydeevne, f.eks. spil, som bruger megen grafik. Fravælg afkrydsningsfeltet for at gå tilbage til kun at bruge ét billede.
Du kan bruge et billede, som du har set på nettet, som dit skrivebordsbillede. Ctrl-klik på billedet, og vælg derefter Brug billede som skrivebordsbillede.
Brug en skærmskåner
I vinduet Skærmskåner kan du vælge en skærmskåner, der skjuler skrivebordet, når du er væk fra din Mac.
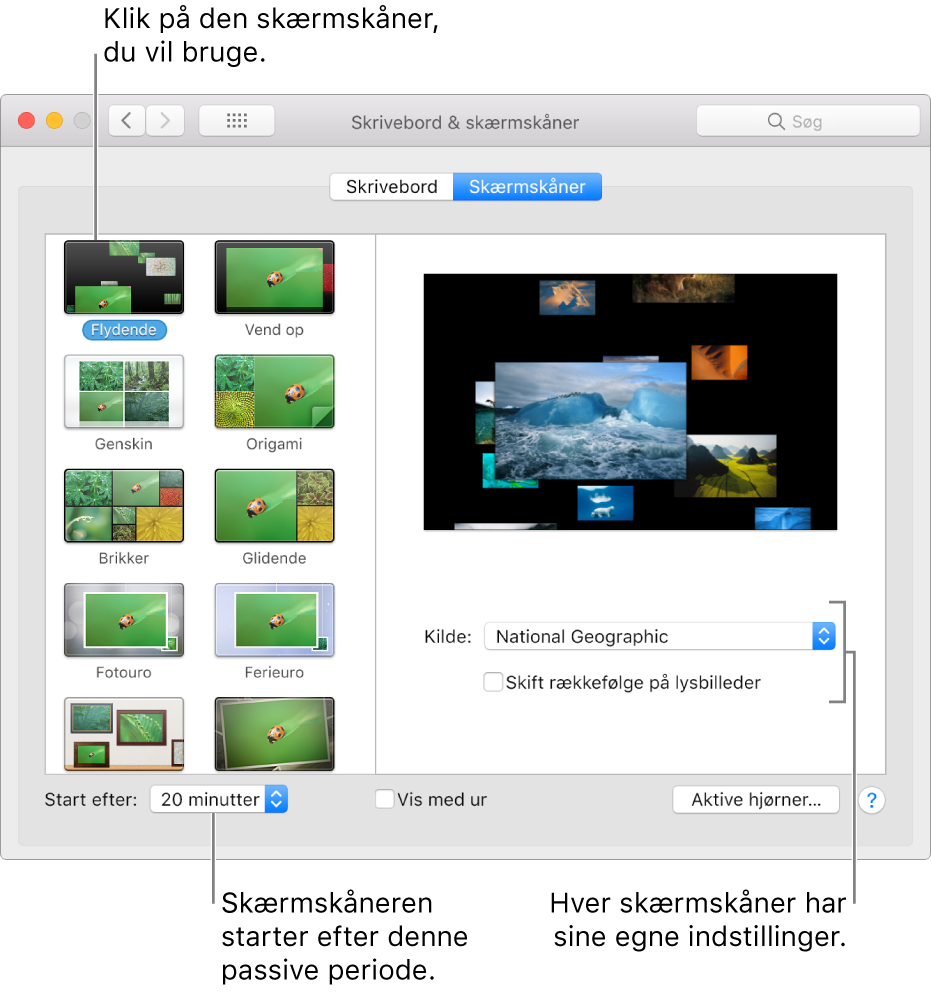
Vælg Apple > Systemindstillinger, klik på Skrivebord & skærmskåner, og klik derefter på Skærmskåner.
Klik på en skærmskåner til venstre, og vælg derefter indstillinger for, hvordan den skal se ud.
Kilde: Klik på lokalmenuen, og vælg derefter de billeder, der skal vises i skærmskåneren. Du kan bruge billeder, der følger med Mac, eller du kan vælge billeder fra Fotobibliotek eller en anden mappe.
Eksempelområdet viser, hvordan skærmskåneren vil se ud. Brug et øjeblik på at se et eksempel på det valgte.
Skift rækkefølge på lysbilleder: Vælg afkrydsningsfeltet for at vise billederne i tilfældig rækkefølge i stedet for den rækkefølge de har i kilden.
Vælg andre indstillinger til skærmskåneren.
Start efter: Klik på lokalmenuen, og vælg, hvor lang tid, der skal gå, før Mac starter skærmskåneren. Hvis du f.eks. vælger 5 minutter, starter skærmskåneren, når Mac ikke har været brugt i fem minutter.
Vis med ur: Vælg afkrydsningsfeltet for at vise klokkeslæt i skærmskåneren.
Aktive hjørner: Vælg afkrydsningsfeltet for at indstille en genvej til start af skærmskåneren.
Du stopper skærmskåneren og vender tilbage til skrivebordet ved at trykke på en tilfældig tast, bevæge musen eller røre ved pegefeltet.
Hvis du ønsker mere sikkerhed, efter at du stopper skærmskåneren, henvises du til Kræv en adgangskode efter at have afbrudt vågeblus på din Mac.
Gør menulinjen og Dock mørkere
Du kan give skrivebordet et mørkere udseende ved at indstille menulinjen og Dock til at være mørke.
Vælg Apple > Systemindstillinger, og klik derefter på Generelt.
Vælg “Brug mørk menulinje og Dock”.
Skift farve på knapper, menuer, vinduer og markering
Brug vinduet Generelt i Systemindstillinger til at vælge nye farver til knapper, menuer, vinduer og til valgt tekst.
Vælg Apple > Systemindstillinger, og klik derefter på Generelt.
Klik på lokalmenuen Udseende, og vælg derefter en farve, der skal bruges til knapper, menuer og vinduer.
Klik på lokalmenuen “Markeringsfarve”, og vælg derefter en farve, der skal bruges til markering af valgt tekst.