Adjust ProRes RAW camera settings in Final Cut Pro for Mac
Apple ProRes RAW brings to RAW video the same great performance, quality, and ease of use that Apple ProRes has brought to conventional video, in a format ideal for HDR content creation. ProRes RAW captures RAW sensor data from compatible cameras. This wealth of data allows you to adjust camera settings in Final Cut Pro with maximum flexibility, without losing quality.
There are several ways to adjust camera settings for ProRes RAW video after you import it:
With the standard RAW conversion built into Final Cut Pro, you can view and adjust the ISO setting, exposure offset, and color temperature of ProRes RAW media using controls in the inspector.
For ProRes RAW video that was recorded on supported iPhone models, you can adjust additional custom camera settings created by Apple, including exposure, color temperature, tint, advanced demosaicing parameters, and RAW denoising powered by machine learning. (RAW denoising is done with Compressor, the professional transcoding app.)
You can install a software plug-in from a camera manufacturer to view and adjust ProRes RAW camera settings optimized specifically for that manufacturer’s camera sensors.
Adjust ProRes RAW camera settings for standard conversion
You can use the standard RAW conversion in Final Cut Pro with ProRes RAW media from any camera.
Import ProRes RAW media into Final Cut Pro.
Important: When you import the media, make sure to deselect the “Create optimized media” and “Create proxy media” options, because any transcoding work done during import will be discarded if you adjust the RAW settings in the next steps.
For more information about importing media, see Import from file-based cameras and Import from your Mac or storage device.
In the Final Cut Pro browser or timeline, select the clip or clips you want to inspect or adjust.
Note: Compound clips can’t be adjusted.
Do one of the following:
Choose Window > Show in Workspace > Inspector (or press Command-4).
Click the Inspector button in the toolbar.

Click the Info button at the top of the inspector.

At the bottom of the Info inspector, click Modify ProRes RAW Settings.
In the ProRes RAW Settings window, click the Processing pop-up menu and choose Standard (if it’s not already chosen).
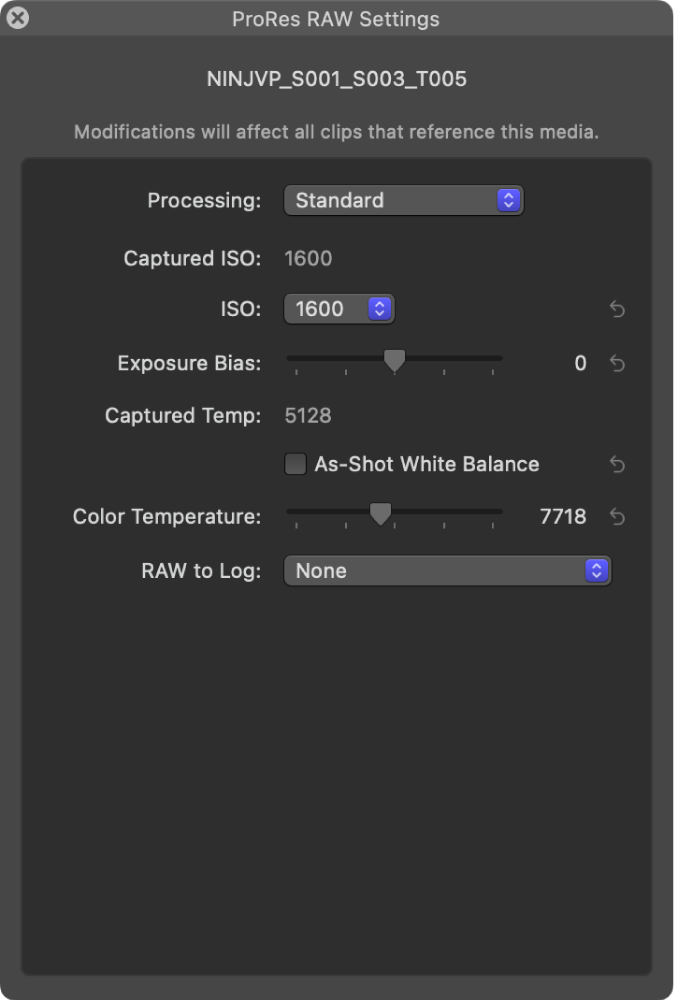
Click the RAW to Log pop-up menu and choose an option appropriate for your workflow.
If you choose None, make sure the Camera LUT pop-up menu is also set to None. See Manually apply, change, or remove a camera LUT and Intro to color correcting ProRes RAW video.
In the ProRes RAW Settings window, view or adjust any of the following settings:
Note: These settings appear only if the corresponding information is found in the clip metadata.
Captured ISO (not adjustable): Displays the as-shot ISO setting of ProRes RAW clips.
ISO: Adjust the ISO setting of ProRes RAW clips.
Exposure Bias: Adjust the ISO setting of ProRes RAW clips up or down by as much as one stop.
Captured Temp (not adjustable): Displays the as-shot color temperature of ProRes RAW clips.
As-Shot White Balance: Retains the original camera white balance setting. This setting is on by default; turn it off to make adjustments to Color Temperature.
Color Temperature: Adjust the camera white balance setting for ProRes RAW clips (available when As-Shot White Balance is turned off).
As needed, generate optimized or proxy media from the ProRes RAW media.
Adjust camera settings for ProRes RAW recorded on iPhone
Use these camera settings with ProRes RAW video that was recorded on supported iPhone models.
Import ProRes RAW media shot on iPhone into Final Cut Pro.
Important: When you import the media, make sure to deselect the “Create optimized media” and “Create proxy media” options, because any transcoding work done during import will be discarded if you adjust the RAW settings in the next steps.
For more information about importing media, see Import from file-based cameras and Import from your Mac or storage device.
In the Final Cut Pro browser or timeline, select the clip or clips you want to inspect or adjust.
Note: Compound clips can’t be adjusted.
Do one of the following:
Choose Window > Show in Workspace > Inspector (or press Command-4).
Click the Inspector button in the toolbar.
Click the Info button at the top of the inspector.
At the bottom of the Info inspector, click Modify ProRes RAW Settings.
In the ProRes RAW Settings window, click the Processing pop-up menu and choose iPhone ProRes RAW (if it’s not already chosen).
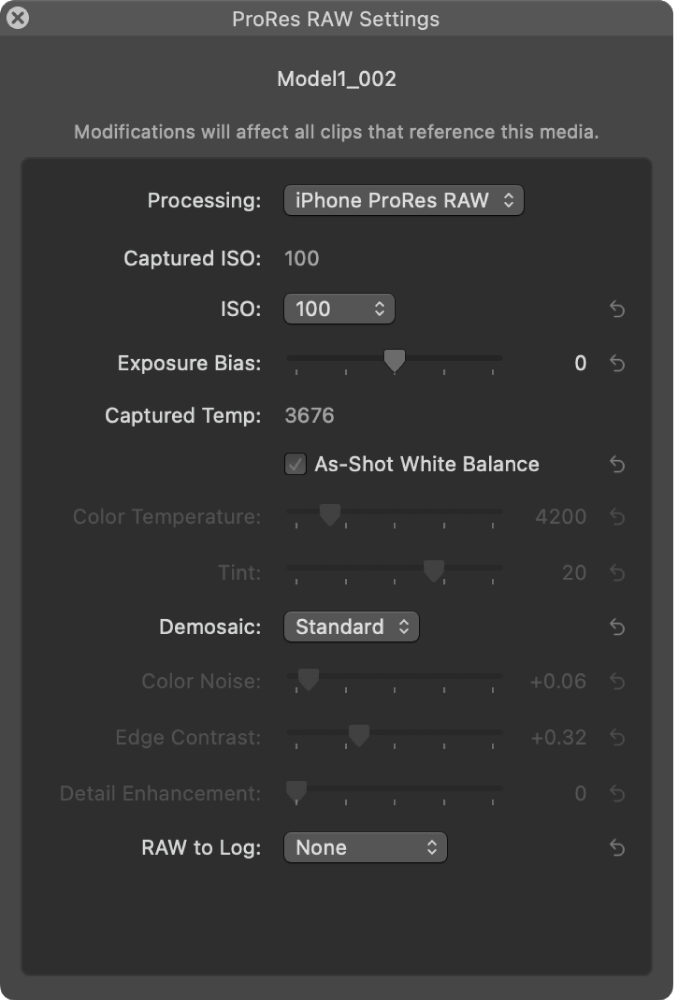
Click the RAW to Log pop-up menu and choose the method of encoding brightness and color information when converting the RAW video file. See Intro to color correcting ProRes RAW video.
None: Represents light values as they exist in the real world, with pixel values proportional to the actual intensity of light captured by the sensor. Choose this option if you plan to color correct the video directly, without LUTs.
Note: If you choose None, make sure the Camera LUT pop-up menu is also set to None. See Manually apply, change, or remove a camera LUT.
Apple Log: Preserves highlight and shadow detail by using a logarithmic transfer function to capture a wide dynamic range. This option creates a flat, desaturated image for color grading in log-based workflows.
Apple Log 2: Preserves highlight and shadow detail but with a wider color gamut than Apple Log, providing greater flexibility and precision for video capture and color grading. This option creates a flat, desaturated image for color grading in log-based workflows.
In the ProRes RAW Settings window, view or adjust any of the following settings:
Note: These settings appear only if the corresponding information is found in the clip metadata.
Captured ISO (not adjustable): Displays the as-shot ISO setting of ProRes RAW clips.
ISO: Adjust the ISO setting of ProRes RAW clips.
Exposure Bias: Adjust the ISO setting of ProRes RAW clips up or down by as much as one stop.
Captured Temp (not adjustable): Displays the as-shot color temperature of ProRes RAW clips.
As-Shot White Balance: Retains the original camera white balance setting. This setting is on by default; turn it off to make adjustments to Color Temperature and Tint.
Color Temperature: Adjust the camera white balance setting for ProRes RAW clips along the blue-amber axis (available when As-Shot White Balance is turned off).
Tint: Adjust the camera white balance setting for ProRes RAW clips along the green-magenta axis (available when As-Shot White Balance is turned off). Use this slider to correct color casts that are not addressed by Color Temperature adjustments alone.
Demosaic: Choose the method for transforming RAW sensor data into a standard full-color RGB image:
Standard: Uses the same demosaicing algorithm as standard conversion. Playback occurs in real time.
Custom: Enables manual demosaicing adjustments using the Color Noise, Edge Contrast, and Detail Enhancement sliders. Playback may be slower than real time.
Color Noise: Drag the slider to suppress color noise artifacts (available when Demosaic is set to Custom).
Edge Contrast: Drag the slider to increase contrast between objects (available when Demosaic is set to Custom).
Detail Enhancement: Drag the slider to increase sharpening for the overall image (available when Demosaic is set to Custom).
As needed, generate optimized or proxy media from the ProRes RAW media.
In the iPhone ProRes RAW conversion, if the media contains lens distortion metadata, geometric lens distortion correction is applied automatically to rectify the distortions introduced by the optical properties of camera lenses.
Note: You can use Compressor, the professional transcoding app designed to work directly with Final Cut Pro, to reduce video noise in ProRes RAW video that was recorded on supported iPhone models. Compressor uses machine learning to reduce noise in the RAW data. This method can preserve sharpness and fine detail better than the standard noise reduction effect, which is applied after image processing. See Import and adjust RAW video in the Compressor User Guide and Share using Compressor.
Use a camera manufacturer’s ProRes RAW plug-in
Download the appropriate plug-in from the camera manufacturer’s website, and install it.
Import ProRes RAW media compatible with the plug-in.
Important: When you import the media, make sure to deselect the “Create optimized media” and “Create proxy media” options, because any transcoding work done during import will be discarded if you adjust the RAW settings in the next steps.
For more information about importing media, see Import from file-based cameras and Import from your Mac or storage device.
In the Final Cut Pro browser or timeline, select the clip or clips you want to inspect or adjust.
Note: Compound clips can’t be adjusted.
Do one of the following:
Choose Window > Show in Workspace > Inspector (or press Command-4).
Click the Inspector button in the toolbar.
Click the Info button at the top of the inspector.
At the bottom of the Info inspector, click Modify ProRes RAW Settings.
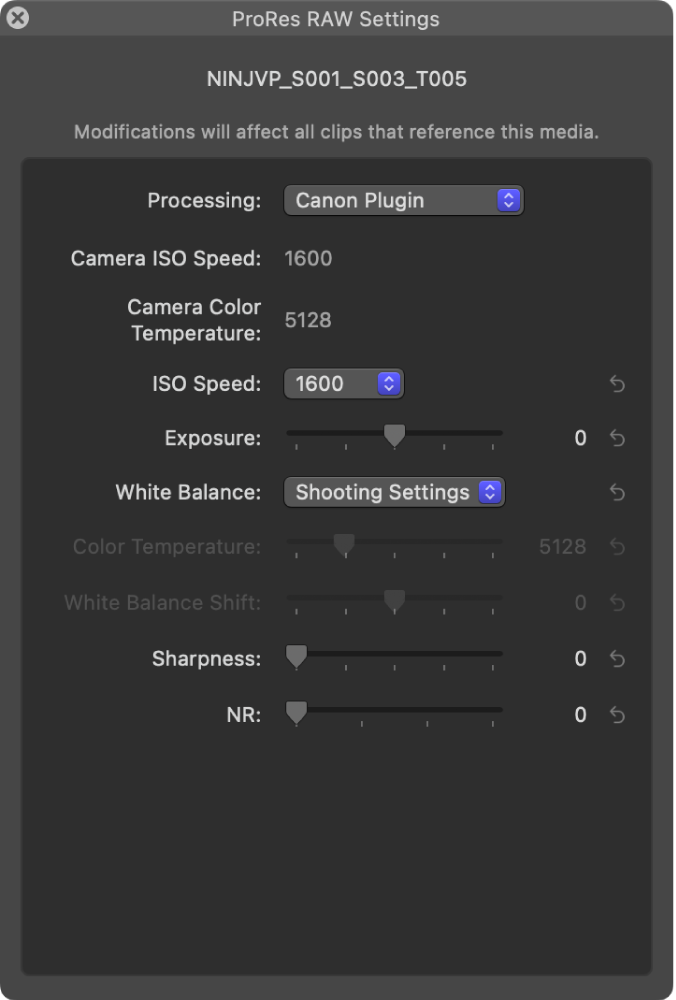
In the ProRes RAW Settings window, click the Processing pop-up menu and choose the plug-in you want to use.
View or adjust any of the plug-in settings.
The example below shows settings for a camera manufacturer plug-in.
As needed, generate optimized or proxy media from the ProRes RAW media.
For information about cameras that are compatible with Apple ProRes RAW, see the Apple Support article Cameras supported by Final Cut Pro.
Download this guide: PDF