Conform frame sizes and rates in Final Cut Pro for Mac
Final Cut Pro manages project settings automatically. This means you can work with multiple media types with differing frame sizes (also referred to as resolution) and frame rates in the same project. When you add the first video clip to your project, Final Cut Pro automatically sets the format, frame size, and frame rate for the entire project based on the properties of that first clip (or, more precisely, on the properties of the clip’s source media file).
You can modify the project’s settings at any time, and you can control, on a clip-by-clip basis, how Final Cut Pro conforms an individual clip’s frame rate and frame size to match the project settings. All of the project information in this section applies equally to compound clips, which can have their own distinct project settings.
You can add interlaced clips to progressive (non-interlaced) projects and progressive clips to interlaced projects. To add an interlaced clip to a progressive project, see the instructions below. Final Cut Pro accepts progressive clips in interlaced projects automatically.
Here are things to keep in mind when working with multiple formats and frame sizes:
Choose video and audio project properties based on how you intend to share your final movie with your audience. For example, if you’re editing a project with mixed-format media and you intend to share it as 1080p HD, you should set your project’s video properties to 1080p HD.
If you’re unsure of the final distribution format, the most important decision you can make before creating your project is choosing your project’s frame rate. It’s easy to change the format and the frame size of your project, but changing the frame rate can cause all the edit points in your project to shift in time.
If you have a clip that matches the video and audio properties of the format in which you intend to share your project, add this clip to your project first. Final Cut Pro automatically creates matching project settings. This saves you from having to change your project settings later.
Tip: If the first clip you add to a project is an audio clip or a still-image clip, Final Cut Pro prompts you to choose the video properties for your project. Cancel the edit, add a video clip whose source media file has the video properties you require for your project, and then add the audio or still-image clip to your project.
Choose a method of conforming frame size
You can choose how Final Cut Pro modifies the frame size of a clip to match the project’s frame size settings. For example, you can have Final Cut Pro change the frame size of the clip to fit within the longest dimension of the project’s frame dimensions, fill the entire frame of the project (which usually results in cropping), or leave the clip’s frame size as is.
Open a project in the Final Cut Pro timeline, then add a clip whose frame size (resolution) is different from the project’s frame size.
For information about adding clips to the timeline, see Intro to adding clips.
Select the clip in the timeline.
If the inspector isn’t already shown, do one of the following:
Choose Window > Show in Workspace > Inspector (or press Command-4).
Click the Inspector button on the right side of the toolbar.

Click the Video button at the top of the inspector.

Click the Type pop-up menu in the Spatial Conform section of the Video inspector, then choose a method of conforming frame size.
Note: If the clip you selected has the same frame size (resolution) as the project, the Spatial Conform section does not appear.
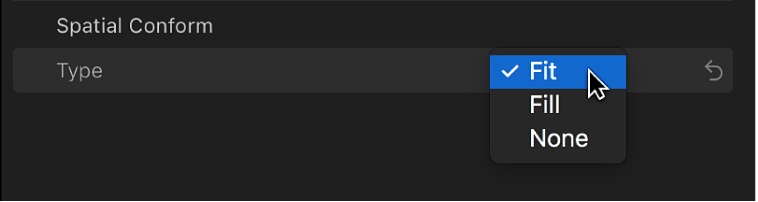
Fit: The default setting. Fits the clip within the project’s frame size without cropping the clip’s video. Black bars appear on the sides of the frames that don’t match the project’s frame size. In the case of a standard-definition (SD) clip in a high-definition (HD) project, Final Cut Pro scales up the SD clip to fit the HD project’s frame size. In the case of an HD clip in an SD project, Final Cut Pro scales down the HD clip to fit the SD project’s frame size.
Fill: Makes the clip’s video fill the project’s frame size. In the case of an SD clip in an HD project, Final Cut Pro scales up the SD clip to fit the HD project’s frame size. In the case of an HD clip in an SD project, Final Cut Pro scales down the HD clip to fit the SD project’s frame size. In both cases, cropping occurs along the clip’s longer dimension to allow the shorter dimension to fill the screen.
None: Leaves the clip’s frame size unchanged. If the clip’s frame size is larger than the project’s frame size, the clip appears cropped. If the clip’s frame size is smaller than the project’s frame size, black bars surround the clip.
Choose a method of conforming frame rate
When a clip’s frame rate differs from the project’s frame rate, Final Cut Pro employs a frame-sampling method to change the clip’s frame rate to match that of the project. You can choose which frame-sampling method Final Cut Pro uses to modify the clip’s frame rate. The method you choose depends on how important it is to eliminate visual stuttering and artifacts.
In Final Cut Pro, open a project in the timeline, then add a clip whose frame rate is different from the project’s frame rate.
For information about adding clips to the timeline, see Intro to adding clips.
Select the clip in the timeline.
If the inspector isn’t already shown, do one of the following:
Choose Window > Show in Workspace > Inspector (or press Command-4).
Click the Inspector button on the right side of the toolbar.
Click the Video button at the top of the inspector.
In the Rate Conform section of the Video inspector, click the Frame Sampling pop-up menu, then choose a method of conforming frame rate.
If you don’t see the Frame Sampling pop-up menu, move the pointer over Rate Conform, then click Show.
Note: If the selected clip has the same frame rate as the project, the Rate Conform section doesn’t appear in the Video inspector.
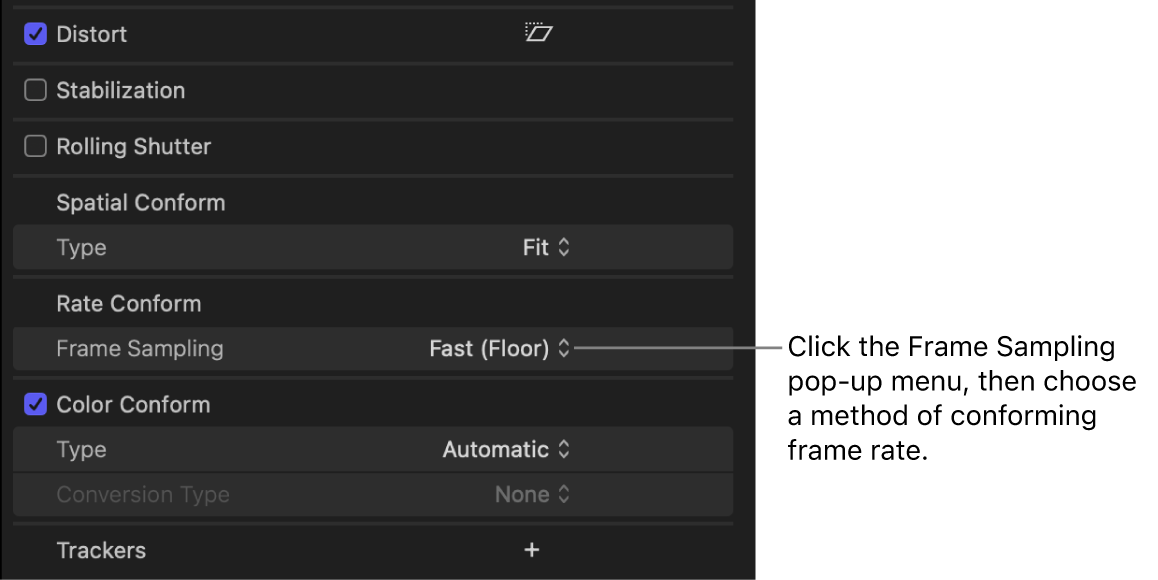
Fast (Floor): The default setting. Final Cut Pro duplicates frames or rounds down to the nearest whole frame to match the clip’s frame rate to the project’s frame rate.
Fast (Nearest Frame): Final Cut Pro rounds up or down to the nearest whole frame to match the clip’s frame rate to the project’s frame rate. This setting reduces artifacts but may cause visual stuttering.
Good (Frame Blending): Creates in-between frames by blending individual pixels of neighboring frames. Slow-motion clips created with frame blending appear to play back more smoothly than those created with the Fast (Floor) or Fast (Nearest Frame) setting. This setting provides better reduction of visual stuttering, but there may be some visual artifacts. For the highest-quality playback, rendering is recommended.
Better (Optical Flow): A type of frame blending that uses an optical flow algorithm to create new in-between frames. Final Cut Pro analyzes the clip to determine the directional movement of pixels and then draws portions of the new frames based on the optical flow analysis. This setting usually provides the greatest reduction in visual stuttering and artifacts. Rendering is required, and takes longer than for the other frame-sampling methods.
Best (Machine Learning): Creates new frames using a bidirectional optical flow algorithm based on machine learning. This is the highest-quality method, with reduced artifacts and better occlusion handling. Rendering is required, and analysis and rendering take longer than for the other methods. This option requires a Mac with Apple silicon.
Tip: Before using Best (Machine Learning) or Better (Optical Flow), try using Good (Frame Blending). Then, if you see artifacts or want the very best image quality, try using the Best or Better setting.

Add an interlaced clip to a non-interlaced (progressive) project
Some video formats use an interlaced scanning method that divides a video frame into two fields, each consisting of alternating odd and even lines that are scanned at different times.
If you want to add an interlaced clip to a progressive project, you can have Final Cut Pro deinterlace the clip so that it plays at full resolution, free of the alternating jagged lines associated with interlaced clips in progressive projects.
In Final Cut Pro, do one of the following:
If the inspector isn’t already shown, do one of the following:
Choose Window > Show in Workspace > Inspector (or press Command-4).
Click the Inspector button on the right side of the toolbar.
Click the Info button at the top of the inspector.

Click the Metadata View pop-up menu in the bottom-left corner of the Info inspector and choose Settings.

Select the Deinterlace checkbox.
Note: Selecting the Deinterlace setting causes the frame rate of the selected clips to double. For example, if the original interlaced clips have a frame rate of 29.97 fps, the deinterlaced clips have a frame rate of 59.94 fps. Keep this in mind when you choose the video and audio settings for your project.
Tip: To confirm the absence of interlacing artifacts, you can press the Left Arrow and Right Arrow keys to step through the clips in the timeline one frame at a time.
To display full-resolution frames during playback, click the View pop-up menu in the top-right corner of the viewer and choose Better Quality.

The clips now play back and function as progressive clips. Depending on your specific computer configuration, background rendering may be necessary.
Download this guide: PDF