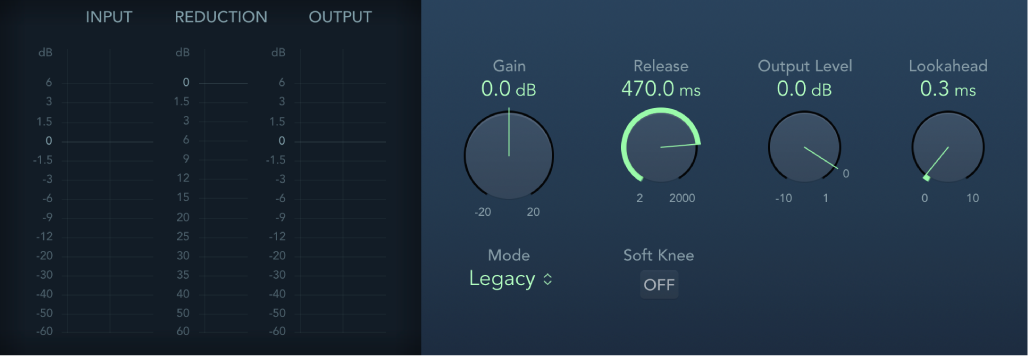
Limiter controls in Final Cut Pro for Mac
Limiter works much like a compressor but with one important difference: Whereas a compressor proportionally reduces the signal when it exceeds the threshold, a limiter reduces any peak above the threshold to the threshold level, effectively limiting the signal to this level.
Limiter is used primarily when mastering. Typically, you apply Limiter as the very last process in the mastering signal chain, where it raises the overall volume of the signal so that it reaches, but does not exceed, 0 dB.
Limiter is designed in such a way that if set to 0 dB Gain and 0 dB Output Level, it has no effect on a normalized signal. If the signal clips, Limiter reduces the level before clipping can occur. Limiter cannot, however, fix audio that is clipped during recording.
To add the Limiter effect to a clip and show the effect’s controls, see Add Logic effects to clips in Final Cut Pro for Mac.

Input meters: Show input levels in real time. The Margin field shows the highest input level. Click the Margin field to reset it.
Reduction meter: Shows the amount of limiting in real time.
Output meters: Show output levels of the limited signal. The Margin field shows the highest output level. Click the Margin field to reset it.
Gain knob and field: Set the amount of gain applied to the input signal.
Release knob and field: Set the time it takes for Limiter to stop processing, after the signal falls below the threshold level.
Output Level knob and field: Set the output level of the signal.
Lookahead knob and field: Adjust how far ahead (in milliseconds) Limiter analyzes the audio signal. This enables it to react earlier to peak volumes by adjusting the amount of reduction.
Note: Lookahead causes latency, but this has no perceptible effect when you use Limiter as a mastering effect on prerecorded material. Set it to higher values if you want the limiting effect to occur before the maximum level is reached, thus creating a smoother transition.
Mode pop-up menu: Choose between Legacy and Precision algorithms. Use Precision for hard limiting, but be aware that this can introduce distortion artifacts.
Soft Knee button (Legacy mode): Turn on to limit the signal only when it reaches the threshold. The transition to full limiting is nonlinear, producing a softer, less abrupt effect, and reducing distortion artifacts that can be produced by hard limiting (in Precision mode).
True Peak Detection button (Precision mode): Turn on to detect intersample peaks in the signal.
Download this guide: PDF