Motion User Guide
- Welcome
- What’s new
-
- Intro to basic compositing
-
- Intro to transforming layers
-
- Intro to transforming layers in the canvas
- Transform layer properties in the canvas
- Transform tools
- Change layer position, scale, or rotation
- Move a layer’s anchor point
- Add a drop shadow to a layer
- Distort or shear a layer
- Crop a layer
- Modify shape or mask points
- Transform text glyphs and other object attributes
- Align layers in the canvas
- Transform layers in the HUD
- Transform 2D layers in 3D space
-
- Intro to the Timeline
- Display or resize the Timing pane
-
- Edit in the Timeline
- Move objects in the Timeline
- Distribute objects in the Timeline
- Trim objects in the Timeline
- Slip video layers in the Timeline
- Split objects in the Timeline
- Delete objects in the Timeline
- Copy and paste objects in the Timeline
- Group tracks in the Timeline
- Edit the group track in the Timeline
- Navigate in the Timeline
- Show and modify keyframes in the Timeline
- Edit in the mini-Timeline
-
- Intro to behaviors
- Behaviors versus keyframes
-
- Intro to behavior types
-
- Intro to Parameter behaviors
- Audio behavior
- Average behavior
- Clamp behavior
- Custom behavior
- Add a Custom behavior
- Exponential behavior
- Link behavior
- Use the Link behavior to control text strings
- Logarithmic behavior
- MIDI behavior
- Add a MIDI behavior
- Negate behavior
- Oscillate behavior
- Create a decaying oscillation
- Overshoot behavior
- Quantize behavior
- Ramp behavior
- Randomize behavior
- Rate behavior
- Reverse behavior
- Stop behavior
- Track behavior
- Wriggle behavior
-
- Intro to Simulation behaviors
- Align to Motion behavior
- Attracted To behavior
- Attractor behavior
- Drag behavior
- Drift Attracted To behavior
- Drift Attractor behavior
- Edge Collision behavior
- Gravity behavior
- Orbit Around behavior
- Random Motion behavior
- Repel behavior
- Repel From behavior
- Rotational Drag behavior
- Spring behavior
- Vortex behavior
- Wind behavior
- Additional behaviors
-
- Intro to shapes, masks, and paint strokes
- Edit fill, outline, and feathering
- Keyframe shape control points
- Convert between shapes and masks
- Using filters and masks with shapes
- Copy shape styles
- Save custom shapes and shape styles
-
- Intro to using generators
- Add a generator
-
- Intro to image generators
- Caustics generator
- Cellular generator
- Checkerboard generator
- Clouds generator
- Color Solid generator
- Concentric Polka Dots generator
- Concentric Shapes generator
- Gradient generator
- Grid generator
- Japanese Pattern generator
- Lens Flare generator
- Manga Lines generator
- Membrane generator
- Noise generator
- One Color Ray generator
- Op Art 1 generator
- Op Art 2 generator
- Op Art 3 generator
- Overlapping Circles generator
- Radial Bars generator
- Soft Gradient generator
- Spirals generator
- Spiral Drawing generator
- Use Spiral Drawing onscreen controls
- Star generator
- Stripes generator
- Sunburst generator
- Truchet Tiles generator
- Two Color Ray generator
- Save a custom generator
-
- Intro to filters
- Browse and preview filters
- Apply or remove filters
-
- Intro to filter types
-
- Intro to Color filters
- Brightness filter
- Channel Mixer filter
- Color Adjustments filter
- Color Balance filter
- Example: Color-balance two layers
- Color Curves filter
- Use the Color Curves filter
- Color Reduce filter
- Color Wheels filter
- Use the Color Wheels filter
- Colorize filter
- Contrast filter
- Custom LUT filter
- Use the Custom LUT filter
- Gamma filter
- Gradient Colorize filter
- HDR Tools filter
- Hue/Saturation filter
- Hue/Saturation Curves filter
- Use the Hue/Saturation Curves filter
- Levels filter
- Negative filter
- OpenEXR Tone Map filter
- Sepia filter
- Threshold filter
- Tint filter
-
- Intro to Distortion filters
- Black Hole filter
- Bulge filter
- Bump Map filter
- Disc Warp filter
- Droplet filter
- Earthquake filter
- Fisheye filter
- Flop filter
- Fun House filter
- Glass Block filter
- Glass Distortion
- Insect Eye filter
- Mirror filter
- Page Curl filter
- Poke filter
- Polar filter
- Refraction filter
- Ring Lens filter
- Ripple filter
- Scrape filter
- Sliced Scale filter
- Use the Sliced Scale filter
- Sphere filter
- Starburst filter
- Stripes filter
- Target filter
- Tiny Planet filter
- Twirl filter
- Underwater filter
- Wave filter
-
- Intro to Stylize filters
- Add Noise filter
- Bad Film filter
- Bad TV filter
- Circle Screen filter
- Circles filter
- Color Emboss filter
- Comic filter
- Crystallize filter
- Edges filter
- Extrude filter
- Fill filter
- Halftone filter
- Hatched Screen filter
- Highpass filter
- Indent filter
- Line Art filter
- Line Screen filter
- MinMax filter
- Noise Dissolve filter
- Pixellate filter
- Posterize filter
- Relief filter
- Slit Scan filter
- Slit Tunnel filter
- Texture Screen filter
- Vignette filter
- Wavy Screen filter
- About filters and color processing
- Publish filter controls to Final Cut Pro
- Using filters on alpha channels
- Filter performance
- Save custom filters
-
- Intro to 360-degree video
- 360-degree projects
- Create 360-degree projects
- Add 360-degree video to a project
- Create a tiny planet effect
- Reorient 360-degree media
- Creating 360-degree templates for Final Cut Pro
- 360-degree-aware filters and generators
- Export and share 360-degree projects
- Guidelines for better 360-degree projects
-
- Intro to exporting projects
- Export a QuickTime movie
- Export audio only
- Export a still image
- Export a still image to Pixelmator Pro
- Export an image sequence
- Export to Apple devices
- Export to email
- Export using Compressor
- Create share destinations
- Render settings
- View the status of shared items
- Share notifications
-
- Intro to settings and shortcuts
-
- Intro to Keyboard shortcuts
- Use function keys
- General keyboard shortcuts
- Audio list keyboard shortcuts
-
- Tools keyboard shortcuts
- Transform tool keyboard shortcuts
- Select/Transform tool keyboard shortcuts
- Crop tool keyboard shortcuts
- Edit Points tool keyboard shortcuts
- Edit shape tools keyboard shortcuts
- Pan and Zoom tools keyboard shortcuts
- Shape tools keyboard shortcuts
- Bezier tool keyboard shortcuts
- B-Spline tool keyboard shortcuts
- Paint Stroke tool keyboard shortcuts
- Text tool keyboard shortcuts
- Shape mask tools keyboard shortcuts
- Bezier Mask tool keyboard shortcuts
- B-Spline Mask tool keyboard shortcuts
- Magnetic Mask tool keyboard shortcuts
- Transport control keyboard shortcuts
- View option keyboard shortcuts
- HUD keyboard shortcuts
- Inspector keyboard shortcuts
- Keyframe Editor keyboard shortcuts
- Layers keyboard shortcuts
- Library keyboard shortcuts
- Media list keyboard shortcuts
- Timeline keyboard shortcuts
- Keyframing keyboard shortcuts
- Shape and Mask keyboard shortcuts
- 3D keyboard shortcuts
- Miscellaneous keyboard shortcuts
- Touch Bar shortcuts
- Move assets to another computer
- Work with GPUs
- Glossary
- Copyright and trademarks
Track the position of a filter or object in Motion
You can use the Track behavior to analyze motion in a video clip, then apply that tracking data to the center parameter of a filter. For example, you can track the center of a Light Rays filter to a moving light in a clip.
You can also use the Track behavior to apply existing tracking data (recorded by another tracking behavior) to the position or anchor point parameter of an object, such as a shape or text.
Note: This behavior applies only to filters with Center parameters, such as Scrape, Ring Warp, Light Rays, Slit Tunnel, and so on.
Track the position parameter of a filter to a source object in a clip
In Motion, apply a filter (that includes a Center parameter) to a layer in your project.
Move the playhead to the frame where you want to start the track analysis.
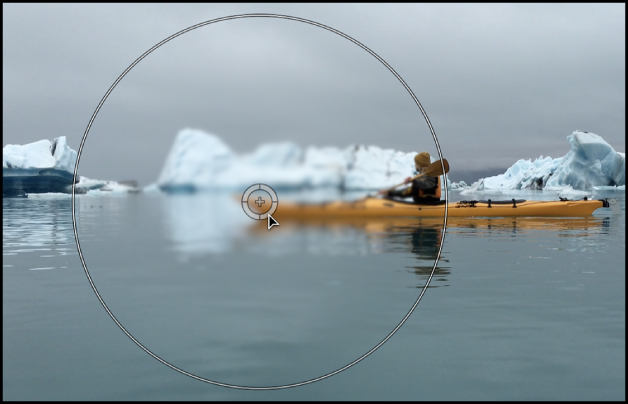
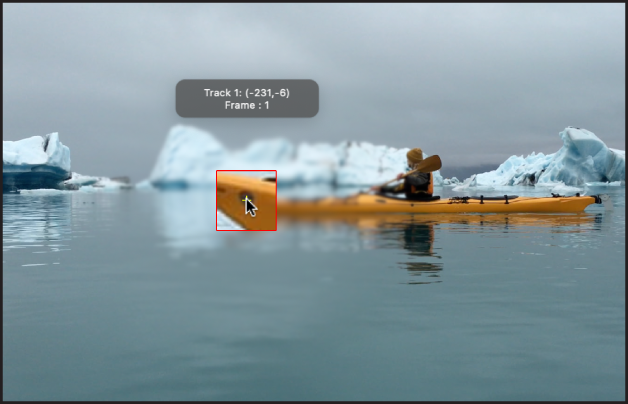
In the canvas, drag the center point of the filter to the region of the layer (a video clip or animated shape) you want to track.
If the filter’s onscreen controls aren’t visible in the canvas, make sure the filter is selected in the Layers list.
Do one of the following:
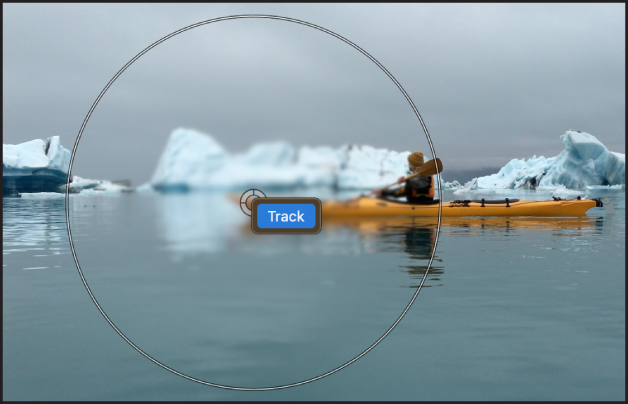
In the canvas, Control-click the Center onscreen control, then choose Track.
In the Filters Inspector, Control-click the Center parameter, then choose Add Parameter Behavior > Track from the shortcut menu.
In the canvas, the filter’s onscreen control is replaced with an object tracker.
Tip: If the reference pattern you want to track is offset from the center of the filter, use the Offset Track checkbox. For more information on using the Offset Track parameter, see Track obscured or off-frame points.
Do any of the following:
Track an area of the clip: In the canvas, drag the object tracker to the reference pattern you want to track. (To better see the reference pattern, turn off the filter in the Layers list.)
Track a suggested subject in the clip: Press and hold the Option key, then drag over elements in the canvas. As you drag, bounding boxes appear over elements and elliptical shapes appear over faces, suggesting regions of interest that may be trackable.
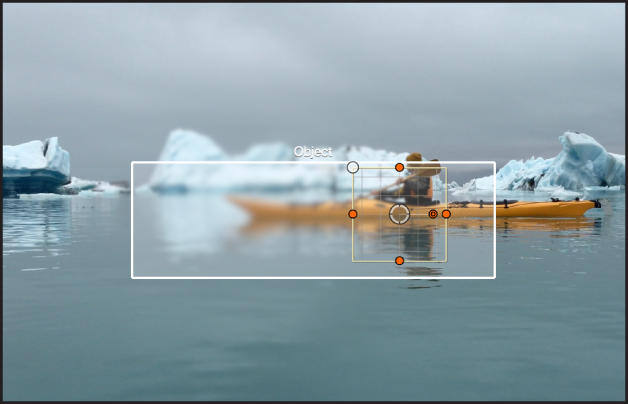
When you release the mouse button over the element you want to track, the object tracker conforms to the subject.
Track a face in the clip: In the Behaviors Inspector, click the Detect pop-up menu, then choose Faces. Onscreen controls appear around any faces detected in the frame. When you click the onscreen control for the face you want to track, the object tracker conforms to the subject.
Note: A subject identified in a clip isn’t necessarily trackable; it’s a potential region of interest in the scene that the machine learning model recognizes.
If necessary, change the shape or size of the object tracker.
In the Behaviors Inspector, click the Analysis Method pop-up menu, then choose one of the following options:
Automatic: Automatically chooses the most suitable analysis method. Because the best method is highly dependent on the properties of a clip and each use case, you may need to experiment with different analysis methods to achieve the best result.
Combined: Uses a combination of the Machine Learning and Point Cloud analysis methods (described below) to track position, scale, and rotation.
Machine Learning: Uses a machine learning model trained on a dataset to identify people, animals, and many other common objects, allowing the tracker to follow the subject in a specified region of video. Choose this option when absolute tracking precision isn’t required, such as when attaching titles or graphics to objects or people. This method can overcome moderate occlusion—when an object (such as a tree or car) briefly obscures the subject being tracked.
Point Cloud: Tracks a specific reference pattern and identifies how the pattern transforms from one frame to the next. Choose this option when you need more precise tracking of specific pixels. This method tracks position, scale, and rotation, and excels at tracking regions that are rigid and somewhat flat (from the camera’s point of view).
In the Behaviors Inspector, do one of the following:
Analyze the entire clip: Click Analyze. The clip is analyzed forward from the playhead position to the end of the clip (or to the frame where the reference pattern can no longer be tracked), and then backward from the playhead position to the start of the clip.
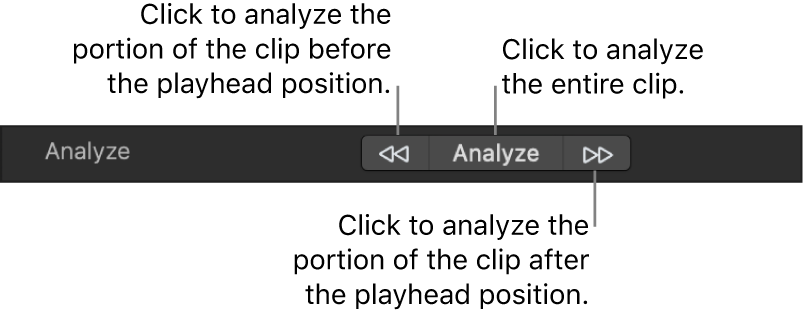
Analyze the portion of the clip before the playhead position: Click the left arrows next to the Analyze button.
Analyze the portion of the clip after the playhead position: Click the right arrows next to the Analyze button.
The tracking analysis progress window displays the analysis method used for the track.
Tip: If you’re using the Machine Learning analysis method and observe jitter during the analysis (the onscreen object tracker bouncing or jumping from one size to another), try switching to the Point Cloud analysis method. Its tracker is much less susceptible to quick changes.
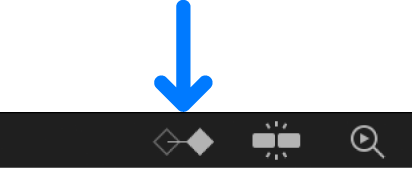
To stop the tracking analysis, click the Stop button in the progress window or press Esc.
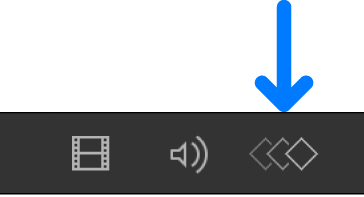
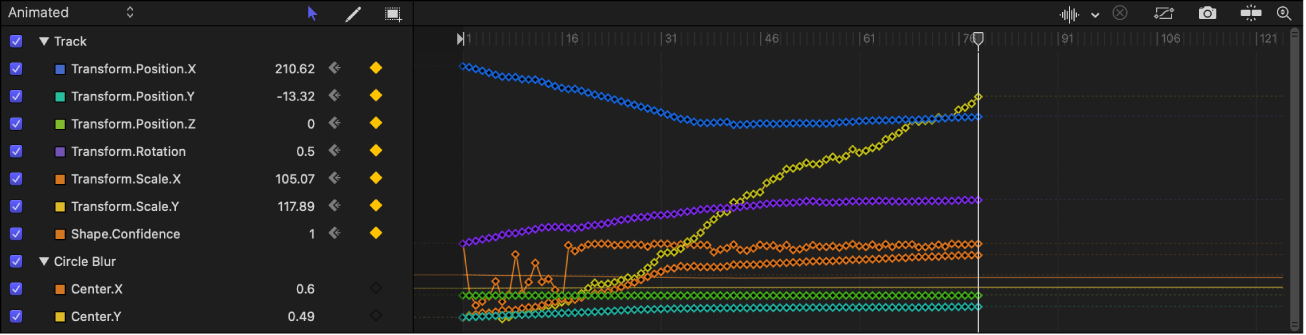
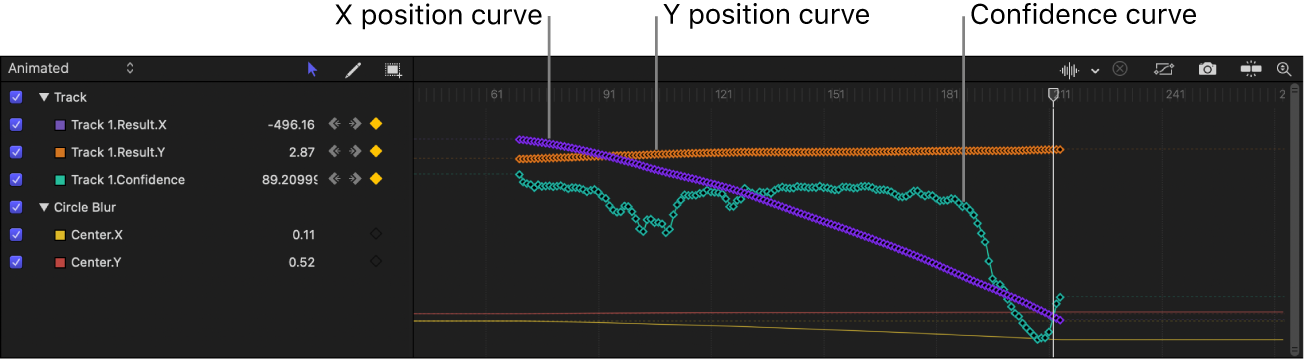
Tracking keyframes appear in the Keyframe Editor. If the Keyframe Editor is not visible, click the Show/Hide Keyframe Editor button in the lower-left corner of the Motion window.
In addition to the tracking keyframes, a confidence curve is displayed in the Keyframe Editor. This curve provides a visual indication of the tracker’s accuracy relative to its parameter settings in the Inspector. The confidence curve is for reference only and is not used for editing purposes.
The filter’s center is tracked to the clip. You can make changes to the filter parameters after the analysis is performed. The Track parameter behavior can also use existing tracking data recorded by another tracking behavior.
Track the position parameter of a filter to points or patterns in a source clip
In Motion, follow steps 1–4 in Track the position parameter of a filter to a source object in a clip.
In the Behaviors Inspector, click the Mode pop-up menu, then choose Point.
The onscreen tracker changes to a point tracker.
In the canvas, drag the point tracker to the reference point you want to use.
In the Behaviors Inspector (or HUD), do one of the following:
Analyze the clip forward from the position of the playhead: Click Analyze.
Analyze the portion of the clip before the playhead position: Click the left arrows next to the Analyze button.
Analyze the portion of the clip after the playhead position: Click the right arrows next to the Analyze button.
When the tracking analysis begins, a progress window opens and points appear on a motion path in the canvas.
To stop a track analysis, click the Stop button in the progress window or press Esc.
The points in the canvas correspond to the tracking keyframes that appear in the Keyframe Editor. If the Keyframe Editor is not visible, click the Show/Hide Keyframe Editor button in the lower-left corner of the Motion window.
A confidence curve is also displayed in the Keyframe Editor. This curve provides a visual indication of the tracker’s accuracy relative to its parameter settings in the Inspector. The confidence curve is for reference only and is not used for editing purposes.
Apply tracking data to the position or anchor point of an object
Using the Track behavior, you can apply existing tracking data to the Position or Anchor Point parameters of an object.
Important: Before you can apply tracking data to an object’s parameters, your project must contain a tracking behavior (such as Analyze Motion) that has analyzed a clip.
In the Layers list in Motion, select the object that you want to apply the tracking data to.
In the Properties Inspector, do either of the following:
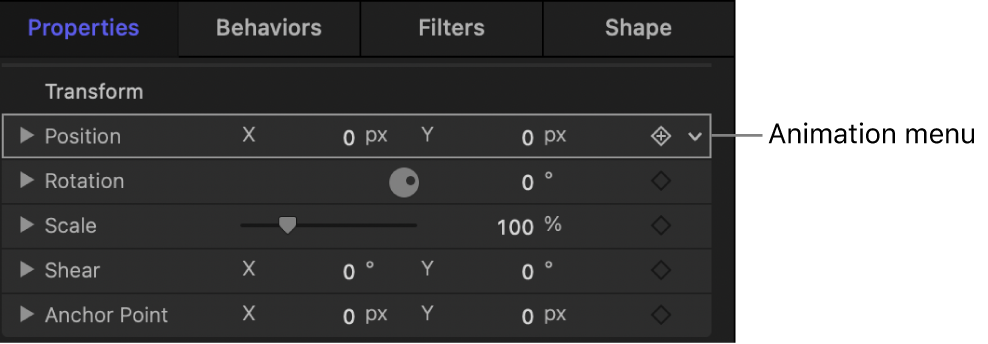
Control-click the Position (or Anchor Point) parameter, then choose Add Parameter Behavior > Track.
Click the Position (or Anchor Point) parameter’s Animation menu (the down arrow that appears when you move the pointer over the right side of a parameter row), then choose Add Parameter Behavior > Track.
In the Behaviors Inspector, click the Action pop-up menu (with the gear icon), then choose a tracking behavior.

Tracking data from the selected behavior in the project is applied to the Position (or Anchor Point) parameter.
To quickly reassign the tracking data from the Position parameter to the Anchor Point parameter (or vice-versa), click “To” in the Apply To row (in the Behaviors Inspector), choose Properties > Transform, then choose Position or Anchor Point.
For a full description of adjustable controls in the Track behavior, see Track controls.
Download this guide: PDF