Final Cut Pro User Guide for Mac
- Welcome
- What’s new
-
- Intro to importing media
- If it’s your first import
- Organize files during import
-
- Import from Image Playground
- Import from iMovie for macOS
- Import from iMovie for iOS or iPadOS
- Import from Final Cut Pro for iPad
- Import from Final Cut Camera
- Import from Photos
- Import from Music
- Import from Apple TV
- Import from Motion
- Import from GarageBand and Logic Pro
- Import using workflow extensions
- Record into Final Cut Pro
- Memory cards and cables
- Supported media formats
-
- Intro to effects
-
- Intro to transitions
- How transitions are created
- Add transitions and fades
- Quickly add a transition with a keyboard shortcut
- Set the default duration for transitions
- Delete transitions
- Adjust transitions in the timeline
- Adjust transitions in the inspector and viewer
- Merge jump cuts with the Flow transition
- Adjust transitions with multiple images
- Modify transitions in Motion
- Add adjustment clips
-
- Add storylines
- Use the precision editor
- Conform frame sizes and rates
- Use XML to transfer projects
- Glossary
- Copyright and trademarks
Export final mastering files in Final Cut Pro for Mac
You can use the Export File command to export your completed project as a high-quality file that can be used as the source media for the final stages of professional post-production or broadcast and distribution. You may also consider this option when you want to use the media in another app, copy the media to an external storage device for a client to review, or publish the media to a website for which there are no preconfigured destination settings in Final Cut Pro. Your project is exported as a QuickTime movie.
You can also use the Export File option to export an MXF file.
In Final Cut Pro, do one of the following:
Select one or more projects or clips in the browser.
Note: You can’t mix projects and clips in a batch share. Your selection must contain only projects or only clips. See Batch sharing.
Select ranges in one or more clips in the browser.
Select a range in a project in the timeline.
Note: To share just a portion of a project, you must make a range selection. A clip selection is not sufficient. You can use the I and O keys to set the range start and end points.
If you’re sharing a project that is set to use proxy media for playback, open it in the timeline, then click the View pop-up menu in the top-right corner of the viewer and choose Optimized/Original.
This ensures the highest quality in the exported file. When you choose this setting, Final Cut Pro uses optimized media to create the shared file. If optimized media doesn’t exist, the original media is used. For more information about optimized and proxy media, see Control playback quality.
Do one of the following:
Choose File > Share > Export File (or press Command-E).
Click the Share button in the toolbar, then click Export File.

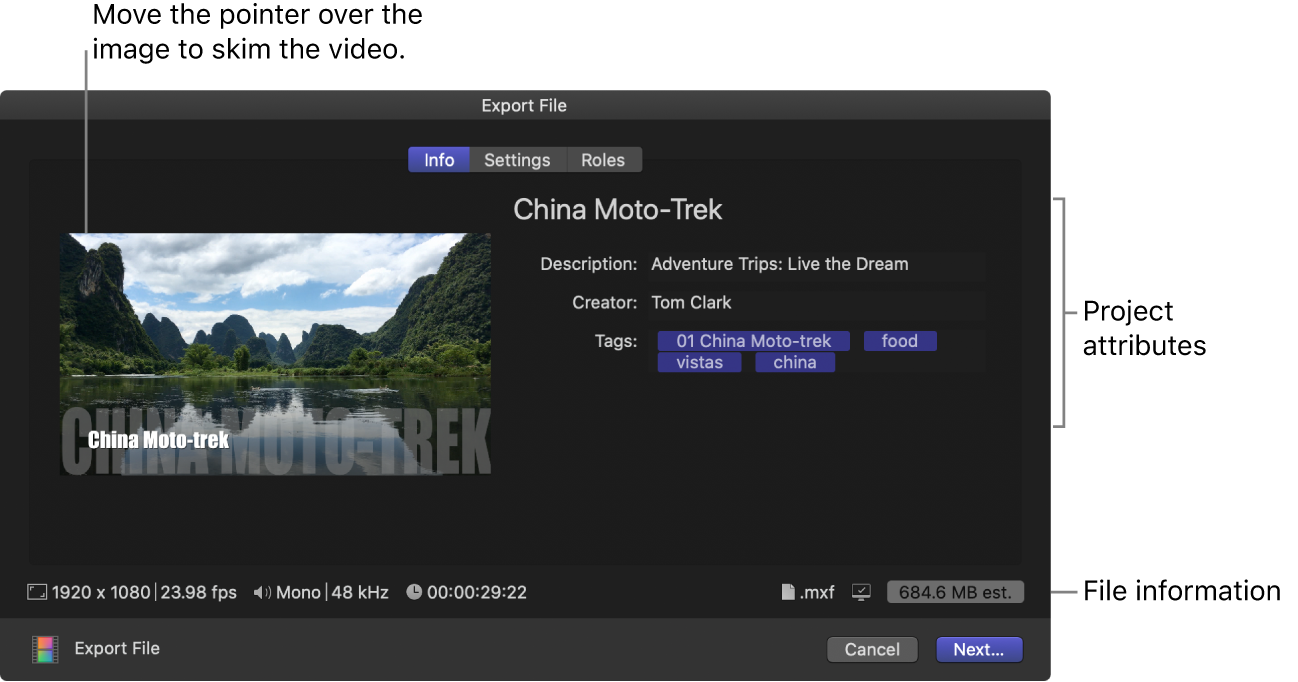
In the Share window that appears, do any of the following:

Move the pointer over the image to skim the video.
If you’re batch sharing (exporting multiple items), the image is replaced by a list of the items you’re exporting.
In the Info pane, view and modify project or clip attributes, such as the title and description.
See Change metadata for shared items. All of the attributes associated with the project or clip are included in the output file.
Important: By default, the title field lists the project or clip name. Changing the title does not change the project or clip name, which is the name used for the exported file.
At the bottom of the window, view information about the file that will be exported, including frame size and frame rate, audio channels and sample rate, duration, output file type, and file size.
For some destinations, you can also view a list of devices that will play the exported file. To view the compatible devices, move the pointer over the Compatibility icon in the lower-right corner.
To view or change the Export File destination settings, click Settings at the top of the Share window.
The available settings vary based on which format you choose from the Format pop-up menu. For detailed descriptions of each setting, see Export File and Apple Devices destinations.
For information about output file formats, see Export formats supported in Final Cut Pro.
Note: If you change the destination’s settings, the changes are saved as the default settings for the destination.
To export roles as separate video, title, audio, or caption tracks in the output media file, click Roles at the top of the Share window, then specify the roles to export.
See Share roles as files.
Click Next, choose a location for the exported files, then click Save.
You can monitor the progress of the transcode in the Background Tasks window, and you can continue to work in Final Cut Pro while the file is transcoded.
When transcoding is complete, a notification appears. You can view and locate shared projects in the Share inspector. See View the status of shared items.
Note: If you added chapter markers to your project, chapter marker thumbnails are placed at the appropriate location in the exported media. See Add chapter markers.
Download this guide: PDF