Final Cut Pro User Guide for Mac
- Welcome
- What’s new
-
- Intro to importing media
- If it’s your first import
- Organize files during import
-
- Import from Image Playground
- Import from iMovie for macOS
- Import from iMovie for iOS or iPadOS
- Import from Final Cut Pro for iPad
- Import from Final Cut Camera
- Import from Photos
- Import from Music
- Import from Apple TV
- Import from Motion
- Import from GarageBand and Logic Pro
- Import using workflow extensions
- Record into Final Cut Pro
- Memory cards and cables
- Supported media formats
-
- Intro to effects
-
- Intro to transitions
- How transitions are created
- Add transitions and fades
- Quickly add a transition with a keyboard shortcut
- Set the default duration for transitions
- Delete transitions
- Adjust transitions in the timeline
- Adjust transitions in the inspector and viewer
- Merge jump cuts with the Flow transition
- Adjust transitions with multiple images
- Modify transitions in Motion
- Add adjustment clips
-
- Add storylines
- Use the precision editor
- Conform frame sizes and rates
- Use XML to transfer projects
-
- Intro to sharing projects
- Share to Apple devices
- Share on the web
- Send a video frame to Pixelmator Pro
- Share in email
- Share stereo or spatial video
- Batch sharing
- Share using Compressor
- Create share destinations
- Change metadata for shared items
- View the status of shared items
- Speed up exports with simultaneous processing
- Glossary
- Copyright and trademarks
Use the Scene Removal Mask in Final Cut Pro for Mac
The Scene Removal Mask effect detects objects in the foreground of a video clip and automatically removes the background—without the need for a green screen. You can then replace the background with a different image or insert a title between the foreground and background.

Note: You can also isolate a subject from the background using the Magnetic Mask or Auto Mask.
Before you begin
For best results, before you apply the Scene Removal Mask to a video clip, make sure the clip:
Has a static background and was captured using a stationary camera (a camera attached to a tripod, for example)
Has a few extra frames at the beginning or end showing the background without the foreground subject present
Was shot in a bright, evenly lit place (preferably indoors)
Has good contrast between the subject and background (no similar colors or textures)
Has no strong moving shadows, and maintains space between the foreground subject and background
Has a visually simple background (without complex patterns or structures such as windows or bookshelves)
Apply the Scene Removal Mask to a clip
In Final Cut Pro, add the foreground clip (the clip with the background you want to remove) to the primary storyline in the timeline.
In the timeline, position the playhead over the clip (so that its image appears in the viewer).
Tip: For best results, position the playhead at a point within the foreground clip that shows the maximum amount of the background to be removed.
Select the foreground clip in the timeline, then click the Effects button in the top-right corner of the timeline (or press Command-5).

In the Effects browser, select the Scene Removal Mask effect.
Tip: Type “scene” in the Effects browser search field to quickly find the Scene Removal Mask effect.
Do one of the following:
Drag the effect to the timeline foreground clip you want to apply the effect to.
Double-click the effect thumbnail to apply the effect to the selected clip.
In the timeline, select the foreground clip with the Scene Removal Mask effect, then open the Video inspector.
Controls for adjusting the Scene Removal Mask effect appear.
In the Scene Removal Mask section of the inspector, click the Reference pop-up menu and choose an option:
First Frame: Final Cut Pro uses the first frame of the clip to analyze and then remove the background.
First Frame + 1 Second: The frame 1 second after the first frame of the clip is used.
Last Frame – 1 Second: The frame 1 second before the last frame of the clip is used.
Last Frame: The last frame of the clip is used.
The original background is removed, and the foreground subject is isolated in front of a transparent background. If the clip is in the primary storyline (with no connected clips), the background appears black in the viewer.

To replace the background, see Add a new background, below.
Add a new background
When you apply the Scene Removal Mask to a clip in the primary storyline, the background appears black in the viewer. You can give the isolated foreground subject a new background by compositing (combining) the masked clip with a separate background clip.
In Final Cut Pro, apply the Scene Removal Mask to a clip in the timeline.
Select the clip in the timeline, then position the playhead over the clip (so that its image appears in the viewer).
In the browser, select the clip you want to use as the background and drag it to the timeline, connecting it at a position under the masked clip.
See Connect clips.
In the viewer, the foreground subject from the masked clip appears superimposed over the image from the background clip.

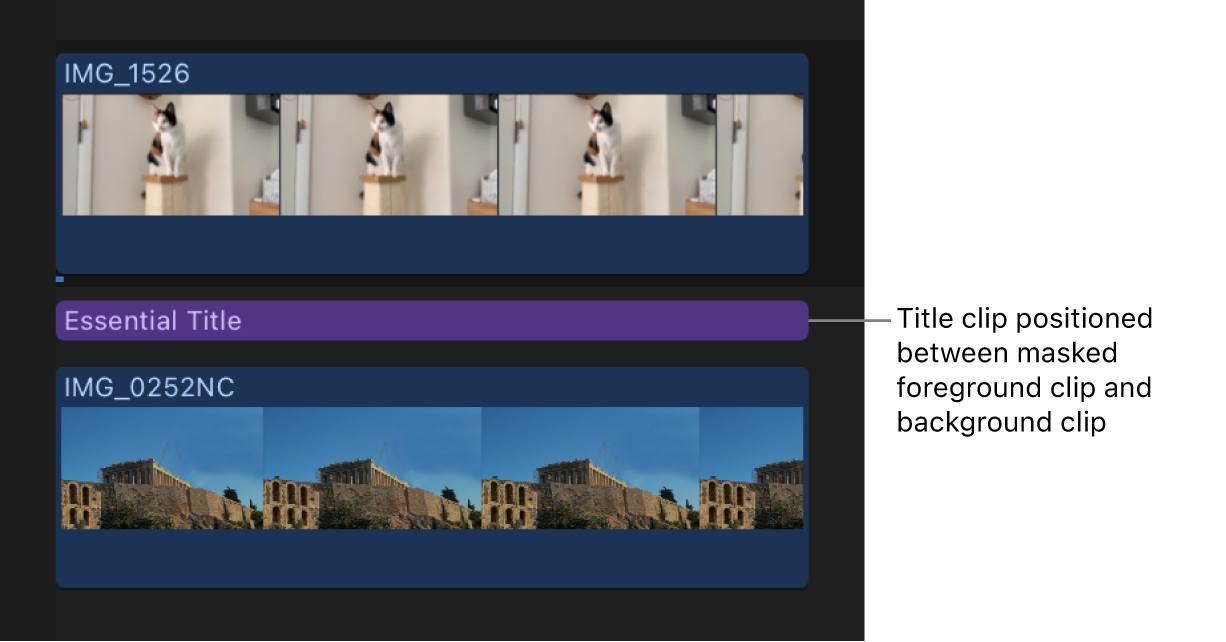
Insert a title between the foreground and background
After you apply the Scene Removal Mask to a clip in the timeline, you can add a title to the timeline so that in the viewer, the text appears behind the foreground subject.
In Final Cut Pro, apply the Scene Removal Mask to a clip in the timeline, add a new background, then position the playhead over the clips (to see the result of the effect in the viewer).
If the Titles and Generators sidebar isn’t already shown, do one of the following:
Click the Titles and Generators button in the top-left corner of the Final Cut Pro window.

Choose Window > Go To > Titles and Generators (or press Option-Command-1).
Drag a title clip from the Titles and Generators sidebar to a position in the timeline between the masked foreground clip and the background clip.
The title clip is attached as a connected clip.
Adjust the title, as needed.

Download this guide: PDF