Final Cut Pro User Guide for Mac
- Welcome
- What’s new
-
- Intro to importing media
- If it’s your first import
- Organize files during import
-
- Import from Image Playground
- Import from iMovie for macOS
- Import from iMovie for iOS or iPadOS
- Import from Final Cut Pro for iPad
- Import from Final Cut Camera
- Import from Photos
- Import from Music
- Import from Apple TV
- Import from Motion
- Import from GarageBand and Logic Pro
- Import using workflow extensions
- Record into Final Cut Pro
- Memory cards and cables
- Supported media formats
-
- Intro to effects
-
- Intro to transitions
- How transitions are created
- Add transitions and fades
- Quickly add a transition with a keyboard shortcut
- Set the default duration for transitions
- Delete transitions
- Adjust transitions in the timeline
- Adjust transitions in the inspector and viewer
- Merge jump cuts with the Flow transition
- Adjust transitions with multiple images
- Modify transitions in Motion
- Add adjustment clips
-
- Add storylines
- Use the precision editor
- Conform frame sizes and rates
- Use XML to transfer projects
-
- Intro to sharing projects
- Share to Apple devices
- Share on the web
- Send a video frame to Pixelmator Pro
- Share in email
- Share stereo or spatial video
- Batch sharing
- Share using Compressor
- Create share destinations
- Change metadata for shared items
- View the status of shared items
- Speed up exports with simultaneous processing
- Glossary
- Copyright and trademarks
Use built-in camera LUTs to color correct ProRes RAW video in Final Cut Pro for Mac
Final Cut Pro can process ProRes RAW video automatically on import. Final Cut Pro does this by applying a RAW-to-log conversion setting and by applying a built-in camera LUT. Both settings are applied based on metadata in the video file that identifies the camera maker. If the metadata is missing (for example, if it was lost during transcoding), you can view or change either setting.
Using built-in camera LUTs with log conversion allows you to color correct ProRes RAW video as if it were SDR or HDR video, depending on your library color-processing setting. When your library is set to Standard color processing, you can color correct ProRes RAW video as if it were SDR video. With your library set to Wide Gamut HDR, you can color correct ProRes RAW video as if it were HDR video.
Confirm or change the RAW to Log setting
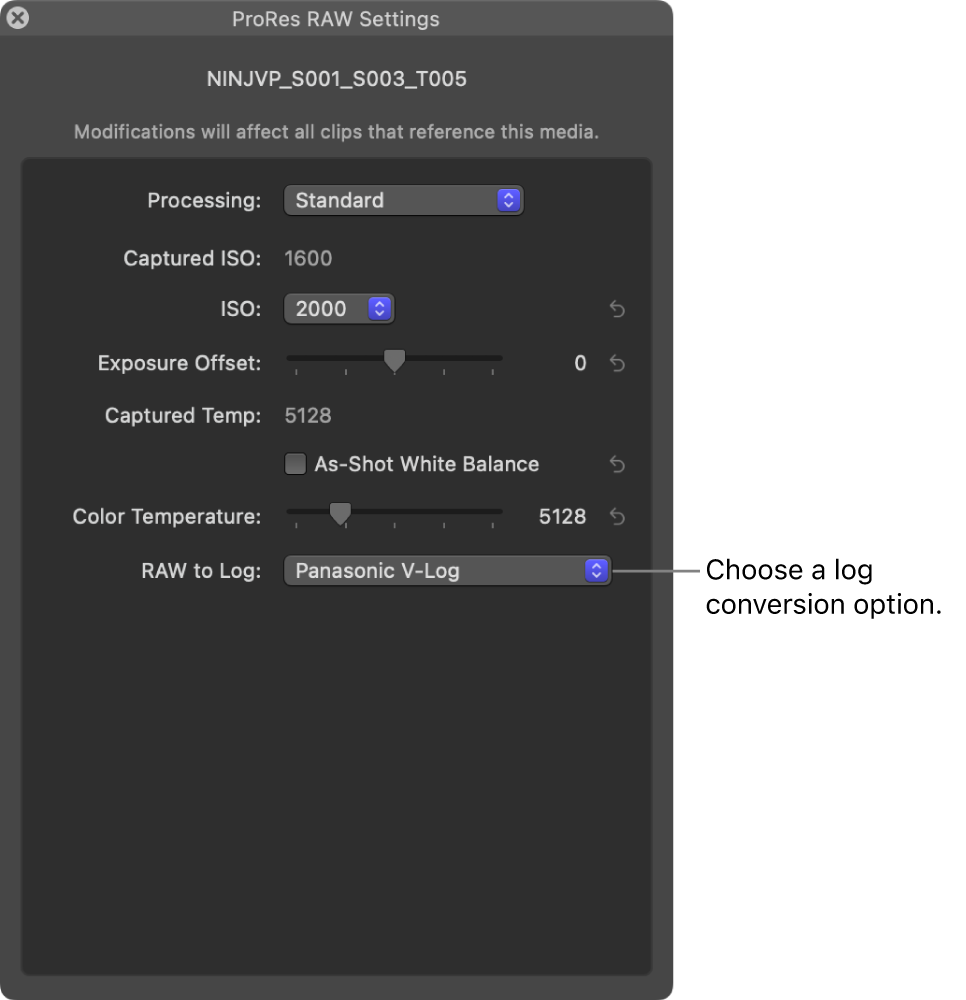
With the RAW to Log setting applied, ProRes RAW files behave just like conventional log video and can be edited the same way. Because ProRes RAW files contain metadata that identifies the camera manufacturer, Final Cut Pro can apply the correct log function (such as Apple Log, Canon Log 2, Panasonic V-Log, or Sony S-Log3) during import. You can also manually adjust the RAW to Log setting.
In Final Cut Pro, select one or more video clips recorded with ProRes RAW.
If the Info inspector isn’t already shown, choose Window > Show in Workspace > Inspector, then click the Info button at the top.
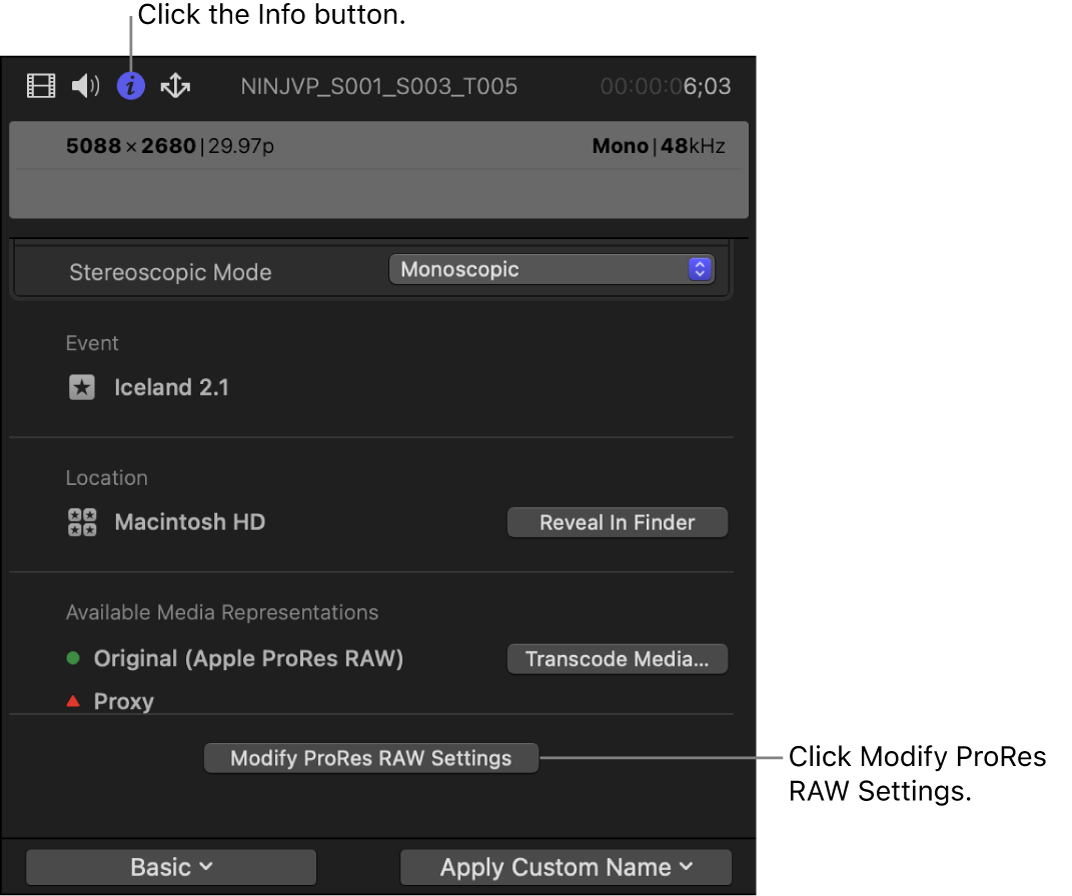
At the bottom of the inspector, click Modify ProRes RAW Settings.
In the ProRes RAW Settings window, click the RAW to Log pop-up menu and choose an option.
For more information, see Adjust ProRes RAW camera settings.
Click the Close button to close the ProRes RAW Settings window.


Confirm or change the Camera LUT setting
Because log video footage looks flat and gray, Final Cut Pro can apply a Camera LUT setting so that the image reflects the vibrancy of the original scene. A camera LUT converts the log-encoded image to an image in the intended output color space in a way that looks pleasing to the eye.
As with all video shot with log encoding, Final Cut Pro automatically applies the Camera LUT setting based on metadata in the file that identifies the camera maker. You can view or change the Camera LUT setting in the Info inspector.
In Final Cut Pro, select one or more video clips recorded with ProRes RAW.
If the Info inspector isn’t already shown, choose Window > Show in Workspace > Inspector, then click the Info button at the top.
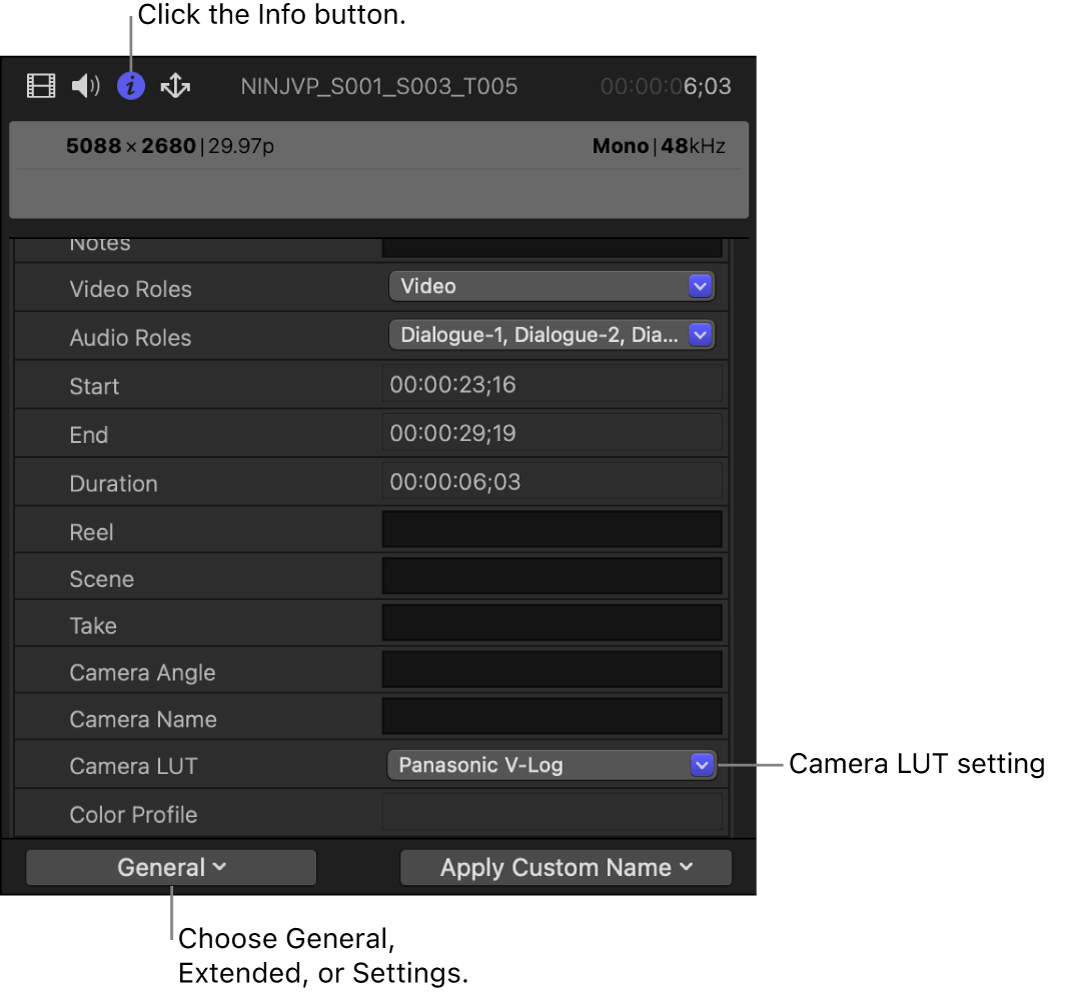
Click the Metadata View pop-up menu in the bottom-left corner, then choose either General, Extended, or Settings.
In the Camera LUT pop-up menu, confirm the current setting, or choose a different setting.
The type of conversion performed by the built-in camera LUT depends on the library color-processing setting. When color processing is set to Standard, the log conversion applies tone mapping to reduce the original high dynamic range of the log content to a range suitable for SDR video.
To make the full dynamic range of the original video available in the working color space, set the library color processing to Wide Gamut HDR. See Set library color processing, below.

Set library color processing
In Final Cut Pro, select the library in the Libraries sidebar, choose File > Library Properties, then click the Modify button at the top of the inspector.
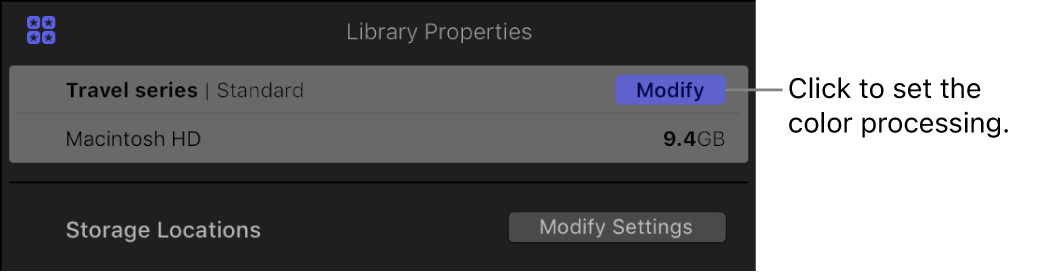
In the window that appears, select one of the following:
Standard: The log conversion applies tone mapping to reduce the original high dynamic range of the log content to a range suitable for SDR video. When your library is set to Standard color processing, you can color correct ProRes RAW video as if it were SDR video.
Wide Gamut HDR: The built-in camera LUT settings do not apply tone mapping and preserve the full dynamic range of log source media when converting to the working space. With your library set to Wide Gamut HDR, you can color correct ProRes RAW video as if it were HDR video.

You can add ProRes RAW clips directly to an HDR project in the timeline—for example, a project set to Rec. 2020 PQ or Rec. 2020 HLG—and monitor them using a professional reference monitor such as the Apple Pro Display XDR. You can easily color correct the clips using the advanced color correction tools. See Intro to color correction effects and Color correct HDR video with Pro Display XDR and Final Cut Pro.
Note: If you need to fix incorrect or missing color space metadata in your video clips, see Change a clip’s color space metadata.
Download this guide: PDF