Use the Green Screen Keyer effect in Final Cut Pro for Mac
With the Green Screen Keyer effect, you can create a chroma key to replace a specific color in a clip with an image from another clip. For example, you can replace a green background with an image.
A challenging part of creating a good chroma key is shooting the chroma key video and, in particular, using a good, well-lit background that provides a uniform color to remove. A wide variety of specialized chroma key background options are available, from chroma key paint that includes highly reflective additives to chroma key cloth or paper sheets. It’s also important to use the best camera you can and to avoid using a highly compressed video format. In the following examples, an image of a person is keyed over a scene in an empty subway station. The light stands are removed in Finalize a key.

Apply the Green Screen Keyer effect
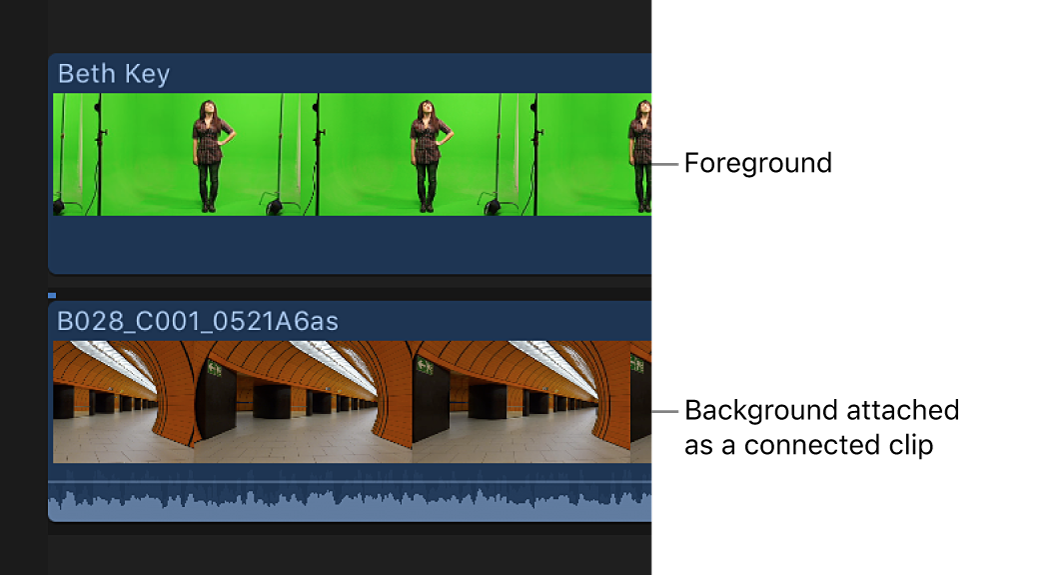
In the Final Cut Pro timeline, add the foreground clip (the chroma key clip with the color you want to remove) to the primary storyline.
Drag the background clip (the clip you want to superimpose the chroma key clip over) so that it’s connected below the foreground clip in the primary storyline.
For more information about connected clips, see Connect clips.
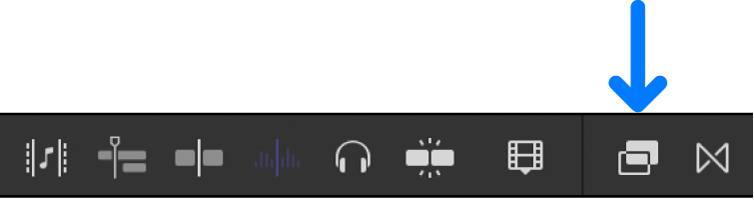
Select the foreground clip in the timeline, then click the Effects button in the top-right corner of the timeline (or press Command-5).
Tip: For best results, position the playhead at a point within the foreground clip that shows the maximum amount of the color to be keyed.
In the Effects browser, select the Green Screen Keyer effect.
Tip: Type “green screen” in the Effects browser search field to quickly find the Green Screen Keyer effect.
Do one of the following:
Drag the effect to the timeline foreground clip you want to apply the effect to.
Double-click the effect thumbnail to apply the effect to the selected clip.

The Green Screen Keyer effect analyzes the video to detect a green or blue dominant color and then removes that color. If the resulting key isn’t right or you want to improve it, you can adjust it.
Adjust the Green Screen Keyer effect
In the Final Cut Pro timeline, select the foreground clip with the Green Screen Keyer effect, then open the Video inspector.
Controls for modifying and improving the Green Screen Keyer effect appear.
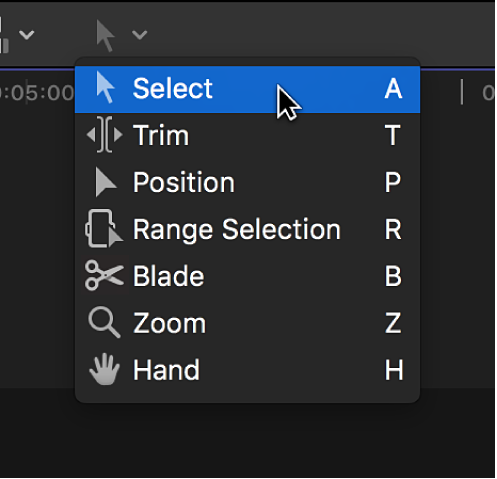
If the Select tool is not the active tool, choose it from the Tools pop-up menu above the timeline (or press A).
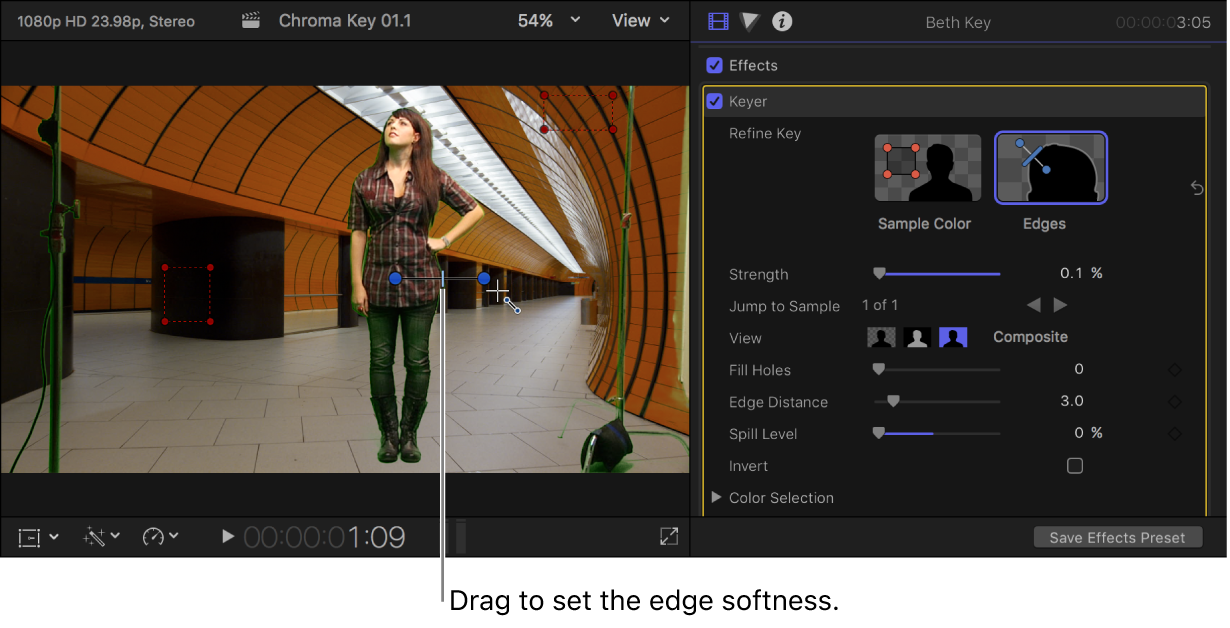
To improve the key using controls in the viewer, use the Refine Key and Strength controls to do any of the following:
Identify areas of the foreground clip that might still have some of the chroma key color showing: Click the Sample Color thumbnail image in the Video inspector and draw a rectangle in the viewer over the area where the chroma key color needs to be removed.
Note: By default, the Green Screen Keyer effect applies spill removal, which neutralizes any leftover tinting of the green- or blue-screen background color you’re removing. To see the original color, set the Spill Level parameter to 0%.

To improve the key, you can drag the rectangle to adjust its position or drag its corners to change its size, and you can drag additional rectangles over any areas with the chroma key color still showing.
Tip: Select Matte (the center button) in the View area in the Video inspector to see the matte that the chroma keyer is creating. This can make it much easier to see areas that are not keying well.
Refine any difficult areas, such as hair and reflections: Click the Edges thumbnail image in the Video inspector, draw a line across the difficult area in the viewer (with one end in the area to keep and the other in the area to remove), and drag the line’s handle to adjust the edge softness.
You can use the following keyboard shortcuts to work directly in the viewer:
Make a Sample Color adjustment: Draw a rectangle while holding down the Shift key.
Make an Edges adjustment: Draw a line while holding down the Command key.
Delete a Sample Color or Edges adjustment: Click a Sample Color rectangle or Edges line while holding down the Option key, or select the control and press the Delete key.
Choose a different color if the Green Screen Keyer effect chose the wrong color: Set the Strength parameter to 0% (to override the automatic initial color sampling). Then use Sample Color to choose the color to remove. Select Composite (the left button) in the View area to see the foreground clip combined with the background clip.
Adjust how strongly the Green Screen Keyer matches a color in the foreground image to the default chroma key color: Use the Strength slider to adjust the tolerance (core transparency) of the Green Screen Keyer effect’s automatic sampling. The default value is 100%. Reducing this value narrows the range of color sampled, resulting in less transparency in the keyed image. Increasing the Strength value expands the range of color sampled, resulting in more transparency in the keyed image. The Strength parameter is useful for retrieving areas of semitransparent detail such as hair, smoke, or reflections.
To help fine-tune the key, use the View options:
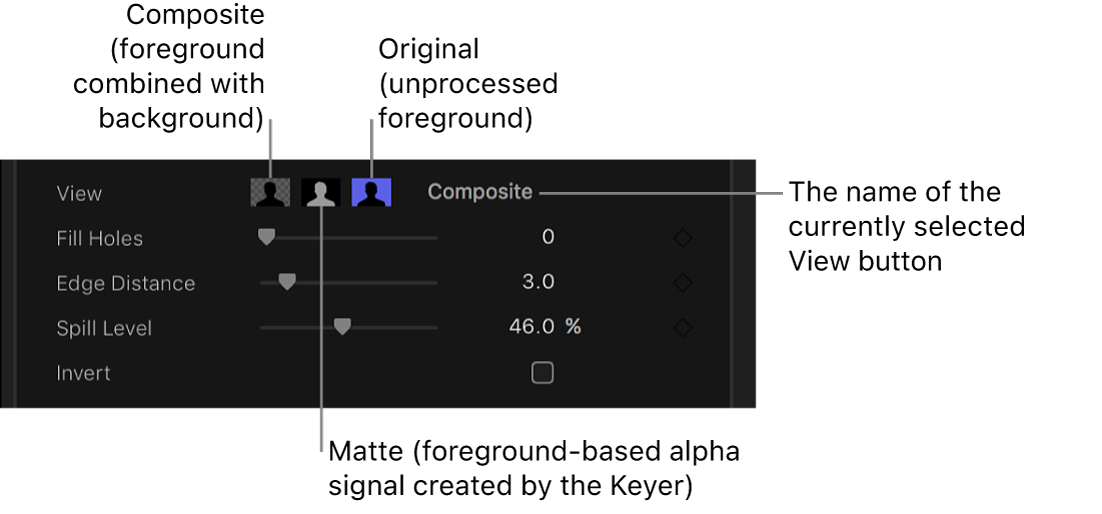
Composite: Shows the final composited image, with the keyed foreground subject over the background clip. This is the default view.
Matte: Shows the grayscale matte, or alpha channel, that’s being generated by the keying operation. White areas are solid (the foreground video is opaque), black areas are transparent (the foreground is not seen at all), and shades of gray indicate varying levels of transparency (the background video can be seen mixed with the foreground video). Viewing the matte makes it easier to spot unwanted holes in the key or areas that aren’t transparent enough.
Original: Shows the original, unkeyed foreground image.
To further refine the matte, use the following controls:
Fill Holes: Increasing this parameter value adds solidity to regions of marginal transparency within a key. This control is useful when you’re satisfied with the edges of your key, but you have unwanted holes in the interior that you can’t eliminate using the Strength parameter without ruining your edges.
Edge Distance: Lets you adjust how close to the edge of your keyed subject the effect of the Fill Holes parameter gets. Reducing this parameter value brings the filled area of the matte closer to the edge of the subject, sacrificing translucency at the edges. Increasing this parameter value pushes the filled area of the matte farther from the edge. Too much edge distance can result in unwanted translucency within parts of the subject that should be solid.
To suppress any of the background color that is appearing (spilling) on the foreground image, adjust the Spill Level control.
To reverse the keying operation, retaining the background color and removing the foreground image, select Invert.
To mix the keyed effect with the unkeyed effect, adjust the Mix control.


If you’re still having trouble getting a clean key, see the following instructions.
Make advanced Green Screen Keyer adjustments
The following controls are available for use in difficult keying situations or for fine-tuning specific problems:
Color Selection: These controls are meant to be used after you begin creating a key using automatic sampling or the Sample Color and Edges tools. (However, you can skip those tools and create a key using Manual mode, described below.) The graphical Chroma and Luma controls provide a detailed way of refining the range of hue, saturation, and image lightness that define the keyed matte.
Matte Tools: These controls are for refining the transparency matte generated by the previous sets of parameters. These parameters don’t alter the range of values sampled to create the keyed matte. Instead, they alter the matte generated by the Green Screen Keyer effect’s basic and advanced controls, letting you shrink, expand, soften, or invert the matte to achieve a better composite.
Light Wrap: These controls are for blending color and brightness values from the background layer of your composite with the keyed foreground layer. Using these controls, you can simulate the interaction of environmental lighting with the keyed subject, making it appear as if background light wraps around the edges of a subject.
In the Final Cut Pro timeline, select the foreground clip with the Green Screen Keyer effect, then open the Video inspector.
Controls for modifying and improving the Green Screen Keyer effect appear.
Click Color Selection to reveal the following controls:
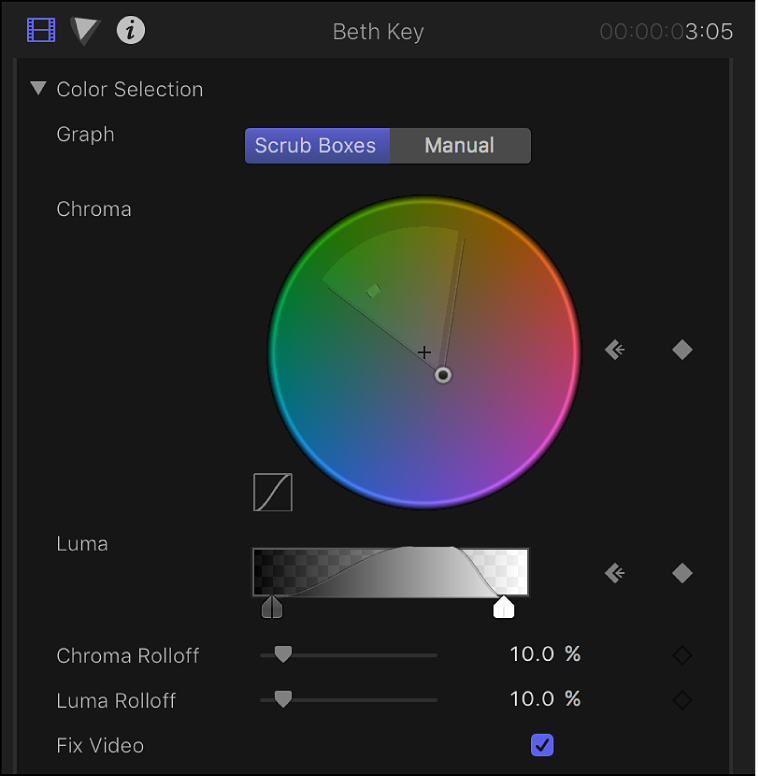
Graph: Provides two options to set how the adjustable graphs in the Chroma and Luma controls are used to fine-tune a key:
Scrub Boxes: Select to limit the Chroma and Luma controls to adjusting softness (edge transparency) in the matte you’re creating. In this mode, you can’t manually adjust tolerance (core transparency), which is determined by the Green Screen Keyer effect’s automatic sampling, plus any Sample Color rectangles you’ve added in the viewer. (To increase matte tolerance, add more Sample Color rectangles or adjust the Strength slider.)
Manual: Select to use the Chroma and Luma controls to adjust the softness (edge transparency) and tolerance (core transparency) in the matte you’re creating. Make sure the Strength slider is set to a value greater than 0% before you switch to Manual mode; otherwise the Chroma and Luma controls are disabled. When you switch to Manual mode, the Refine Key tools and Strength slider become disabled, but samples you’ve made with those controls continue to contribute to the matte.
Important: When you switch to Manual mode, it’s best not to switch back to Scrub Boxes mode. For best results, begin keying an image using the Sample Color and Edges tools in Scrub Boxes mode. Switch to Manual mode afterward if you feel it’s necessary to refine your matte using the Chroma and Luma controls. However, if you switch back to Scrub Boxes mode, you may experience unexpected combinations of additionally sampled and keyframed values that might be difficult to control.
Chroma: Drag the two graphs in this color wheel control to adjust the isolated range of hue and saturation that help define the keyed matte. The selected mode governs which graphs in the color wheel are adjustable. The outer graph controls the softness (edge transparency) of the matte you’re creating, and can be adjusted in either Scrub Boxes or Manual mode. The inner graph controls tolerance (core transparency), and is only adjustable when in Manual mode. Drag any side of either graph to expand or contract the graph’s border, which adds to or subtracts from the range of hue and saturation contributing to the key. In Manual mode, you can also drag inside the tolerance graph to adjust its overall position in the color wheel. To the left of the color wheel, a small graph displays the slope of chroma rolloff, the relative softness of matte edges in regions most affected by the Chroma control. Dragging the Chroma Rolloff slider (described below) modifies the shape of this slope.
Tip: It’s possible to zoom in to and pan around the Chroma control to more precisely adjust the graphs. To zoom in to the Chroma control, move the pointer over the color wheel and, holding down the Z key, drag to the left to zoom out or to the right to zoom in. To pan in the Chroma control, hold down the H key and drag in the color wheel in the direction you want to move it. To reset the zoom and recenter the Chroma control, move the pointer over the Chroma control and press Shift-Z.
Luma: Drag the adjustable handles in this grayscale gradient to modify the isolated range of the luma channel (the range of brightness and darkness) that also helps define the keyed matte. The upper handles (which appear only in Manual mode) adjust the tolerance (core transparency) of the luma channel’s contribution to the key. The lower handles adjust the softness (edge transparency) of the luma channel’s contribution to the key. The Graph mode governs which handles are adjustable. In Scrub Boxes mode, you can adjust only the lower softness handles, which modify the range of brightness and darkness affecting the edge transparency of the matte. In Manual mode, you can also adjust the upper tolerance handles, which modify core transparency within the luma channel of the matte. By default, the slope of the left and right sides of the Luma graph has a slight “S” curve. You can modify the shape of the curve by adjusting the Luma Rolloff slider (described below).
Note: The luma softness handles may extend past the outer boundaries of the Luma control. This is due to the floating-point precision of the Green Screen Keyer effect and is expected. To reveal out-of-bounds handles and then move them, drag the slope line of the Luma graph.
Chroma Rolloff: Use this slider to adjust the linearity of the chroma rolloff slope (displayed in the small graph to the left of the Chroma control). Chroma rolloff modifies the softness of the matte around the edges of regions that are affected most by the Chroma control. Lowering this value makes the slope of the graph more linear, which softens the edges of the matte. Raising this value makes the slope of the graph steeper, which sharpens the edges of the matte.
Luma Rolloff: Use this slider to adjust the linearity of the luma rolloff slope (the ends of the bell-shaped luma curve displayed in the Luma control). Luma rolloff modifies the softness of the matte around the edges of regions that are affected most by the Luma control. Lowering this value makes the slope between the upper and lower handles in the Luma control more linear, which increases edge softness in the matte. Raising this value makes the slope steeper, sharpening the edges of the matte and making them more abrupt.
Fix Video: Select this checkbox to apply subpixel smoothing to the chroma components of the image, reducing the jagged edges that result from keying compressed media using 4:2:0, 4:1:1, or 4:2:2 chroma subsampling. Although selected by default, this checkbox can be deselected if subpixel smoothing degrades the quality of your keys.
Click Matte Tools to reveal the following controls:
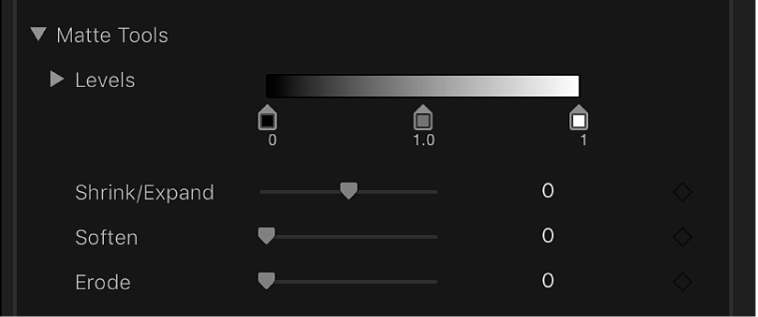
Levels: Use this grayscale gradient to alter the contrast of the keyed matte, by dragging three handles that set the black point, white point, and bias (distribution of gray values between the black point and white point). Adjusting the contrast of a matte can be useful for manipulating translucent areas of the key to make them more solid (by lowering the white point) or more translucent (by raising the black point). Dragging the Bias handle right erodes translucent regions of the key, and dragging the Bias handle left makes translucent regions of the key more solid.
Black, White, Bias: Click the Levels disclosure triangle to reveal sliders for the Black, White, and Bias parameters. These sliders, which mirror the settings of the Levels handles described above, allow you to keyframe the three Levels parameters (using the Add Keyframe button to the right of each slider). Keyframing the Black, White, and Bias parameters may yield a better key, one that adapts to changing blue-screen or green-screen conditions.
Shrink/Expand: Use this slider to manipulate the contrast of the matte to affect matte translucence and matte size simultaneously. Drag the slider left to make translucent regions more translucent while simultaneously shrinking the matte. Drag the slider right to make translucent regions more solid while simultaneously expanding the matte.
Soften: Use this slider to blur the keyed matte, feathering the edges by a uniform amount.
Erode: Drag this slider right to gradually increase transparency from the edge of the solid portion of the key inward.
Click Spill Suppression to reveal the following controls:
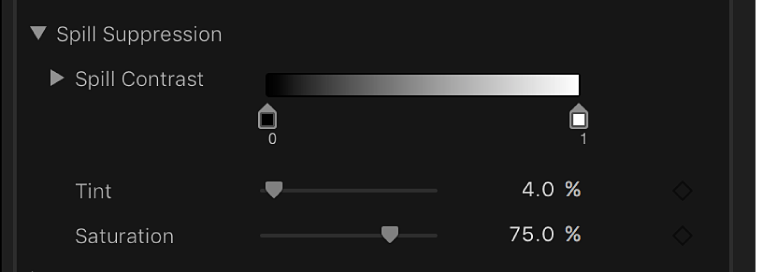
Spill Contrast: Use this grayscale gradient to adjust the contrast of the color being suppressed, using the Black and White point handles (and corresponding sliders). Modifying spill contrast can reduce the gray fringing surrounding a foreground subject. The Black point handle (on the left side of the gradient control) lightens edge fringing that is too dark for a successful composite. The White point handle (on the right side of the gradient control) darkens edge fringing that is too light. Depending on how much spill is neutralized by the Spill Level slider, these controls may have a greater or lesser effect on the subject.
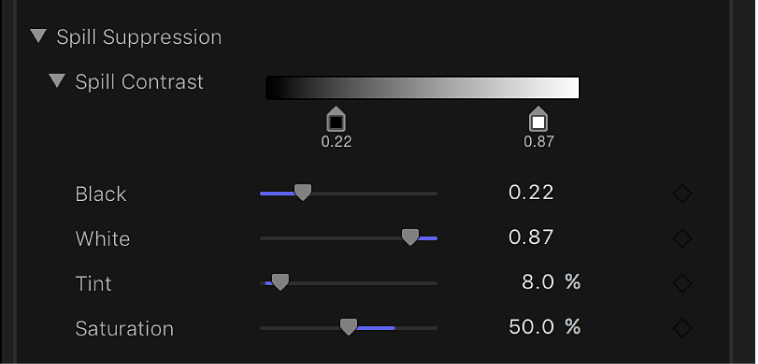
Black, White: Click the Spill Contrast disclosure triangle to reveal sliders for the Black and White point parameters. These sliders, which mirror the settings of the Spill Contrast handles described above, allow you to keyframe the Black point and White point parameters (using the Add Keyframe button to the right of each slider).
Tint: Use this slider to restore the natural color of the keyed foreground subject. Because the Spill Suppression controls eliminate blue or green spill by desaturating subtle blue or green fringing and reflection on the subject, the Tint slider lets you add hues to restore the natural color of the subject. Overdoing this parameter results in over-tinting the subject with the complementary color of the hue being suppressed—magenta if green, and orange if blue.
Saturation: Use this slider to alter the range of hues introduced by the Tint slider (when the Tint slider is used at moderate levels).
Click Light Wrap to reveal the following controls:
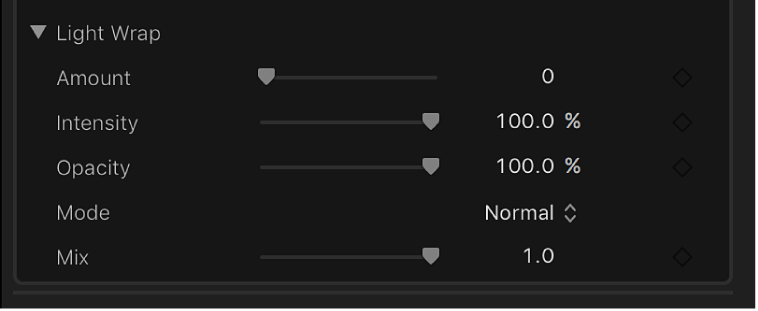
Amount: Use this slider to control the overall light wrap effect, setting how far into the foreground the light wrap extends.
Intensity: Use this slider to adjust gamma levels to lighten or darken the interaction of wrapped edge values with the keyed foreground subject.
Opacity: Use this slider to fade the light wrap effect up or down.
Mode: Use this pop-up menu to choose the compositing method that blends the sampled background values with the edges of the keyed subject. There are five modes:
Normal: Evenly blends light and dark values from the background layer with the edges of the keyed foreground layer.
Lighten: Compares overlapping pixels from the foreground and background layers, and then preserves the lighter of the two. This method is good for creating a selective light wrap effect.
Screen: Superimposes lighter portions of the background layer over wrapped areas of the keyed foreground layer. This method is good for creating an aggressive light wrap effect.
Overlay: Combines the background layer with the wrapped areas of the keyed foreground layer so overlapping dark portions become darker, light portions become lighter, and colors become intensified.
Hard Light: Similar to the Overlay composite mode, except that colors become muted.
Animate the Green Screen Keyer effect
To compensate for changing conditions in the foreground clip, you can make Sample Color and Edges adjustments at multiple points in the clip.
In the Final Cut Pro timeline, place the playhead at the start of the foreground clip with the Green Screen Keyer effect.
Use Sample Color and Edges (described above) to create a good chroma key.
Move the playhead to a point later in the clip where the lighting or background conditions change, resulting in the chroma key no longer being acceptable.
Use Sample Color and Edges to once again create a good chroma key.
To add additional adjustments at other playhead positions, repeat steps 3 and 4 as needed.
To move the playhead between adjustment points, use the Jump to Sample arrows.
When you play the clip, the Sample Color and Edges settings smoothly change from one sample point to the next. For even greater control, you can add keyframes for most of the other settings in the Keyer section of the Video inspector. For more information about working with keyframes, see Intro to video keyframing.
Note: Keyframes for the chroma and luma graphs in the Color Selection controls appear only in the Video inspector and not the Video Animation editor in the timeline.
Download this guide: PDF