
Use the Sampler Zone pane in MainStage
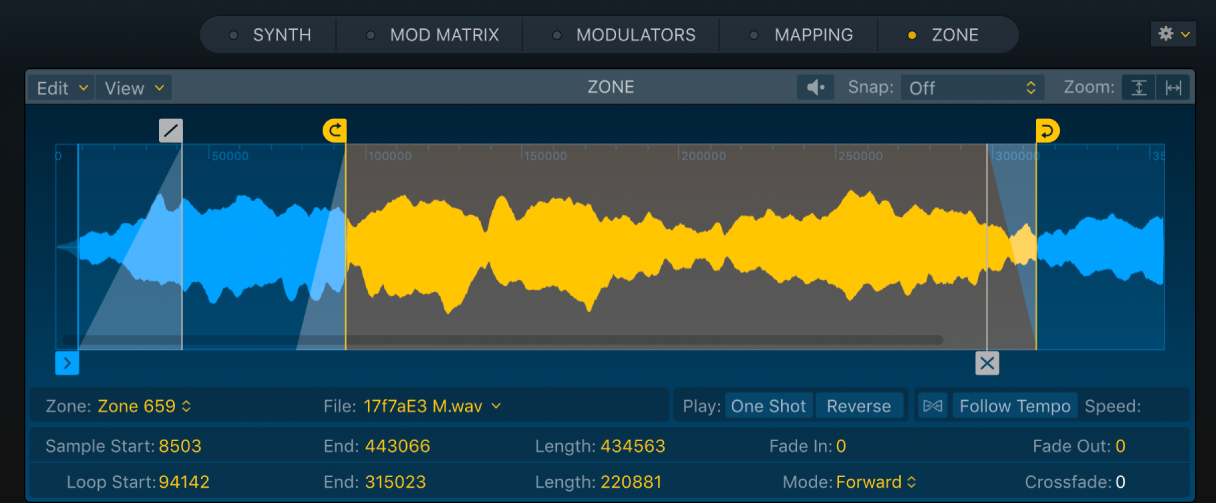
You can see the current waveform of the selected zone and can directly edit a number of sample playback parameters in the Zone pane waveform display. You can zoom in or out with pinch gestures, or scroll the waveform display using two-finger swipes or by dragging the scroll bar. You can use single-finger swipes if you are using a Magic Mouse.
Important: Use of gestures, such as swiping or pinching require these features to be enabled in the Mouse or Trackpad panes of your System Settings.
As you move the pointer across the waveform display, it changes in appearance and function. For example, the pointer will change to indicate that you can move a slice marker or fade marker. In addition, parameters and values related to the current pointer tool function are shown below the waveform display (and in Zone view).
Click or drag markers and handles in the waveform display to change values. Drag vertically in parameter value fields to change them. For example, vertically drag the value shown for Loop Start to change it. Alternatively, you can double-click in a field and enter a value, then press the Return key.
You can also Control-click the waveform display to open a shortcut menu that allows you to open the sample in the Logic Pro Audio File Editor (or an external editor), if you prefer.
Tip: The Zone pane is best used with the Mapping pane also visible. See Mapping and Zone pane overview.
Zone pane parameters
Double-click a parameter value field to enter a new value. Press Return to complete the operation.
Waveform display: Shows the selected zone waveform, marker handles, and shaded marker areas. You can drag the marker handles to adjust zone playback.
Edit menu: Choose an editing command or function. See the task in this section to learn more about the commands and functions in this pop-up menu.
The Zone pane Edit menu also includes the Loop commands available in the Mapping pane Zone menu.
View menu: Choose an option that affects the appearance of the display. See the task in this section to learn more about the commands and functions in this pop-up menu.
Preview button: Play the selected zone.
Snap pop-up menu: Choose a value. Edits to crossfade, sample, fade, or loop markers in the waveform display automatically snap to the nearest possible value.
Zoom vertical button: Switch between the maximum vertical zoom view for the currently displayed waveform section and the default zoom view.
Zoom horizontal button: Switch between the last manually set zoom level, if applicable, and an optimized zoom level that shows the area between the sample start and end markers. When no manual zoom level is set, the entire audio file is shown.
Tip: You can use your trackpad to zoom in or out on the waveform display with pinch gestures, or scroll using two-finger swipes or by dragging the scroll bar. You can use a Magic Mouse to perform the following gestures: one finger horizontal swipe to scroll, or use a one finger vertical swipe to zoom.
Zone pop-up menu: Displays the zone name. Click to choose other zones.
File pop-up menu: Displays the audio filename. Click to choose file handling commands.
Load Audio File: Opens a dialog where you can select an audio file.
Rename Current File: Opens a dialog where you can rename the selected audio file.
Detach Current File: Detach the selected audio file from the zone. You can load and assign another audio file to this zone.
Show in Finder: Shows the full path of the loaded audio file in the Finder.
Playback buttons: Use these options to determine zone playback behavior.
One Shot button: Turn on to make the zone ignore the length of incoming MIDI note events, resulting in the sample always being played from start to end whenever a note-on event is received. This is useful for drum samples, where you often don’t want the MIDI note length to affect sample playback. Also see the Fade field parameters.
Loop and crossfade parameters are dimmed when the One Shot button is active.
Reverse button: Turn on to play the sample from the sample end marker to the sample start marker.
Flex On/Off button: Turn Flex mode on or off. If Flex mode is turned on, an audio sample is played at its original speed for all note pitches. See the task in this section to learn more about Flex use.
Follow Tempo button: When Flex mode is active, turn on to follow the project tempo.
(Flex) Speed pop-up menu: When Flex mode is active, choose a playback speed division or multiplication value.
Tip: Flex Speed is also available as a modulation target.
Sample Start/End handles and fields: Set the sample start and end points. Drag to reposition. Option-click, then drag either handle to move both markers.
Sample Length field: Displays the length between the sample start and end marker positions. Drag vertically to move the end and fade-out marker.
Fade In/Fade Out handles and fields: Set the fade-in or fade-out time for the zone. Drag to reposition. Option-click, then drag either handle to move both markers. The fade markers cannot be positioned before or after the sample start and end markers.
Loop Start/Loop End handles and fields: Set the loop start and end points. Drag to reposition. Drag the shaded loop area to move both markers and the crossfade marker. Alternatively, you can Option-click, then drag either handle to move both markers and the crossfade marker.
Loop Length field: Displays the length between the loop start and end marker positions. Drag vertically to move the loop end and crossfade marker.
Loop Mode pop-up menu: Choose a looping mode. Set to No Loop to disable looping.
No Loop: Turn off looped playback. This hides loop markers and crossfades from the waveform display.
Forward: Playback cycles from the loop start point to the loop end point while you hold a key.
Reverse: Playback cycles from the loop end point to the loop start point while you hold a key.
Alternate: Playback continuously cycles from the loop start point to the loop end point, then switches from the loop end point to the loop start point, while you hold a key.
Play to End on Release: Turn on to continue playback to the end marker position after you have released the key—provided that the amp release time is long enough for the audio portion after the loop to be audible. This feature is useful for allowing the natural decay of a sampled acoustic instrument to be heard during the envelope release phase, for example.
Crossfade handle and field: Drag to set the crossfade time between the end and start of a looped sample. The crossfade marker handle is indicated with an X in the waveform display. Option-click, then drag the handle to move both crossfades.
In a crossfaded loop, there is no step between the loop end and loop start points. The higher the value, the longer the crossfade and the smoother the transition between the loop end and start points. This is especially convenient with samples that are hard to loop and that would normally produce clicks at the transition point—the join in the loop.