Use wide-gamut HDR color processing in Final Cut Pro for Mac
You can choose between two basic color spaces in Final Cut Pro: Standard and Wide Gamut HDR.
To work in wide-gamut HDR, you must first configure two settings:
The color-processing setting for an entire library: This global setting changes the way in which effects and log processing work for all projects. Set your library to Wide Gamut HDR if you’re considering exporting a wide-gamut HDR output media file.
The color space setting for a specific project: This setting determines the color space of your render files, the color of images you see on the screen, and the color space of your exported project (the output media file). Set your project to Wide Gamut HDR if you intend to export an HDR movie when you complete the project. (This project setting is available only when the library is set to Wide Gamut HDR.)
Set the color processing for a library
Because the color-processing setting affects all projects and media in the library, it’s a good idea to create a separate library for each project or deliverable (to prevent accidental color space crossover issues). See Create a new library.
Important: The working color space setting may affect video processing and the appearance of your final rendering results. For example, when the library color-processing setting is changed from Standard to Wide Gamut HDR, some filters or compositing effects (blend modes) may change in appearance.
In the Libraries sidebar in Final Cut Pro, select a library.
To open the Library Properties inspector, do one of the following:
Choose File > Library Properties (or press Control-Command-J).
Click the Inspector button on the right side of the toolbar.

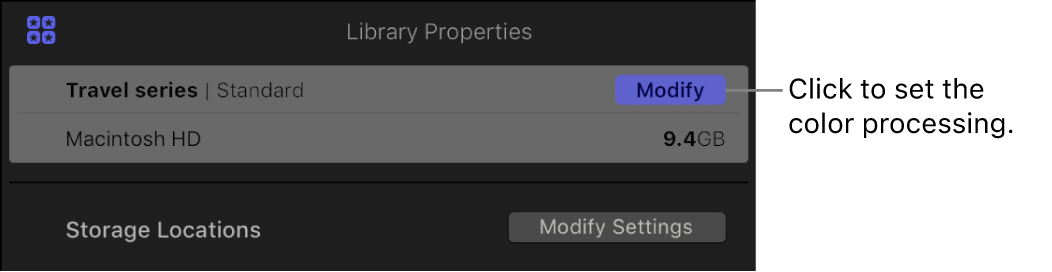
Click Modify at the top of the Library Properties inspector.
Select one of the following in the window that appears:
Standard: Set the working color space to linear RGB with Rec. 709 color primaries, the color space that previous versions of Final Cut Pro have used. Rec. 709 is the current standard for HDTV projects, including HD cable, Blu-ray discs, and most streaming video today.
Wide Gamut HDR: Set the working color space to linear RGB with Rec. 2020 color primaries, a color space with a wider range of colors than Rec. 709. Rec. 2020 is useful for 4K and 8K UHDTV and HDR projects. In a Wide Gamut HDR library, the built-in camera LUT settings preserve the full dynamic range of log source media when converting to the working space. See Apply LUTs.
A third option, Wide Gamut (Deprecated), appears if you selected a wide-gamut library containing log media that was created with Final Cut Pro 10.3. The Wide Gamut (Deprecated) option ensures that wide-gamut projects created with Final Cut Pro 10.3 don’t change in appearance.
Important: If you switch from Wide Gamut (Deprecated) to another color-processing setting, you can’t switch back—the Wide Gamut (Deprecated) setting will no longer be available.

Set the color space for a project
You can choose one of four color space options for your project if the library color processing is set to Wide Gamut HDR and the project video format is set to HD or larger.
When you set the project color space, the project’s render files are generated in that color space, and your project is exported in that color space if the destination codec supports it. During playback, output images are converted to the project color space and then displayed onscreen according to the display device’s color profile.
In the Libraries sidebar in Final Cut Pro, select the event that contains the project you want to modify, then select the project (or double-click it to open it in the timeline).
Do one of the following:
Choose Window > Project Properties (or press Command-J).
Click the Inspector button on the right side of the toolbar.
In the Project Properties inspector, click the Modify button in the top-right corner.

In the window that appears, click the Color Space pop-up menu and choose one of the following:
Standard - Rec. 709: Choose this option to set your project to use the Rec. 709 color space, the current standard for HDTV projects, including HD cable, Blu-ray discs, and most streaming video today. You can also create a project that uses the standard color space within a wide-gamut library—for example, if you have wide-gamut media but need to deliver a standard project, or if you need to deliver both standard and wide-gamut versions of a project.
Wide Gamut - Rec. 2020: Choose this legacy setting for projects created previously using the Wide Gamut - Rec. 2020 color space. If you intend to export an HDR movie, choose one of the following Wide Gamut HDR options.
Wide Gamut HDR - Rec. 2020 PQ: Choose this option if you intend to create an HDR movie with the Rec. 2020 color space and PQ transfer function (Rec. 2100 standard), using formats such as HDR10, HDR10+, Dolby Vision, or Advanced HDR. You can create an HDR10-compatible movie entirely within Final Cut Pro. See Export an HDR10 file. For other HDR formats, some additional steps are required after you export the movie file from Final Cut Pro.
Wide Gamut HDR - Rec. 2020 HLG: Choose this option if you intend to create an HDR movie with the Rec. 2020 color space and HLG transfer function (Rec. 2100 standard), using formats such as HLG or Advanced HDR. HLG, or Hybrid Log-Gamma, was developed by the BBC and NHK broadcasting networks and is compatible with older standard dynamic range (SDR) televisions and monitors. Movies created with this color space option in Final Cut Pro are compatible with HLG HDR televisions and displays.
Note: If you want to set the project to a wide-gamut color space, but the menu is set to something else and dimmed, you must first set the color processing for the library.
Click OK.

For a detailed list of all project settings, see Project settings. For information about displaying the image details of HDR clips or projects in the viewer, see Playback settings.
Note: You can use the video scopes and the range check overlay in Final Cut Pro to measure video levels and detect out-of-gamut colors. See Intro to measuring video and Detect out-of-gamut colors. You can also use the Broadcast Safe filter as a quick way to reduce luma and chroma levels that exceed the specification limits for either standard or wide-gamut color spaces in standard-dynamic-range (SDR) video media. To apply the Broadcast Safe filter to a clip in your project, see Add video effects.
Download this guide: PDF