Logic Pro User Guide for iPad
- Welcome
- What’s new in Logic Pro for iPad
-
- What is Logic Pro?
- Working areas
- Work with the menu bar
- Work with function buttons
- Work with numeric values
- Undo and redo edits in Logic Pro for iPad
-
- Intro to tracks
- Create tracks
- Create tracks using drag and drop
- Choose the default region type for a software instrument track
- Select tracks
- Duplicate tracks
- Reorder tracks
- Rename tracks
- Change track icons
- Change track colors
- Use the tuner on an audio track
- Show the output track in the Tracks area
- Delete tracks
- Edit track parameters
- How to get help
-
- Intro to recording
-
- Before recording software instruments
- Record software instruments
- Record additional software instrument takes
- Record to multiple software instrument tracks
- Record multiple MIDI devices to multiple tracks
- Record software instruments and audio simultaneously
- Merge software instrument recordings
- Spot erase software instrument recordings
- Replace software instrument recordings
- Route MIDI internally to software instrument tracks
- Record with Low Latency Monitoring mode
- Use the metronome
- Use the count-in
-
- Intro to arranging
-
- Intro to regions
- Select regions
- Cut, copy, and paste regions
- Move regions
- Remove gaps between regions
- Delay region playback
- Trim regions
- Loop regions
- Repeat regions
- Mute regions
- Split and join regions
- Stretch regions
- Separate a MIDI region by note pitch
- Bounce regions in place
- Change the gain of audio regions
- Normalize audio regions in the Tracks area in Logic Pro for iPad
- Create regions in the Tracks area
- Convert a MIDI region to a Session Player region or a pattern region
- Replace a MIDI region with a Session Player region in Logic Pro for iPad
- Rename regions
- Change the color of regions
- Delete regions
-
- Intro to chords
- Add and delete chords
- Select chords
- Cut, copy, and paste chords
- Move and resize chords
- Loop chords on the Chord track
- Color chords on the Chord track
- Edit chords
- Work with chord groups
- Use chord progressions
- Change the chord rhythm
- Choose which chords a Session Player region follows
- Analyze the key signature of a range of chords
- Analyze the chords in an audio or MIDI region with Chord ID
- Create fades on audio regions
- Extract vocal and instrumental stems with Stem Splitter
- Access mixing functions using the Fader
-
- Intro to editing regions and cells
-
-
- Piano Roll Editor overview
- Select notes
- Add notes
- Delete notes
- Mute notes
- Trim notes
- Move notes
- Copy notes
- Repeat notes
- Shorten overlaps
- Force legato
- Lock note position
- Transpose notes
- Change note velocity
- Change release velocity
- Change MIDI channel
- Set articulation IDs
- Quantize timing
- Quantize pitch
- Edit Live Loops in the Cell Editor
-
- Intro to Step Sequencer
- Use Step Sequencer with Drum Machine Designer
- Chords and pitch in Step Sequencer
- Record Step Sequencer patterns live
- Step record Step Sequencer patterns
- Load and save patterns
- Modify pattern playback
- Edit steps
- Edit rows
- Edit Step Sequencer pattern, row, and step settings in the inspector
- Customize Step Sequencer
-
- Intro to mixing
-
- Channel strip types
- Channel strip controls
- Peak level display and clipping
- Set channel strip volume
- Set channel strip input format
- Set the output for a channel strip
- Set channel strip pan position
- Mute and solo channel strips
- Reorder channel strips
- Replace a patch on a channel strip using drag and drop
- Work with plug-ins in the Mixer
- Search for plug-ins in the Mixer
-
-
- Effect plug-ins overview
-
- Instrument plug-ins overview
-
- ES2 overview
-
- Modulation overview
- Use the Mod Pad
-
- Vector Envelope overview
- Use Vector Envelope points
- Use Vector Envelope solo and sustain points
- Set Vector Envelope segment times
- Vector Envelope XY pad controls
- Vector Envelope Actions menu
- Vector Envelope loop controls
- Vector Envelope point transition shapes
- Vector Envelope release phase behavior
- Use Vector Envelope time scaling
- Modulation source reference
- Via modulation source reference
- Use macro controls
-
- Sample Alchemy overview
- Interface overview
- Add source material
- Save a preset
- Edit mode
- Play modes
- Source overview
- Synthesis modes
- Granular controls
- Additive effects
- Additive effect controls
- Spectral effect
- Spectral effect controls
- Filter module
- Low, bandpass, and highpass filters
- Comb PM filter
- Downsampler filter
- FM filter
- Envelope generators
- Mod Matrix
- Modulation routing
- Motion mode
- Trim mode
- More menu
- Sampler
- Studio Piano
- Copyright and trademarks
Match EQ parameters in Logic Pro for iPad
Match EQ offers the parameters described in this section.
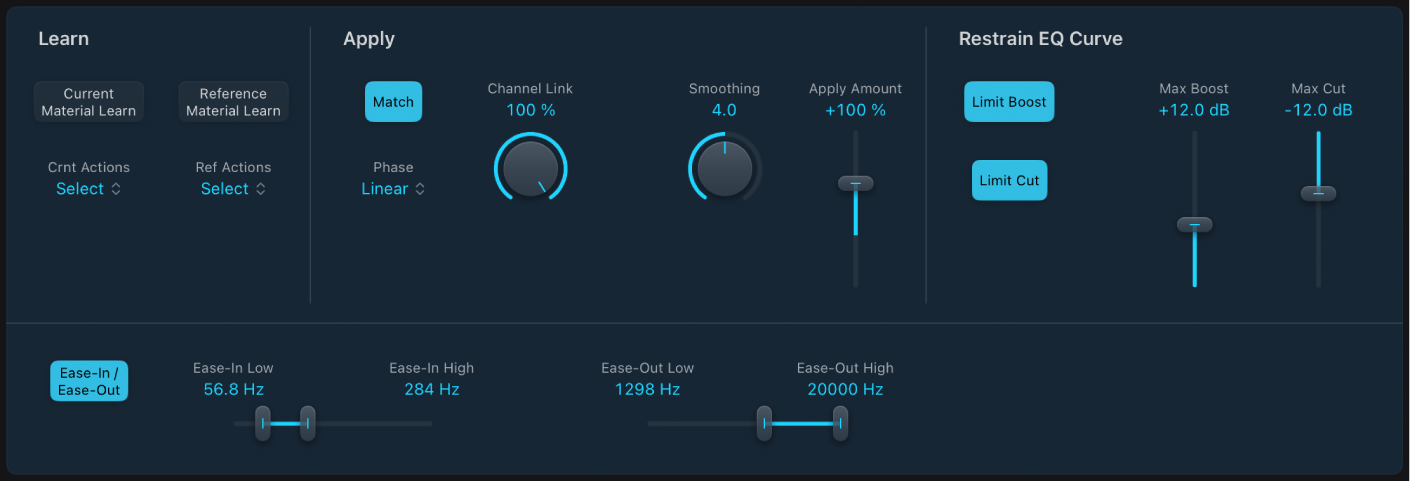
Match EQ parameters
 Current Material Learn button: Start or stop the process of learning the frequency spectrum of the project you want to match with the source file or input.
Reference Material Learn button: Start or stop the process of learning the frequency spectrum of the source file or input.
Crnt/Ref Actions pop-up menus: Choose and execute commands from either the Current or Reference Actions pop-up menu.
Clear Current Material/Reference Spectrum: Clears the Current Material Spectrum or Reference Spectrum.
Copy Current/Reference Spectrum: Copies the Current Material Spectrum or Reference Spectrum to the Clipboard.
Paste Current/Reference Spectrum: Pastes the Current Material Spectrum or Reference Spectrum from the Clipboard.
Match button: Match the frequency spectrum of the current material to that of the template (source) file.
Phase pop-up menu: Choose the operational principle of the filter curve.
Linear: Prevents processing from altering the signal phase, but latency is higher.
Minimal: Alters the signal phase (slightly), but latency is reduced.
Minimal, Zero Latency: Adds no latency, but has a higher CPU overhead than the other options.
Channel Link knob: Change the way the EQ curve is applied to stereo channels.
When set to 100%, both channels share a common EQ curve.
When set to 0%, a separate filter curve is applied for the left and right channel.
Settings between 0 and 100% blend these values with your filter curve changes for each channel. This results in a hybrid curve.
Note: The Channel Link parameter is unavailable when you use the effect on a mono channel.
Smoothing knob and field: Set the amount of smoothing for the filter curve, using a constant bandwidth set in semitone steps. A value of 0.0 has no impact on the filter curve. A value of 1.0 means a smoothing bandwidth of one semitone. A value of 4.0 means a smoothing bandwidth of four semitones (a major third). A value of 12.0 means a smoothing bandwidth of one octave, and so on.
Note: Smoothing has no effect on any manual changes you make to the filter curve.
- Apply Amount slider and field: Determine the impact of the filter curve on the signal.
Values above 100% magnify the effect.
Values below 100% reduce it.
Negative values (−1% to −100%) invert the peaks and troughs in the filter curve.
A value of 100% has no impact on the filter curve.
Limit Boost/Limit Cut buttons: Activate to set and adjust boost and cut limits with the corresponding faders.
Max Boost fader: Drag to set the maximum positive value (boost) the EQ curve can’t exceed.
Max Cut fader: Drag to set the maximum negative value (cut) the EQ curve can’t exceed.
Ease-In/Ease-Out button: Activate the following four parameters: Ease-In Low, Ease-In High, Ease-Out Low, and Ease-Out High to adjust the EQ curve based on those settings.
Ease-In Low/High sliders: Drag the left and right handles to set a frequency band. The EQ curve is adjusted so frequencies below its low frequency mark result in a flat 0 dB curve (no EQ effect), and frequencies above its high frequency mark are processed by the actual EQ curve. The range between the low and high frequency mark represents the ease-in area where the EQ curve is gradually increasing from 0 dB to its actual values.
Ease-Out Low/High sliders: Drag the left and right handles to set a frequency band. The EQ curve is adjusted so frequencies below its low frequency mark are processed by the actual EQ curve, and frequencies above its high frequency mark result in a flat 0 dB curve (no EQ effect). The range between the low and high frequency mark represents the ease-out area where the EQ curve gradually decreases its actual values down to 0 dB.
Download this guide: PDF