iPad User Guide
- Welcome
- What’s new in iOS 12
-
- Wake and unlock
- Learn basic gestures
- Learn gestures for models with Face ID
- Explore the Home screen and apps
- Change the settings
- Take a screenshot
- Adjust the volume
- Change or turn off the sounds
- Search for content
- Use and customize Control Center
- View and organize Today View
- Access features from the Lock screen
- Travel with iPad
- Set screen time, allowances, and limits
- Sync iPad using iTunes
- Charge and monitor the battery
- Learn the meaning of the status icons
-
- Accessories included with iPad
- Connect Bluetooth devices
- Stream audio and video to other devices
- Connect to a TV, projector, or monitor
- Control audio on multiple devices
- Apple Pencil
- Use Smart Keyboard and Smart Keyboard Folio
- Use Magic Keyboard
- AirPrint
- Handoff
- Use Universal Clipboard
- Make and receive Wi-Fi calls
- Instant Hotspot
- Personal Hotspot
- Transfer files with iTunes
-
-
- Get started with accessibility features
- Accessibility shortcuts
-
-
- Turn on and practice VoiceOver
- Change your VoiceOver settings
- Learn VoiceOver gestures
- Operate iPad using VoiceOver gestures
- Control VoiceOver using the rotor
- Use the onscreen keyboard
- Write with your finger
- Control VoiceOver with Magic Keyboard
- Type onscreen braille using VoiceOver
- Use a braille display
- Use VoiceOver in apps
- Speak selection, speak screen, typing feedback
- Zoom
- Magnifier
- Display settings
- Face ID and attention
-
- Guided Access
-
- Important safety information
- Important handling information
- Zoom an app to fill the screen
- Get information about your iPad
- View or change cellular settings
- Learn more about iPad software and service
- FCC compliance statement
- ISED Canada compliance statement
- Class 1 Laser information
- Apple and the environment
- Disposal and recycling information
- ENERGY STAR compliance statement
- Copyright
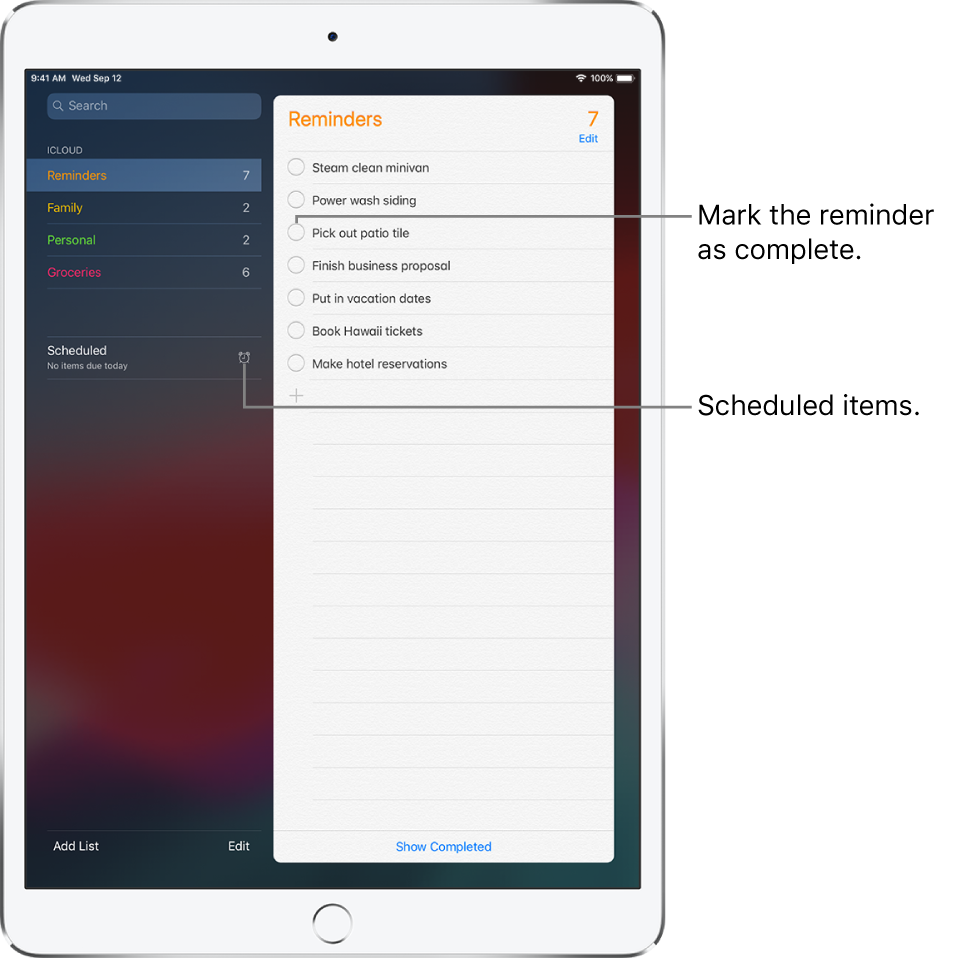
Make a reminder list on iPad
Keep track of the things you need to do in the Reminders app ![]() . You can create lists, add items, and schedule dates and times when you want to receive notifications (reminders) about the items on the list.
. You can create lists, add items, and schedule dates and times when you want to receive notifications (reminders) about the items on the list.
Ask Siri. Say something like: “Add artichokes to my groceries list.” Learn how to ask Siri.
Add a reminder
Tap the Reminders list.
Tap
 , then enter your reminder.
Tap Done.
To delete a reminder, swipe left on the reminder, then tap Delete.
Note: To change the default list new reminders you create outside of a specific list appear in, go to Settings ![]() > Reminders > Default List, then select the list you want to use.
> Reminders > Default List, then select the list you want to use.
Create a new reminder list
Some lists, like Reminders and Family, are already created for you. You can create new lists for categories like work, school, or personal.
Tap
at the top of the screen.Tap List, then select the account you want to add the list to.
Name the list, choose a color, then tap Done.
To delete a list, tap Edit at the top of the list, then tap Delete List.
Keep your reminders up to date on other devices
Go to Settings ![]() > [your name] > iCloud, then turn on Reminders.
> [your name] > iCloud, then turn on Reminders.
Some other types of accounts, such as Exchange, also support Reminders. You can change how far back past reminders are synced in Settings > Reminders.
Tip: With OS X 10.10 or later, you can hand off reminders you’re editing between your Mac and iPad. See Use Handoff with iPad.