Final Cut Pro User Guide
- Welcome
-
- What’s new in Final Cut Pro 10.6
- What’s new in Final Cut Pro 10.5.3
- What’s new in Final Cut Pro 10.5
- What’s new in Final Cut Pro 10.4.9
- What’s new in Final Cut Pro 10.4.7
- What’s new in Final Cut Pro 10.4.6
- What’s new in Final Cut Pro 10.4.4
- What’s new in Final Cut Pro 10.4.1
- What’s new in Final Cut Pro 10.4
- What’s new in Final Cut Pro 10.3
- What’s new in Final Cut Pro 10.2
- What’s new in Final Cut Pro 10.1.2
- What’s new in Final Cut Pro 10.1
- What’s new in Final Cut Pro 10.0.6
- What’s new in Final Cut Pro 10.0.3
- What’s new in Final Cut Pro 10.0.1
-
- Intro to effects
-
- Intro to transitions
- How transitions are created
- Add transitions
- Set the default transition
- Delete transitions
- Adjust transitions in the timeline
- Adjust transitions in the inspector and viewer
- Merge jump cuts with the Flow transition
- Adjust transitions with multiple images
- Modify transitions in Motion
-
- Add storylines
- Use the precision editor
- Conform frame sizes and rates
- Use XML to transfer projects
-
- Glossary
- Copyright

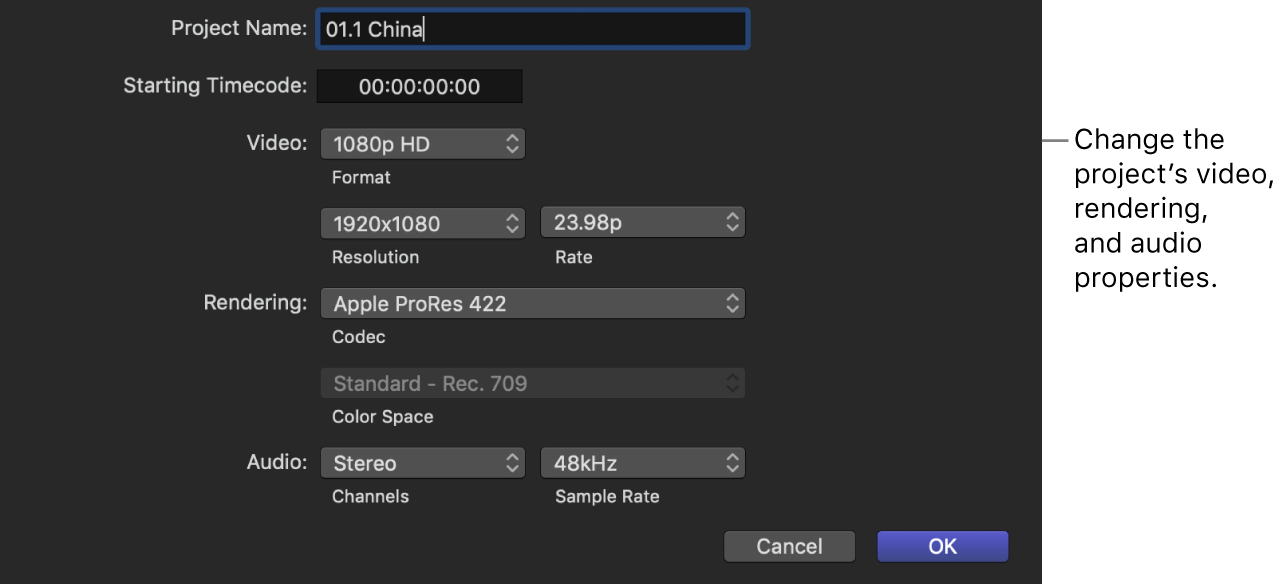
Final Cut Pro project settings
You can change almost all settings of an existing Final Cut Pro project. See Modify a project’s settings in Final Cut Pro.

Project Name
Project Name: Type a name for the project.
Starting Timecode
Starting Timecode: If you want your project’s timecode to start at a value other than 00:00:00:00, type a starting timecode value.
Video
Format: Choose the video format (a specific method of encoding the video) or an aspect ratio.
Note: If you choose 360° from the Format pop-up menu, the Projection Type pop-up menu appears. See Intro to 360° video in Final Cut Pro.
Resolution: Choose the frame size of the video. Available frame sizes are dependent on the format. To enter an arbitrary frame size, click the Format pop-up menu and choose Custom.
Rate: Choose the frames per second (fps).
Note: Unless the timeline is completely empty, you can’t change the frame rate of an existing project.
Rendering
Codec: Choose the codec to use for your project’s background rendering.
Color Space: Choose the color space for your project, including the color space of the project’s render files. The color space you choose should be the color space in which you intend to export for final delivery. When the color-processing setting in the Library Properties inspector is set to Wide Gamut HDR, wide-gamut settings appear in this menu. For standard formats, the rendering color space is chosen for you based on other settings. For example, setting the video format to NTSC SD automatically sets the color space to Standard - Rec. 601 (NTSC).
Note: This setting also determines the color space of the images sent to video scopes, the color space used to detect out-of-gamut colors, the color space of files exported using the Export File share option, and the color space of images that appear on your computer display.
Audio
Channels: Choose whether to present the audio as multichannel surround sound or as stereo.
Sample Rate: Choose the audio sample rate for your project (the number of times a signal is measured—or sampled—per second). A higher sample rate produces higher-quality audio and larger file sizes, and a lower sample rate produces lower-quality audio and smaller file sizes. The sample rate you choose depends on the source material you’re working with and the final destination of your audio.
Download this guide: Apple Books | PDF