
DeEsser 2 in MainStage
DeEsser 2 is a fast-acting dynamics compressor designed to isolate and attenuate a particular band of high frequencies in a complex audio signal. It is commonly used on vocal recordings to reduce unwanted sibilance (harsh s and t sounds) caused by the microphone positioning, the vocalist’s delivery of the performance, or compression and saturation effects.
You can use DeEsser 2 on a vocal track to reduce sibilance without affecting other frequencies on the track. DeEsser 2 attenuates the selected frequency only if it exceeds a set threshold level, preventing the sound from becoming darker when no sibilance is present. It has extremely fast attack and release response times for the shortest of transients, helping the recording retain a natural sound.
To add DeEsser 2 to your concert, choose Dynamics > DeEsser 2 in a channel strip Audio Effect plug-in menu. See Add and remove plug-ins in MainStage.
DeEsser 2 provides two operating modes—Relative and Absolute—for working with high- or low-level audio signals. Also included are two filter shapes and range parameters that you can use to define and control the affected frequency range.
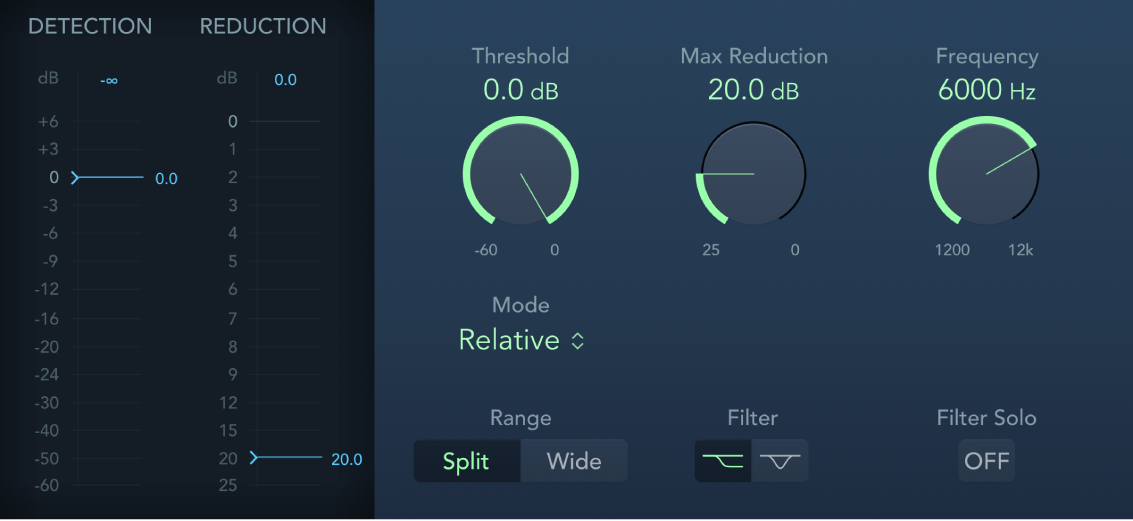
DeEsser 2 parameters
Detection meter: Shows the input signal level of the selected frequency. Behavior of the meter changes in Absolute or Relative mode. See Mode pop-up menu description.
Detection max field: The maximum level of the selected frequency is shown. Click to reset.
Detection meter slider: Drag to set the Threshold, or amplification level, above which gain reduction of the selected frequency is applied.
Reduction meter: Shows the amount of gain reduction applied.
Reduction max field: The maximum level is shown (peak hold). Click to reset.
Reduction meter slider: Drag to set the maximum amount of dynamic gain reduction applied to the selected frequency.
Threshold knob and field: Set the Threshold, or amplification level, above which gain reduction of the selected frequency is applied.
Max Reduction knob and field: Set the maximum amount of dynamic gain reduction applied to the selected frequency.
Frequency knob and field: Set the center or maximum frequency of the detection filter, depending on the chosen filter.
Mode pop-up menu: Choose Relative or Absolute mode. Relative is highly responsive and works with both high- and low-level level signals. Absolute works with high level signals, fulfilling the role of a classic de-esser.
Relative: In this mode the level of the filtered signal (determined by the Range, Frequency and Filter settings) is compared with the full bandwidth level of the incoming signal. The Threshold parameter value determines the amplification level of the filtered signal (because the level of the filtered signal will always be lower than the full bandwidth signal). When the amplified, filtered signal level is lower than the full bandwidth signal, the Detection meter shows a blue meter below the Threshold value and no processing occurs. When the amplified, filtered signal level is higher than the full bandwidth level, the Detection meter shows a yellow meter above the Threshold value and processing takes place.
Absolute: The Detection level meter shows the level of the incoming filtered signal (determined by the Range, Frequency and Filter settings). When the level surpasses the Threshold parameter value the meter display switches from blue (not processed) to yellow (processed). Low level signals can only be processed in Absolute mode if the Threshold parameter is set to a very low value.
Range buttons: Set the filter frequency range. Split affects only signals within the set frequency band. Wide affects the entire frequency range.
Filter buttons: Choose a lowpass shelving or peak filter shape. To reduce a broad range of frequencies, click the Lowpass Filter button. To reduce specific frequencies in a narrow range, click the Peak Filter button. The filter is applied before detection.
Filter Solo button: Turn on to hear the filtered signal—the split frequency band—in isolation, when Split is turned on.
Use DeEsser 2
Imagine that you need to reduce unwanted sibilance on a vocal track. The following steps outline how you might do this.
In MainStage, start playback of the incoming signal. Ideally, this should be soloed (and cycled, if a shorter phrase).
In DeEsser 2, use the Mode pop-up menu to choose a mode. The default Relative mode works for most signals.
Identify the frequency you want to attenuate. Sibilance in human voices typically occurs between 5 and 10 kHZ.
Tip: To help identify the frequency you want to attenuate, insert Channel EQ in an Audio Effect slot before the DeEsser 2 and watch the EQ Channel analyzer as the project plays.
Set the frequency you want to reduce using the Frequency knob. You can click the Filter Solo button to make the frequency easier to hear and identify.
Drag the Threshold knob to the level at which DeEsser 2 should start to apply reduction. To set a narrow frequency range, click the Split Range button. To set a broader range, click the Wide Range button.
Drag the Max Reduction knob to set how much sibilance to reduce. The Reduction meter shows how much sibilance DeEsser 2 is attenuating.
Note: Be prudent with how much reduction you apply. Sibilance is a natural part of speech and removing too much may make your vocals sound strange.