MainStage User Guide
- Welcome
-
- Overview of Edit mode
-
- Select patches and sets in the Patch List
- Copy, paste, and delete patches
- Reorder and move patches in the Patch List
- Add and rename patches
- Create a patch from several patches
-
- Overview of the Patch Settings Inspector
- Select patch settings in the Patch Library
- Set the time signature for patches
- Change the tempo when you select a patch
- Set program change and bank numbers
- Defer patch changes
- Instantly silence the previous patch
- Change patch icons
- Transpose the pitch of incoming notes for a patch
- Change the tuning for a patch
- Add text notes to a patch
-
- Overview of channel strips
- Add a channel strip
- Change a channel strip setting
- Configure channel strip components
- Show signal flow channel strips
- Hide the metronome channel strip
- Create an alias of a channel strip
- Add a patch bus
- Set channel strip pan or balance positions
- Set channel strip volume levels
- Mute and solo channel strips
- Use multiple instrument outputs
- Use external MIDI instruments
- Reorganize channel strips
- Delete channel strips
-
- Overview of the Channel Strip Inspector
- Choose channel strip settings
- Rename channel strips
- Change channel strip colors
- Change channel strip icons
- Use feedback protection with channel strips
- Set keyboard input for a software instrument channel strip
- Transpose individual software instruments
- Filter MIDI messages
- Scale channel strip velocity
- Set channel strips to ignore Hermode tuning
- Override concert- and set-level key ranges
- Add text notes to a channel strip in the Channel Strip Inspector
- Route audio via send effects
-
- Screen Control Inspector overview
- Replace parameter labels
- Choose custom colors for screen controls
- Change background or grouped screen control appearance
- Set screen controls to show the hardware value
- Set parameter change behavior for screen controls
- Set hardware matching behavior for screen controls
- Reset and compare changes to a patch
- Override concert- and set-level mappings
-
- Overview of mapping screen controls
- Map to channel strip and plug-in parameters
- Map screen controls to actions
- Map a screen control to multiple parameters
- Use screen controls to display PDF document pages
- Edit the saved value for a mapped parameter
- Set drum pads or buttons to use note velocity
- Map screen controls to all channel strips in a patch
- Undo screen control parameter mappings
- Remove screen control mappings
- Work with graphs
- Create controller transforms
- Share patches and sets between concerts
- Record the audio output of a concert
-
- Overview of concerts
- Create a concert
- Open and close concerts
- Save concerts
- How saving affects parameter values
- Clean up concerts
- Consolidate assets in a concert
- Rename the current concert
-
- Overview of the Concert Settings Inspector
- Set MIDI Routing to channel strips
- Transpose incoming note pitch for a concert
- Define the program change message source
- Send unused program changes to channel strips
- Set the time signature for a concert
- Change the tuning for a concert
- Set the pan law for a concert
- Add text notes to a concert
- Control the metronome
- Silence MIDI notes
- Mute audio output
-
- Layout mode overview
-
- Screen control parameter editing overview
- Lift and stamp screen control parameters
- Reset screen control parameters
- Common screen control parameters
- Keyboard screen control parameters
- MIDI activity screen control parameters
- Drum pad screen control parameters
- Waveform screen control parameters
- Selector screen control parameters
- Text screen control parameters
- Background screen control parameters
- How MainStage passes through MIDI messages
- Export and import layouts
- Change the aspect ratio of a layout
-
- Before performing live
- Use Perform mode
- Screen controls in performance
- Tempo changes during performance
- Tips for performing with keyboard controllers
- Tips for performing with guitars and other instruments
- Tune guitars and other instruments with the Tuner
- The Playback plug-in in performance
- Record your performances
- After the performance
- Tips for complex hardware setups
-
- Overview of keyboard shortcuts and command sets
-
- Concerts and layouts keyboard shortcuts
- Patches and sets (Edit mode) keyboard shortcuts
- Editing keyboard shortcuts
- Actions keyboard shortcuts
- Parameter mapping (Edit mode) keyboard shortcuts
- Channel strips (Edit mode) keyboard shortcuts
- Screen controls (Layout mode) keyboard shortcuts
- Perform in Full Screen keyboard shortcuts
- Window and view keyboard shortcuts
- Help and support keyboard shortcuts
-
-
- Use MIDI plug-ins
-
- Arpeggiator overview
- Arpeggiator control parameters
- Note order parameters overview
- Note order variations
- Note order inversions
- Arpeggiator pattern parameters overview
- Use Live mode
- Use Grid mode
- Arpeggiator options parameters
- Arpeggiator keyboard parameters
- Use keyboard parameters
- Assign controllers
- Modifier controls
- Note Repeater controls
- Randomizer controls
-
- Use Scripter
- Use the Script Editor
- Scripter API overview
- MIDI processing functions overview
- HandleMIDI function
- ProcessMIDI function
- GetParameter function
- SetParameter function
- ParameterChanged function
- Reset function
- JavaScript objects overview
- Use the JavaScript Event object
- Use the JavaScript TimingInfo object
- Use the Trace object
- Use the MIDI event beatPos property
- Use the JavaScript MIDI object
- Create Scripter controls
- Transposer controls
-
-
- Alchemy overview
- Alchemy interface overview
- Alchemy Name bar
- Alchemy file locations
-
- Alchemy source overview
- Source master controls
- Import browser
- Source subpage controls
- Source filter controls
- Source filter use tips
- Source elements overview
- Additive element controls
- Additive element effects
- Spectral element controls
- Spectral element effects
- Pitch correction controls
- Formant filter controls
- Granular element controls
- Sampler element controls
- VA element controls
- Wide unison mode
- Source modulations
- Morph controls
- Alchemy master voice section
- Alchemy Extended parameters
-
- Playback plug-in overview
- Add a Playback plug-in
- Playback interface
- Use the Playback waveform display
- Playback transport and function buttons
- Playback information display
- Playback Sync, Snap To, and Play From parameters
- Use the Playback group functions
- Use the Playback Action menu and File field
- Use markers with the Playback plug-in
-
- Sample Alchemy overview
- Interface overview
- Add source material
- Edit mode
- Play modes
- Source overview
- Synthesis modes
- Granular controls
- Additive effects
- Additive effect controls
- Spectral effect
- Spectral effect controls
- Filter module
- Lowpass, bandpass, and highpass filters
- Comb PM filter
- Downsampler filter
- FM filter
- Envelope generators
- Mod Matrix
- Modulation routing
- Motion mode
- Trim mode
- More menu
-
- Sculpture overview
- Sculpture interface
- Global parameters
- Amplitude envelope parameters
- Use the Waveshaper
- Filter parameters
- Output parameters
- Define MIDI controllers
- Extended parameters
-
- Studio Piano
- Copyright and trademarks
Refine the basic bass sound in Sculpture in MainStage
This section covers modifications to the basic bass sound. See Program a picked bass sound in Sculpture, Program a slap bass sound in Sculpture, and Program a fretless bass sound in Sculpture.
Sequentially follow the tasks in this section after reading Program a basic bass sound in Sculpture to learn how different components can be modeled and to gain a fuller understanding of how Sculpture parameters interact.
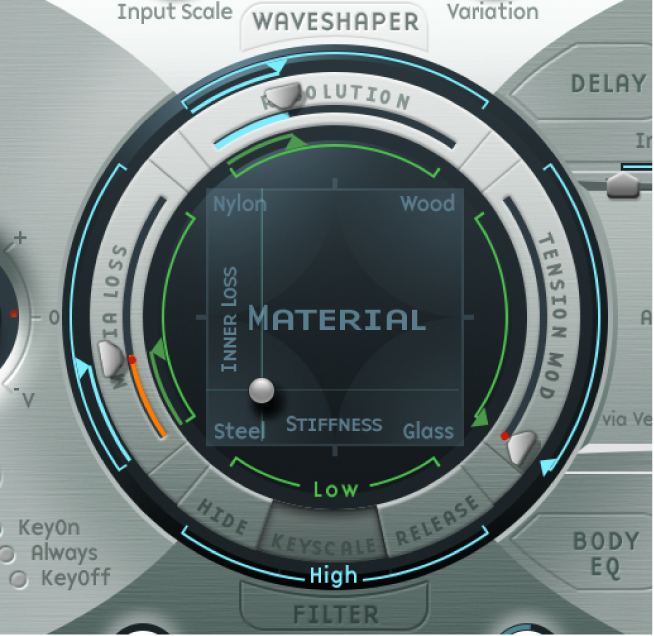
Use the Resolution parameter to control the timbre, independent of pitch in Sculpture
The Resolution parameter is normally used to set the balance between DSP load and sound quality. It can, however, also be used to shape the sound.
In MainStage, play some notes at the higher end of the bass range (around C2), then drag the Resolution slider all the way to the right and then gradually back toward the left.
You can hear how the sound loses overtones yet simultaneously becomes louder. At low Resolution values, an inharmonic metallic rattling is heard in the sound.
Increase the Resolution value until the metallic rattling disappears. Set the slider to the following position:
Play some notes in the bottom range (around E 0). You’ll note that the sound is quite muffled and vintage-like. Move the green Low Keyscale slider (found below the main Resolution slider) all the way to the right; the low range should now sound a little more wiry.
With most stringed instruments, the overtone content decreases as the pitch becomes higher. Strictly speaking, this is true only of open strings, and even then in a limited sense. If the strings are fingered, the length of the string is shortened, especially in the high register, and the effect becomes more significant.
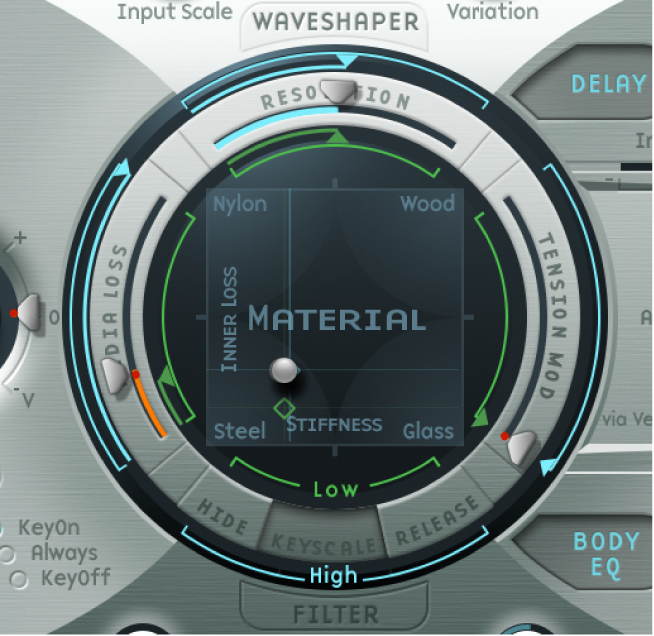
Use the Inner Loss parameter to scale the overtone content, dependent on pitch in Sculpture
In MainStage, move the Material Pad ball above the words Inner Loss. Try to move the ball solely in a vertical direction to maintain a constant Stiffness value.
Drag the green line next to the ball toward the bottom until the small green diamond is located directly above the word Steel.
When playing, you’ll recognize the smooth transition that takes place between the wiry, overtone-rich sound at the bottom end and the extremely dampened sound in the upper register. This exaggerated setting was chosen to clearly demonstrate the scaling principle in stringed instruments. To achieve an authentic sound and timbre, try the following setting:
Set sustain levels for the basic bass sound, dependent on pitch in Sculpture
In basses in particular, low notes sustain far longer than high notes. Sculpture allows you to authentically and convincingly simulate this behavior with the Media Loss parameter.
In MainStage, play a few held notes in the range around C2 and above. You’ll hear that these notes die out much too slowly. Drag the Media Loss slider up until this range begins to fade out quickly enough. The downside is that the lower notes now die out too quickly.
Drag the green Media Loss Key Scale slider down until the fade-out phase of the lower range is sufficiently long.
Compare your results with these recommended values:
You’ve now created a basic bass that’s articulated with your fingers. Save this as E-Bass Fingered Basic. You’ll be using this basic bass as a foundation for the construction of further bass sounds.
The scope for sound design, by altering the frequency spectrum of electromagnetic instruments, is far more flexible than that offered by acoustic instruments. In addition to the number of pickups, a major role is also played by the choice of amplifier, the equalization setting within the amplifier, and—last but not least—the physical properties of the speakers and their enclosing cabinet.
The central features of your electric bass sound are complete, but the sound can be improved by paying close attention to some details. Here are a few general suggestions:
Vary the position of the pickups. Try placing each of them in different positions. This cancels out certain frequencies, and others are summed together.
Try turning on the Invert switch, even though this effect is not typical for electric basses.
What is typical for bass sounds is the placement of the pickups in the outer-left third of the string model. The farther you move them to the left, the thinner and more nasal the sound becomes.
Shifting Object 1 has a similar effect. Try different combinations here as well.
Alter the frequency spectrum of your basic bass with the Body EQ in Sculpture
The Body EQ is ideal for giving the bass sound that final, finishing touch. Your electric bass sound could be a little less smooth, and a bit more precise in its attack phase. Bassists like to use the terms drier and more bite to describe this phenomenon.
In MainStage, load the E-Bass Fingered Basic setting.
Choose the standard Lo Mid Hi model from the Model pop-up menu in the Body EQ section.
Reduce the low bass frequencies by setting the Low knob to a value of −0.30.
Boost the mid-range frequencies substantially by setting the Mid knob to a value of 0.50. Drag the Mid Frequency slider to a value of 0.26.
You’ll probably find that the boosting of the low mid frequencies is a little too strong at this point, so return the Mid value to 0.30.
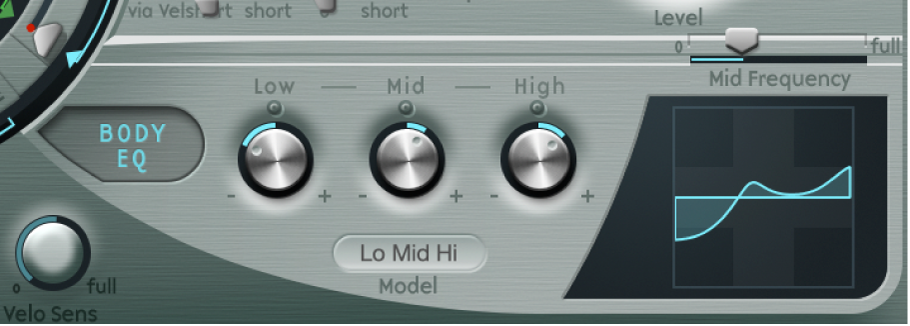
The sound could stand to be a little more wiry, so set the High knob to a value of 0.30.
To finish off, set the Level knob (to the right of the amplitude envelope) to a value of −3 dB.
The sound is now as loud as possible, without the low notes distorting.
Save this sound setting as E-Bass Fingered Basic EQ1.