MainStage User Guide
- Welcome
-
- Overview of Edit mode
-
- Select patches and sets in the Patch List
- Copy, paste, and delete patches
- Reorder and move patches in the Patch List
- Add and rename patches
- Create a patch from several patches
-
- Overview of the Patch Settings Inspector
- Select patch settings in the Patch Library
- Set the time signature for patches
- Change the tempo when you select a patch
- Set program change and bank numbers
- Defer patch changes
- Instantly silence the previous patch
- Change patch icons
- Transpose the pitch of incoming notes for a patch
- Change the tuning for a patch
- Add text notes to a patch
-
- Overview of channel strips
- Add a channel strip
- Change a channel strip setting
- Configure channel strip components
- Show signal flow channel strips
- Hide the metronome channel strip
- Create an alias of a channel strip
- Add a patch bus
- Set channel strip pan or balance positions
- Set channel strip volume levels
- Mute and solo channel strips
- Use multiple instrument outputs
- Use external MIDI instruments
- Reorganize channel strips
- Delete channel strips
-
- Overview of the Channel Strip Inspector
- Choose channel strip settings
- Rename channel strips
- Change channel strip colors
- Change channel strip icons
- Use feedback protection with channel strips
- Set keyboard input for a software instrument channel strip
- Transpose individual software instruments
- Filter MIDI messages
- Scale channel strip velocity
- Set channel strips to ignore Hermode tuning
- Override concert- and set-level key ranges
- Add text notes to a channel strip in the Channel Strip Inspector
- Route audio via send effects
-
- Screen Control Inspector overview
- Replace parameter labels
- Choose custom colors for screen controls
- Change background or grouped screen control appearance
- Set screen controls to show the hardware value
- Set parameter change behavior for screen controls
- Set hardware matching behavior for screen controls
- Reset and compare changes to a patch
- Override concert- and set-level mappings
-
- Overview of mapping screen controls
- Map to channel strip and plug-in parameters
- Map screen controls to actions
- Map a screen control to multiple parameters
- Use screen controls to display PDF document pages
- Edit the saved value for a mapped parameter
- Set drum pads or buttons to use note velocity
- Map screen controls to all channel strips in a patch
- Undo screen control parameter mappings
- Remove screen control mappings
- Work with graphs
- Create controller transforms
- Share patches and sets between concerts
- Record the audio output of a concert
-
- Overview of concerts
- Create a concert
- Open and close concerts
- Save concerts
- How saving affects parameter values
- Clean up concerts
- Consolidate assets in a concert
- Rename the current concert
-
- Overview of the Concert Settings Inspector
- Set MIDI Routing to channel strips
- Transpose incoming note pitch for a concert
- Define the program change message source
- Send unused program changes to channel strips
- Set the time signature for a concert
- Change the tuning for a concert
- Set the pan law for a concert
- Add text notes to a concert
- Control the metronome
- Silence MIDI notes
- Mute audio output
-
- Layout mode overview
-
- Screen control parameter editing overview
- Lift and stamp screen control parameters
- Reset screen control parameters
- Common screen control parameters
- Keyboard screen control parameters
- MIDI activity screen control parameters
- Drum pad screen control parameters
- Waveform screen control parameters
- Selector screen control parameters
- Text screen control parameters
- Background screen control parameters
- How MainStage passes through MIDI messages
- Export and import layouts
- Change the aspect ratio of a layout
-
- Before performing live
- Use Perform mode
- Screen controls in performance
- Tempo changes during performance
- Tips for performing with keyboard controllers
- Tips for performing with guitars and other instruments
- Tune guitars and other instruments with the Tuner
- The Playback plug-in in performance
- Record your performances
- After the performance
- Tips for complex hardware setups
-
- Overview of keyboard shortcuts and command sets
-
- Concerts and layouts keyboard shortcuts
- Patches and sets (Edit mode) keyboard shortcuts
- Editing keyboard shortcuts
- Actions keyboard shortcuts
- Parameter mapping (Edit mode) keyboard shortcuts
- Channel strips (Edit mode) keyboard shortcuts
- Screen controls (Layout mode) keyboard shortcuts
- Perform in Full Screen keyboard shortcuts
- Window and view keyboard shortcuts
- Help and support keyboard shortcuts
-
-
- Use MIDI plug-ins
-
- Arpeggiator overview
- Arpeggiator control parameters
- Note order parameters overview
- Note order variations
- Note order inversions
- Arpeggiator pattern parameters overview
- Use Live mode
- Use Grid mode
- Arpeggiator options parameters
- Arpeggiator keyboard parameters
- Use keyboard parameters
- Assign controllers
- Modifier controls
- Note Repeater controls
- Randomizer controls
-
- Use Scripter
- Use the Script Editor
- Scripter API overview
- MIDI processing functions overview
- HandleMIDI function
- ProcessMIDI function
- GetParameter function
- SetParameter function
- ParameterChanged function
- Reset function
- JavaScript objects overview
- Use the JavaScript Event object
- Use the JavaScript TimingInfo object
- Use the Trace object
- Use the MIDI event beatPos property
- Use the JavaScript MIDI object
- Create Scripter controls
- Transposer controls
-
-
- Alchemy overview
- Alchemy interface overview
- Alchemy Name bar
- Alchemy file locations
-
- Alchemy source overview
- Source master controls
- Import browser
- Source subpage controls
- Source filter controls
- Source filter use tips
- Source elements overview
- Additive element controls
- Additive element effects
- Spectral element controls
- Spectral element effects
- Pitch correction controls
- Formant filter controls
- Granular element controls
- Sampler element controls
- VA element controls
- Wide unison mode
- Source modulations
- Morph controls
- Alchemy master voice section
- Alchemy Extended parameters
-
- Playback plug-in overview
- Add a Playback plug-in
- Playback interface
- Use the Playback waveform display
- Playback transport and function buttons
- Playback information display
- Playback Sync, Snap To, and Play From parameters
- Use the Playback group functions
- Use the Playback Action menu and File field
- Use markers with the Playback plug-in
-
- Sample Alchemy overview
- Interface overview
- Add source material
- Edit mode
- Play modes
- Source overview
- Synthesis modes
- Granular controls
- Additive effects
- Additive effect controls
- Spectral effect
- Spectral effect controls
- Filter module
- Lowpass, bandpass, and highpass filters
- Comb PM filter
- Downsampler filter
- FM filter
- Envelope generators
- Mod Matrix
- Modulation routing
- Motion mode
- Trim mode
- More menu
-
- Sculpture overview
- Sculpture interface
- Global parameters
- Amplitude envelope parameters
- Use the Waveshaper
- Filter parameters
- Output parameters
- Define MIDI controllers
- Extended parameters
-
- Studio Piano
- Copyright and trademarks
Use impulse responses in MainStage
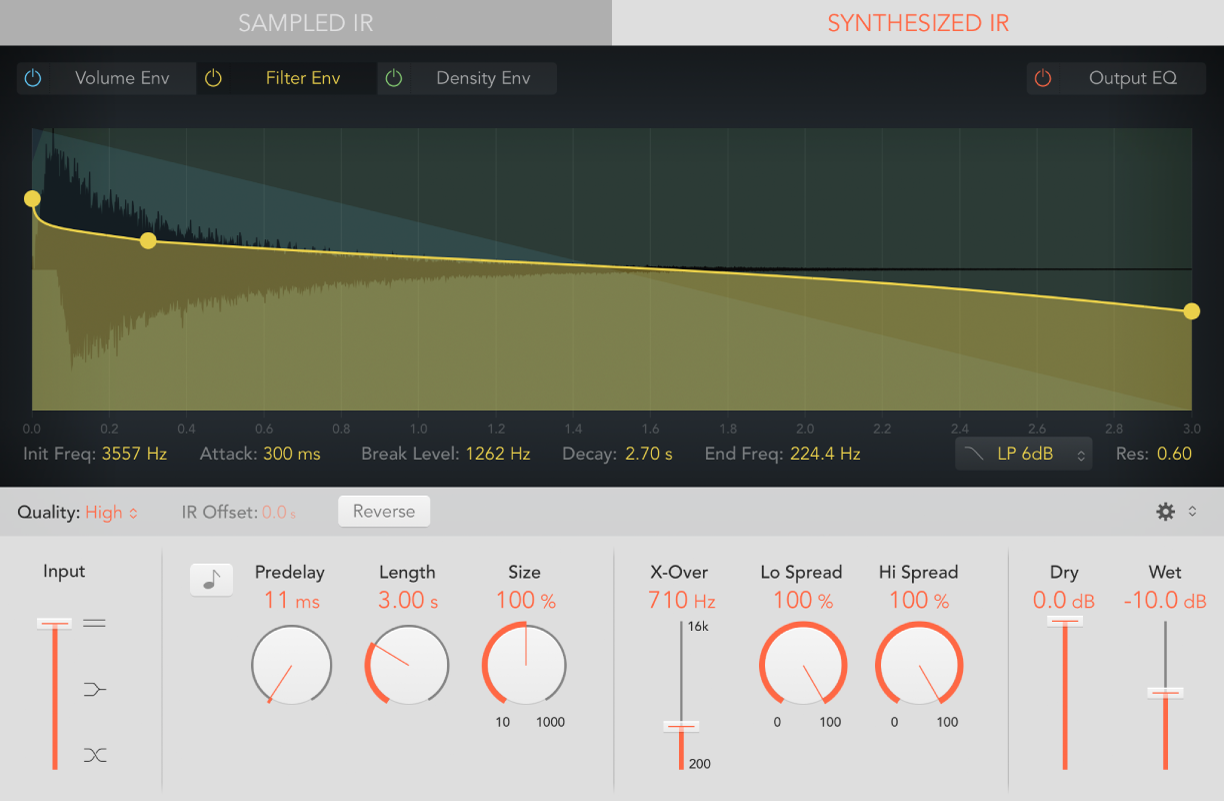
Space Designer can use either recorded impulse response files or synthesized impulse responses. The Sampled IR and Synthesized IR buttons choose the impulse response mode.
Important: To convolve audio in real time, Space Designer must first calculate any parameter adjustments to the impulse response. This requires a moment or two following parameter edits and is indicated by waveform changes in the main display.
Impulse response parameters
Sampled IR button: Turn on Sampled IR mode. In this mode, an impulse response sample is used to generate reverberation.
Synthesized IR button: Turn on Synthesized IR mode. A new synthesized impulse response is generated, derived from the values of the Length, Envelope, Filter, EQ, and Spread parameters.
IR Sample pop-up menu: Shows the name of the loaded impulse response. Click to choose an IR sample command. Also see Space Designer global parameters.
Load IR: Loads an impulse response sample without changing the envelopes.
Load IR & Init: Loads an impulse response sample and initializes all envelopes.
Show in Finder: Opens a Finder window that shows the location of the current impulse response.
Open IR Utility: Opens the Impulse Response Utility window. This application lets you create your own impulse response files.
IR Format display: Shows the channel format of the loaded sample-based impulse response.
Several related parameters are shown below the main display.
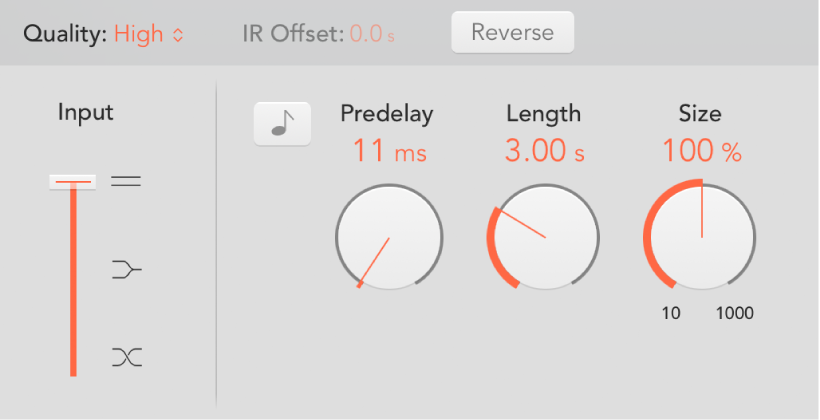
Quality pop-up menu: Choose the sample rate. Lo-Fi produces a grainy reverb. Low halves the host application sample rate. Medium matches the host application sample rate. High is smooth and clean sounding.
Reverse button: Reverse the impulse response and envelopes. When the impulse response is reversed, you are effectively using the tail rather than the front end of the sample. You may need to adjust the Predelay and other parameter values when reversing. See Space Designer global parameters.
Length knob and field: Adjust the length of the impulse response. This control works in conjunction with the Size knob.
Size knob and field: Adjust the sample rate of the loaded impulse response file, thereby changing the perceived size of the reverb by widening or narrowing the room. Size can also be used to preserve the original length of the impulse response when changing the sample rate with the Quality pop-up menu.
The Size knob value has an impact on the decay because it is multiplied with the Length knob value. To explain, when you rotate the Length knob to its maximum value and use a Size knob value of 100%, this results in a decay that is the full length of the loaded impulse response.
Use Sampled IR mode
In Sampled IR mode, Space Designer loads and uses an impulse response recording of an acoustic environment. This is convolved with the incoming audio signal to place it in the acoustic space provided by the impulse response.

In MainStage, click the Sampled IR button above the main display.
Click the Sample IR pop-up menu and choose Load IR.
Choose an impulse response file from any folder.
Manage the loaded impulse response file
In MainStage, click the IR Sample pop-up menu to use any of the following commands:
Load IR: Loads an impulse response sample without changing the envelopes.
Load IR & Init: Loads an impulse response sample and initializes the envelopes.
Show in Finder: Opens a Finder window that shows the location of the current impulse response.
Open IR Utility: Opens the Impulse Response Utility window.
This application lets you create your own impulse response files. It provides recording, editing, and processing facilities designed specifically for this task. See Impulse Response Utility Help in the Impulse Response Utility application for details.
All supplied impulse responses are installed in the /Library/Audio/Impulse Responses/Apple folder. Deconvolution files have an .sdir file extension.
Any mono or stereo AIFF or WAVE file can be used as an impulse response. In addition, surround formats up to 7.1, discrete audio files, and B-format audio files that consist of a single surround impulse response can be used.
Use Synthesized IR mode
In Synthesized IR mode, Space Designer generates a synthesized impulse response based on the values of parameters such as Length, Filter, Spread, and various envelope values.
Note: You can switch between a loaded impulse response sample and a synthesized impulse response without losing the settings of the other.

In MainStage, click the Synthesized IR button above the main display.
Repeated clicks of the Synthesized IR button randomly generate new impulse responses with slightly different reflection patterns. The current impulse response state is saved with the setting file, including parameter and other values that represent the IR reflection patterns and characteristics.
Note: Click the Synthesized IR button while you’re in Sampled IR mode to switch to the synthesized impulse response stored with the setting.
Set the impulse response sample rate and preserve length
Changing the sample rate upward increases—or changing it downward decreases—the frequency response (and length) of the impulse response, and to a degree the overall sound quality of the reverb. Upward sample rate changes are of benefit only if the original impulse response sample actually contains higher frequencies. When reducing the sample rate, use your ears to decide if the sonic quality meets your needs.
Note: Natural room surfaces—except concrete and tiles—tend to have minimal reflections in higher frequency ranges, making half-rate and full-rate impulse responses sound almost identical.
In MainStage, choose one of the following from the Quality pop-up menu to set the sample rate of an impulse response:
Lo-Fi: This setting divides the sample rate by four. If the project sample rate is 96 kHz, the impulse response sample rate is converted to 24 kHz. If the project sample rate is 44.1 kHz, the impulse response sample rate is converted to 11.025 kHz, and so on.
Low: This setting effectively halves the sample rate. If the project sample rate is 96 kHz, the impulse response sample rate is converted to 48 kHz. If the project sample rate is 44.1 kHz, the impulse response sample rate is converted to 22.05 kHz, and so on.
When you select a half sample rate, the impulse response becomes twice as long. The highest frequency that can be reverberated is halved. This results in a behavior that is much like doubling every dimension of a virtual room—multiplying the volume of a room by eight. The Low (and Lo-Fi) setting can also be used for interesting tempo, pitch, and retro digital effects. Another benefit of reducing the sample rate is that processing requirements drop significantly, making the lower quality settings useful for large, open spaces.
This behavior also applies when you choose Lo-Fi, but the sample rate is divided by four and the impulse response is multiplied in length four times.
Medium: Space Designer uses the current project sample rate. The sample rate of a loaded impulse response is automatically converted to match the current project sample rate, if necessary. For example, this allows you to load a 44.1 kHz impulse response into a project running at 96 kHz, and vice versa.
High: Space Designer uses the highest possible sample rate.
To retain the original length of the impulse response when the sample rate is changed: Adjust the Size knob value. Using this parameter with your Quality pop-up menu choice can lead to interesting results.
If you’re running Space Designer in a project that uses a higher sample rate than the impulse response, you may also want to reduce the impulse response sample rate. Adjust the Size knob value to reduce CPU processing time without compromising reverb quality.
Tip: You can make similar adjustments while running in Synthesized IR mode. Most typical reverb sounds don’t contain an excessive amount of high frequency content. If your project is running at 96 kHz, for example, you would need to use lowpass filtering to obtain the mellow frequency response characteristics of many reverb sounds. A better approach would be to first reduce the high frequencies by choosing a lower rate from the Quality pop-up menu, followed by using the lowpass filter, thus conserving significant CPU resources. It is also worth noting that longer impulse responses (sampled or synthesized) place a higher strain on the CPU.
Set impulse response lengths
In MainStage, rotate the Length knob to set the length of the impulse response—sampled or synthesized.
The Length knob setting changes the decay value, depending on the current Size knob value. To clarify, a maximum Length value and a Size value of 100% result in a decay that is the full length of the loaded impulse response.
All envelopes are automatically calculated as a percentage of the overall length. Changes to the Length or Size parameter values result in envelope curves stretching or shrinking to fit the new impulse response length.
Note: When you’re using a sampled impulse response file, the combined Length (and Size) parameter values cannot exceed the length of the underlying impulse response sample.