MainStage User Guide
- Welcome
-
- Overview of Edit mode
-
- Select patches and sets in the Patch List
- Copy, paste, and delete patches
- Reorder and move patches in the Patch List
- Add and rename patches
- Create a patch from several patches
-
- Overview of the Patch Settings Inspector
- Select patch settings in the Patch Library
- Set the time signature for patches
- Change the tempo when you select a patch
- Set program change and bank numbers
- Defer patch changes
- Instantly silence the previous patch
- Change patch icons
- Transpose the pitch of incoming notes for a patch
- Change the tuning for a patch
- Add text notes to a patch
-
- Overview of channel strips
- Add a channel strip
- Change a channel strip setting
- Configure channel strip components
- Show signal flow channel strips
- Hide the metronome channel strip
- Create an alias of a channel strip
- Add a patch bus
- Set channel strip pan or balance positions
- Set channel strip volume levels
- Mute and solo channel strips
- Use multiple instrument outputs
- Use external MIDI instruments
- Reorganize channel strips
- Delete channel strips
-
- Overview of the Channel Strip Inspector
- Choose channel strip settings
- Rename channel strips
- Change channel strip colors
- Change channel strip icons
- Use feedback protection with channel strips
- Set keyboard input for a software instrument channel strip
- Transpose individual software instruments
- Filter MIDI messages
- Scale channel strip velocity
- Set channel strips to ignore Hermode tuning
- Override concert- and set-level key ranges
- Add text notes to a channel strip in the Channel Strip Inspector
- Route audio via send effects
-
- Screen Control Inspector overview
- Replace parameter labels
- Choose custom colors for screen controls
- Change background or grouped screen control appearance
- Set screen controls to show the hardware value
- Set parameter change behavior for screen controls
- Set hardware matching behavior for screen controls
- Reset and compare changes to a patch
- Override concert- and set-level mappings
-
- Overview of mapping screen controls
- Map to channel strip and plug-in parameters
- Map screen controls to actions
- Map a screen control to multiple parameters
- Use screen controls to display PDF document pages
- Edit the saved value for a mapped parameter
- Set drum pads or buttons to use note velocity
- Map screen controls to all channel strips in a patch
- Undo screen control parameter mappings
- Remove screen control mappings
- Work with graphs
- Create controller transforms
- Share patches and sets between concerts
- Record the audio output of a concert
-
- Overview of concerts
- Create a concert
- Open and close concerts
- Save concerts
- How saving affects parameter values
- Clean up concerts
- Consolidate assets in a concert
- Rename the current concert
-
- Overview of the Concert Settings Inspector
- Set MIDI Routing to channel strips
- Transpose incoming note pitch for a concert
- Define the program change message source
- Send unused program changes to channel strips
- Set the time signature for a concert
- Change the tuning for a concert
- Set the pan law for a concert
- Add text notes to a concert
- Control the metronome
- Silence MIDI notes
- Mute audio output
-
- Layout mode overview
-
- Screen control parameter editing overview
- Lift and stamp screen control parameters
- Reset screen control parameters
- Common screen control parameters
- Keyboard screen control parameters
- MIDI activity screen control parameters
- Drum pad screen control parameters
- Waveform screen control parameters
- Selector screen control parameters
- Text screen control parameters
- Background screen control parameters
- How MainStage passes through MIDI messages
- Export and import layouts
- Change the aspect ratio of a layout
-
- Before performing live
- Use Perform mode
- Screen controls in performance
- Tempo changes during performance
- Tips for performing with keyboard controllers
- Tips for performing with guitars and other instruments
- Tune guitars and other instruments with the Tuner
- The Playback plug-in in performance
- Record your performances
- After the performance
- Tips for complex hardware setups
-
- Overview of keyboard shortcuts and command sets
-
- Concerts and layouts keyboard shortcuts
- Patches and sets (Edit mode) keyboard shortcuts
- Editing keyboard shortcuts
- Actions keyboard shortcuts
- Parameter mapping (Edit mode) keyboard shortcuts
- Channel strips (Edit mode) keyboard shortcuts
- Screen controls (Layout mode) keyboard shortcuts
- Perform in Full Screen keyboard shortcuts
- Window and view keyboard shortcuts
- Help and support keyboard shortcuts
-
-
- Use MIDI plug-ins
-
- Arpeggiator overview
- Arpeggiator control parameters
- Note order parameters overview
- Note order variations
- Note order inversions
- Arpeggiator pattern parameters overview
- Use Live mode
- Use Grid mode
- Arpeggiator options parameters
- Arpeggiator keyboard parameters
- Use keyboard parameters
- Assign controllers
- Modifier controls
- Note Repeater controls
- Randomizer controls
-
- Use Scripter
- Use the Script Editor
- Scripter API overview
- MIDI processing functions overview
- HandleMIDI function
- ProcessMIDI function
- GetParameter function
- SetParameter function
- ParameterChanged function
- Reset function
- JavaScript objects overview
- Use the JavaScript Event object
- Use the JavaScript TimingInfo object
- Use the Trace object
- Use the MIDI event beatPos property
- Use the JavaScript MIDI object
- Create Scripter controls
- Transposer controls
-
-
- Alchemy overview
- Alchemy interface overview
- Alchemy Name bar
- Alchemy file locations
-
- Alchemy source overview
- Source master controls
- Import browser
- Source subpage controls
- Source filter controls
- Source filter use tips
- Source elements overview
- Additive element controls
- Additive element effects
- Spectral element controls
- Spectral element effects
- Pitch correction controls
- Formant filter controls
- Granular element controls
- Sampler element controls
- VA element controls
- Wide unison mode
- Source modulations
- Morph controls
- Alchemy master voice section
- Alchemy Extended parameters
-
- Playback plug-in overview
- Add a Playback plug-in
- Playback interface
- Use the Playback waveform display
- Playback transport and function buttons
- Playback information display
- Playback Sync, Snap To, and Play From parameters
- Use the Playback group functions
- Use the Playback Action menu and File field
- Use markers with the Playback plug-in
-
- Sample Alchemy overview
- Interface overview
- Add source material
- Edit mode
- Play modes
- Source overview
- Synthesis modes
- Granular controls
- Additive effects
- Additive effect controls
- Spectral effect
- Spectral effect controls
- Filter module
- Lowpass, bandpass, and highpass filters
- Comb PM filter
- Downsampler filter
- FM filter
- Envelope generators
- Mod Matrix
- Modulation routing
- Motion mode
- Trim mode
- More menu
-
- Sculpture overview
- Sculpture interface
- Global parameters
- Amplitude envelope parameters
- Use the Waveshaper
- Filter parameters
- Output parameters
- Define MIDI controllers
- Extended parameters
-
- Studio Piano
- Copyright and trademarks
Manage articulations with the MainStage Articulation Set Editor
The Articulation Set Editor consists of three panes: Articulations, Switches, and Output.
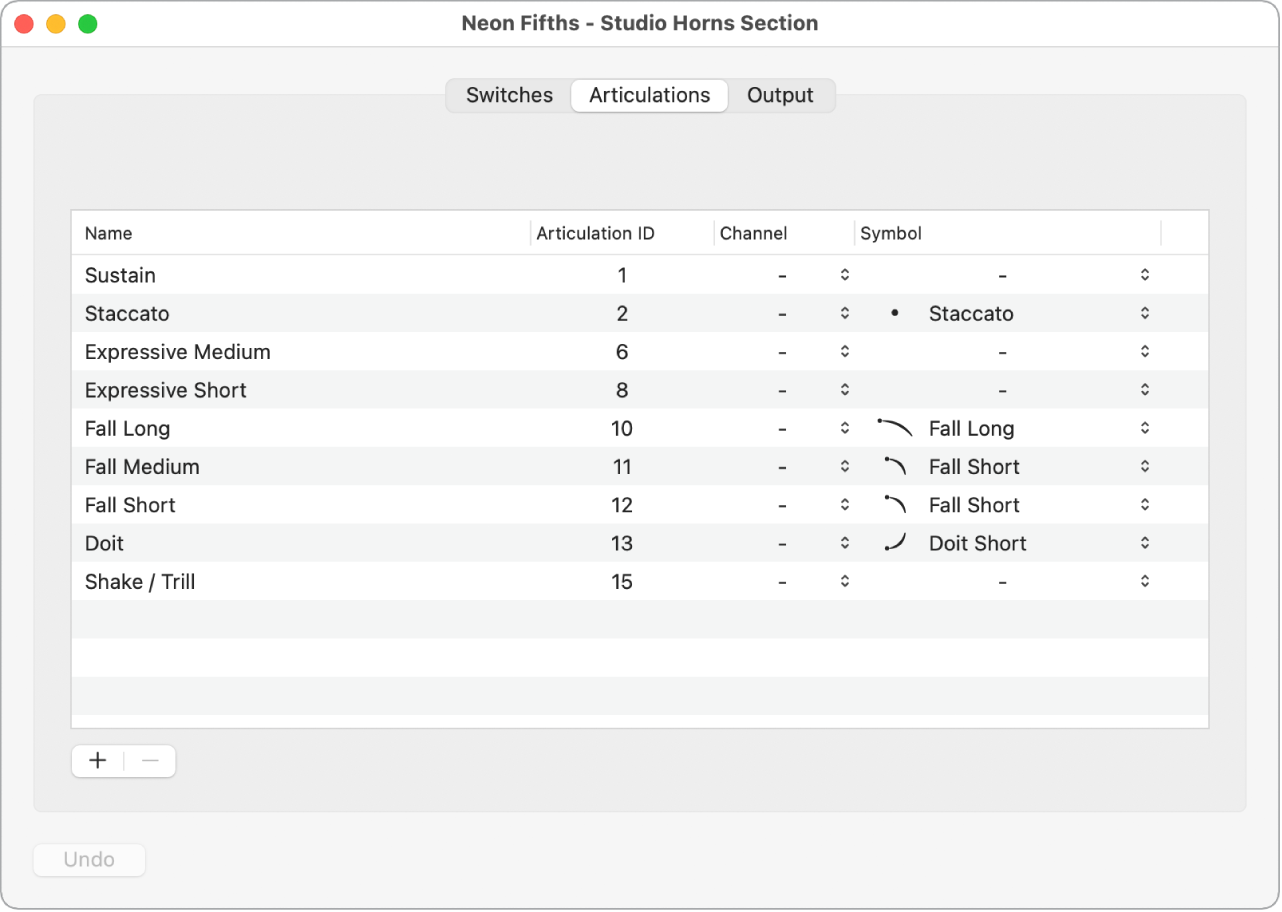
The Articulations pane
The Articulations pane is where you can define specific articulations, including their names and IDs. The articulations defined here populate the articulation menus in the plug-in header and the various editors.
You can set articulations to be triggered by MIDI channel rather than an articulation ID. This can be useful for instruments whose MIDI channels are used to control additional properties.
The Articulations pane contains a table showing the following parameters:
Name field: Type a name for your articulation in this field.
Articulation ID field: Type a number to be the Articulation ID for your articulation. For Sampler based instruments that use the articulation ID for group selection, choose the corresponding articulation ID. For any other instruments, an output transformation needs to be defined on the output page (converting the articulations back into keyswitches), and the IDs can be arbitrary.
Channel pop-up menu: Choose a MIDI channel for the articulation, or choose “-” for all MIDI channels.
Symbol pop-up menu: Choose a notation symbol to represent the articulation in the Score Editor.
Revert button: Reverts any changes done to the articulations to their saved state.
Plus and minus buttons: Use these buttons to create and remove articulations.
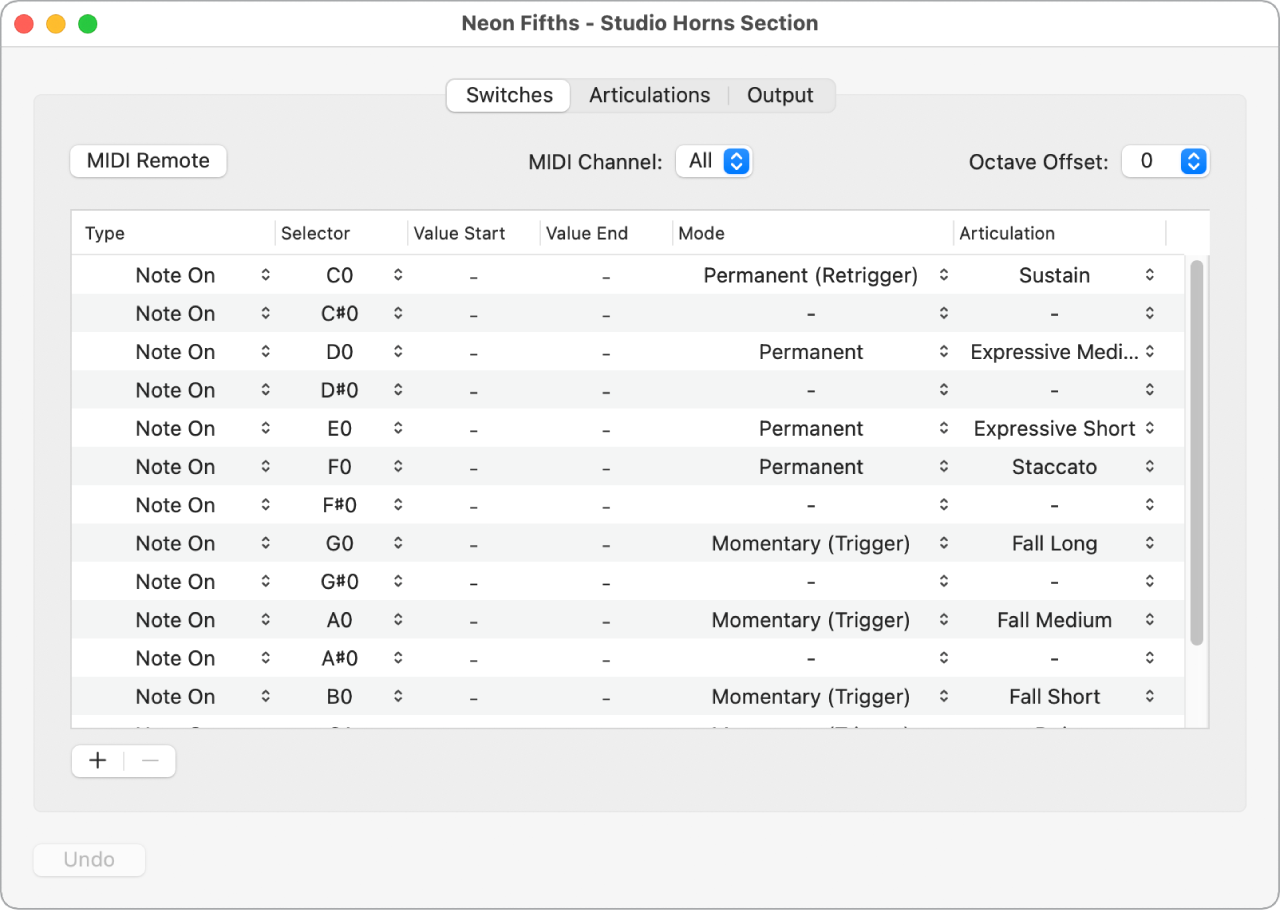
The Switches pane
The Switches pane is where you create and customize keyswitches and controller switch assignments for each articulation. You can determine the type of MIDI message to use for switches, what values within that MIDI message to use, and you can specify the articulation behavior when the switch is triggered.
It includes the following controls:
MIDI Remote button: This button has to be active for your articulation switches to respond to the defined MIDI messages. If MIDI Remote is off, you cannot control your articulation switches remotely with your attached MIDI device. For example, you might want to turn off MIDI Remote if you want to play an instrument live using the full keyboard range without risking an accidental switch between articulations.
MIDI Channel pop-up menu: Sets a specific MIDI channel for all your keyswitches. This is useful if you have a dedicated keyboard for keyswitches or you want to limit your keyswitches to a particular MIDI channel.
Octave Offset pop-up menu: Sets an offset for the octave used for keyswitches. You can set an offset of up to plus or minus ten octaves. This can be useful in particular for bass instruments; keyswitches are often set to very low octaves, with bass instruments you may want to move the keyswitches to higher octaves and leave the lower octaves free for playing.
These three controls can be set locally in the Switches pane, or globally to affect how all instruments with articulations behave. To determine if these settings are local or global, see MIDI settings in MainStage.
Below the controls is a table showing each articulation, along with the following parameters:
Type pop-up menu: Chooses the specific type of MIDI message used to activate the articulation. Note On is the standard MIDI message used to trigger articulations, but Note Off, Poly Aftertouch (polyphonic aftertouch), Controller, Program (program change), Aftertouch (monophonic aftertouch), and Pitch Bend are also supported.
Selector pop-up menu: Determines which specific value of the MIDI message chosen in the Type column triggers the articulation. For example, if you chose Note On in the Type column, here is where you would choose the specific note for the keyswitch. If you chose Controller in the Type column, you would choose the specific controller number. If you choose Program, Aftertouch, or Pitch Bend in the Type column, there will be no Selector value.
Value Start slider: Defines the low end of the range for the controller switches. For Note On/Off messages, this relates to velocity values.
Value End slider: Defines the high end of the range for the controller switches. For Note On/Off messages, this relates to velocity values.
Mode pop-up menu: Selects between different switch modes. These different switch modes exist in order to support both variations in your playing style and special articulation features.
Permanent: Switches to the selected articulation, which then is used for all subsequent notes until another articulation is selected. This is useful for the main (standard) articulations such as Sustain, Staccato, and other common playing techniques.
Permanent (Retrigger): Stops the currently sounding note and retriggers it immediately with the newly selected articulation. The new articulation is used for all the following notes until another articulation is selected.
Permanent (Trigger): Immediately applies the newly selected articulation to the currently playing note. As soon as the switch is disengaged, all notes are stopped. This is useful to trigger falls, doits, and so on, at the end of a musical phrase.
Momentary: Activates the keyswitch only while the switch is within its defined Value range. For Note On or Note Off articulations this means the articulation switches only while the key is depressed or released respectively; for controllers the articulation is selected as long as the value is within the value start and end range. This is useful for articulations you only want to use for one note or a very short passage such as growls, trills, and so on.
Momentary (Retrigger): Stops the current note and retriggers it immediately with the selected articulation while the switch is within its defined Value range. For Note On or Note Off articulations this means the articulation switches only while the key is depressed or released respectively; for controllers the articulation is selected as long as the value is within the value start and end range.
Momentary (Trigger): Immediately applies the newly selected articulation to the currently playing note while the switch is within its defined Value range. As soon as the switch is disengaged all notes are stopped. This is useful to trigger falls, doits, and so on, at the end of a musical phrase.
Toggle: Activates the selected articulation when the switch is engaged. When the switch is engaged again it reactivates the previous articulation. This is useful when you want to toggle between two articulations, such as sustained notes and palm muting.
Toggle (Retrigger): Stops the currently sounding note and retriggers it immediately with the newly selected articulation. When the switch is engaged again it reactivates the previous articulation.
Toggle (Trigger): Immediately applies the newly selected articulation to the currently playing note. As soon as the switch is disengaged all notes are stopped. This is useful to trigger falls, doits, and so on, at the end of a musical phrase.
Articulation pop-up menu: Choose the articulation for the switch. You can use the same articulation multiple times, each triggered by a different type or selector, and with different value ranges.
Revert button: Reverts any changes made to the switches to their saved state.
Plus and minus buttons: Use these buttons to create and remove the selected switch.
The Output pane
For instruments that don’t support the use of articulation IDs directly, you can use the Output pane to define how articulations are accessed in your particular instrument. Output articulations are mostly keyswitches. Some third-party sampler instruments also use controllers as switches.
Working in the Output pane, you can define output triggers for articulations, which means that you can use triggers with third-party libraries for which pre-configured Articulation Sets do not already exist. Because the output triggers are independent of the switches, they can be used to create setups with consistent switches across different libraries.
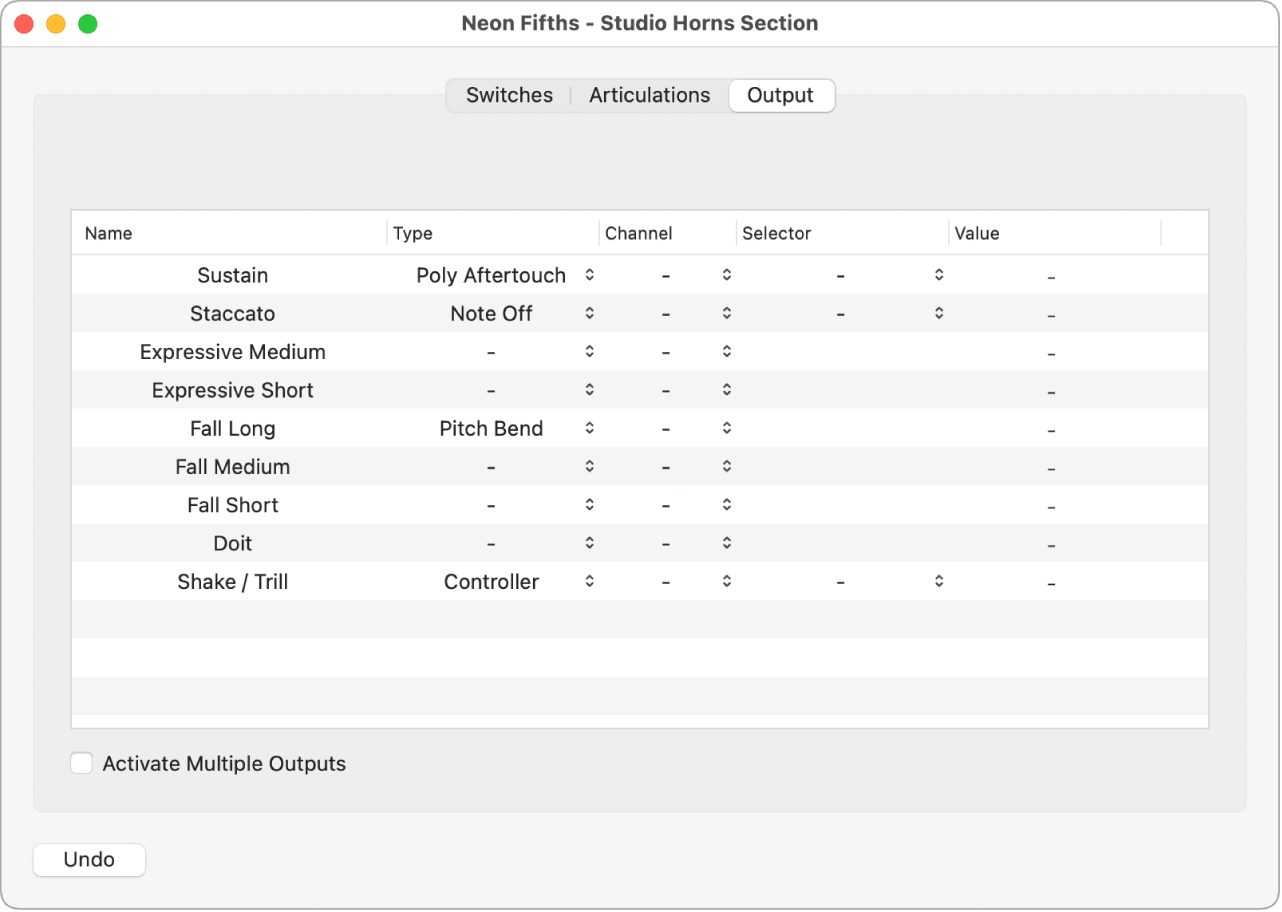
The Output pane consists of a table showing each articulation, along with the following parameters:
Name field: Displays the name of the articulation.
Type pop-up menu: Choose the specific type of MIDI message that is used to activate the articulation. Note On is the standard MIDI message used to trigger articulations, but Note Off, Poly Aftertouch (polyphonic aftertouch), Controller, Program (program change), Aftertouch (monophonic aftertouch), and Pitch Bend are also supported.
Channel pop-up menu: Choose a MIDI channel for the articulation, or choose “-” for all MIDI channels. This is useful when third-party sample libraries use specific MIDI channels for articulations.
Selector pop-up menu: Determines which specific value of the MIDI message chosen in the Type column triggers the articulation. For example, if you chose Note On in the Type column, here is where you would choose the specific note for the keyswitch. If you chose Controller in the Type column, you would choose the specific controller number.
Value Start slider: Defines the low end of the range for the controller switches.
Value End slider: Defines the high end of the range for the controller switches.
Activate Multiple Outputs checkbox: Define up to three MIDI messages that can be sent to an instrument in order to activate an articulation. This may be necessary for instruments that require, for example, one MIDI message to chose a category and another MIDI message to choose an articulation within within that category.
Revert button: Reverts any changes made to the output assignments to their saved state.
Choose an Articulation Set
In the Layer Editor tab of the MainStage Instrument Channel Strip Inspector, choose an Articulation Set from the Articulation Set pop-up menu.
Open the Articulation Set Editor
In the Layer Editor tab of the MainStage Instrument Channel Strip Inspector, choose Edit from the Articulation Set pop-up menu.
Create a new articulation
In the MainStage Articulations pane, click the “+” button at the bottom left of the Articulation Set Editor window.
Remove an articulation
In the MainStage Articulations pane, select an articulation and click the “-” button at the bottom left of the Articulation Set Editor window.
Revert to a previously saved version of articulations
Click the Revert button at the bottom left of the MainStage Articulation Set Editor window.