MainStage User Guide
- Welcome
-
- Overview of Edit mode
-
- Select patches and sets in the Patch List
- Copy, paste, and delete patches
- Reorder and move patches in the Patch List
- Add and rename patches
- Create a patch from several patches
-
- Overview of the Patch Settings Inspector
- Select patch settings in the Patch Library
- Set the time signature for patches
- Change the tempo when you select a patch
- Set program change and bank numbers
- Defer patch changes
- Instantly silence the previous patch
- Change patch icons
- Transpose the pitch of incoming notes for a patch
- Change the tuning for a patch
- Add text notes to a patch
-
- Overview of channel strips
- Add a channel strip
- Change a channel strip setting
- Configure channel strip components
- Show signal flow channel strips
- Hide the metronome channel strip
- Create an alias of a channel strip
- Add a patch bus
- Set channel strip pan or balance positions
- Set channel strip volume levels
- Mute and solo channel strips
- Use multiple instrument outputs
- Use external MIDI instruments
- Reorganize channel strips
- Delete channel strips
-
- Overview of the Channel Strip Inspector
- Choose channel strip settings
- Rename channel strips
- Change channel strip colors
- Change channel strip icons
- Use feedback protection with channel strips
- Set keyboard input for a software instrument channel strip
- Transpose individual software instruments
- Filter MIDI messages
- Scale channel strip velocity
- Set channel strips to ignore Hermode tuning
- Override concert- and set-level key ranges
- Add text notes to a channel strip in the Channel Strip Inspector
- Route audio via send effects
-
- Screen Control Inspector overview
- Replace parameter labels
- Choose custom colors for screen controls
- Change background or grouped screen control appearance
- Set screen controls to show the hardware value
- Set parameter change behavior for screen controls
- Set hardware matching behavior for screen controls
- Reset and compare changes to a patch
- Override concert- and set-level mappings
-
- Overview of mapping screen controls
- Map to channel strip and plug-in parameters
- Map screen controls to actions
- Map a screen control to multiple parameters
- Use screen controls to display PDF document pages
- Edit the saved value for a mapped parameter
- Set drum pads or buttons to use note velocity
- Map screen controls to all channel strips in a patch
- Undo screen control parameter mappings
- Remove screen control mappings
- Work with graphs
- Create controller transforms
- Share patches and sets between concerts
- Record the audio output of a concert
-
- Overview of concerts
- Create a concert
- Open and close concerts
- Save concerts
- How saving affects parameter values
- Clean up concerts
- Consolidate assets in a concert
- Rename the current concert
-
- Overview of the Concert Settings Inspector
- Set MIDI Routing to channel strips
- Transpose incoming note pitch for a concert
- Define the program change message source
- Send unused program changes to channel strips
- Set the time signature for a concert
- Change the tuning for a concert
- Set the pan law for a concert
- Add text notes to a concert
- Control the metronome
- Silence MIDI notes
- Mute audio output
-
- Layout mode overview
-
- Screen control parameter editing overview
- Lift and stamp screen control parameters
- Reset screen control parameters
- Common screen control parameters
- Keyboard screen control parameters
- MIDI activity screen control parameters
- Drum pad screen control parameters
- Waveform screen control parameters
- Selector screen control parameters
- Text screen control parameters
- Background screen control parameters
- How MainStage passes through MIDI messages
- Export and import layouts
- Change the aspect ratio of a layout
-
- Before performing live
- Use Perform mode
- Screen controls in performance
- Tempo changes during performance
- Tips for performing with keyboard controllers
- Tips for performing with guitars and other instruments
- Tune guitars and other instruments with the Tuner
- The Playback plug-in in performance
- Record your performances
- After the performance
- Tips for complex hardware setups
-
- Overview of keyboard shortcuts and command sets
-
- Concerts and layouts keyboard shortcuts
- Patches and sets (Edit mode) keyboard shortcuts
- Editing keyboard shortcuts
- Actions keyboard shortcuts
- Parameter mapping (Edit mode) keyboard shortcuts
- Channel strips (Edit mode) keyboard shortcuts
- Screen controls (Layout mode) keyboard shortcuts
- Perform in Full Screen keyboard shortcuts
- Window and view keyboard shortcuts
- Help and support keyboard shortcuts
-
-
- Use MIDI plug-ins
-
- Arpeggiator overview
- Arpeggiator control parameters
- Note order parameters overview
- Note order variations
- Note order inversions
- Arpeggiator pattern parameters overview
- Use Live mode
- Use Grid mode
- Arpeggiator options parameters
- Arpeggiator keyboard parameters
- Use keyboard parameters
- Assign controllers
- Modifier controls
- Note Repeater controls
- Randomizer controls
-
- Use Scripter
- Use the Script Editor
- Scripter API overview
- MIDI processing functions overview
- HandleMIDI function
- ProcessMIDI function
- GetParameter function
- SetParameter function
- ParameterChanged function
- Reset function
- JavaScript objects overview
- Use the JavaScript Event object
- Use the JavaScript TimingInfo object
- Use the Trace object
- Use the MIDI event beatPos property
- Use the JavaScript MIDI object
- Create Scripter controls
- Transposer controls
-
-
- Alchemy overview
- Alchemy interface overview
- Alchemy Name bar
- Alchemy file locations
-
- Alchemy source overview
- Source master controls
- Import browser
- Source subpage controls
- Source filter controls
- Source filter use tips
- Source elements overview
- Additive element controls
- Additive element effects
- Spectral element controls
- Spectral element effects
- Pitch correction controls
- Formant filter controls
- Granular element controls
- Sampler element controls
- VA element controls
- Wide unison mode
- Source modulations
- Morph controls
- Alchemy master voice section
- Alchemy Extended parameters
-
- Playback plug-in overview
- Add a Playback plug-in
- Playback interface
- Use the Playback waveform display
- Playback transport and function buttons
- Playback information display
- Playback Sync, Snap To, and Play From parameters
- Use the Playback group functions
- Use the Playback Action menu and File field
- Use markers with the Playback plug-in
-
- Sample Alchemy overview
- Interface overview
- Add source material
- Edit mode
- Play modes
- Source overview
- Synthesis modes
- Granular controls
- Additive effects
- Additive effect controls
- Spectral effect
- Spectral effect controls
- Filter module
- Lowpass, bandpass, and highpass filters
- Comb PM filter
- Downsampler filter
- FM filter
- Envelope generators
- Mod Matrix
- Modulation routing
- Motion mode
- Trim mode
- More menu
-
- Sculpture overview
- Sculpture interface
- Global parameters
- Amplitude envelope parameters
- Use the Waveshaper
- Filter parameters
- Output parameters
- Define MIDI controllers
- Extended parameters
-
- Studio Piano
- Copyright and trademarks
Morph melodic sounds in Alchemy in MainStage
Sounds that contain melodic or harmonic material, such as those that aren't purely drums or percussion, present more challenges when morphing. In these cases, it’s especially important to understand some of the limitations and to know which synthesis options will deliver the best results. This group of tutorial tasks covers morphing between sounds that contain melodic material produced by monophonic instruments such as a solo voice, a synth lead, or an orchestral instrument such as a flute or oboe. The example files have the same basic length, which makes results more predictable than if file lengths were quite different.
Note: Images shown in tutorials aren't specific to presets used in tasks. They're included as a guide to help you find areas and parameters in the Alchemy interface.
Play a source melody with another source in Alchemy
In Alchemy in MainStage, click the File button in the Name bar and choose Initialize Preset from the pop-up menu to reset all Alchemy parameters to default settings.
Important: Use of Initialize Preset automatically turns on wide unison mode. See Alchemy wide unison mode.
Click the source select field for source A, and choose Import Audio from the pop-up menu.
The Import window opens.
Type “Amanda Aa Ee Ay Oh C3” in the search field, and drag the file to the Dropzone area of the Import window.
Click the Additive and Formant analysis mode buttons at the lower left, then click the Import button.
This determines the synthesis engine used for resynthesis of the audio sample. This combination is generally best when you are working with melodic, monophonic audio files. When analysis is complete, you can trigger the audio at its native pitch by playing C3 on your keyboard. It’s important to understand that you are hearing a resynthesized version of the original sound that is being generated by the additive synthesis engine and further shaped by the formant engine.
Tip: It’s best to select the same analysis mode for all audio you plan to morph between. If you don’t do this, the primary synthesis element morphing control will be non functional when morphing between sources analyzed with different engines. For example, you can’t perform additive morphing between a source generated by the additive engine and another source generated by the spectral engine.
Click the source B select field, and choose Import Audio from the pop-up menu.
Type “Velvet Rope Synth Lead” in the search field, and click to select the file or drag it to the Dropzone area of the Import window, then click the Import button.
Note: The previously selected import mode is retained, so there’s no need to change anything.
To set both files to loop continuously while you hold down the note, click the A button (under Global), then choose Continuous from the Loop Mode pop-up menu. Repeat this step for source B.
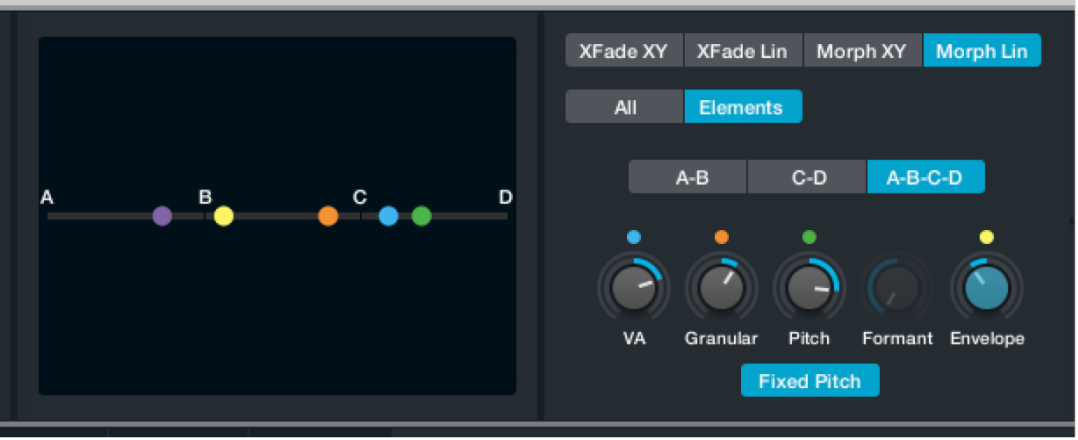
Click the Morph button at the left to show the morphing section at the upper right, then click the Morph Lin button and the A-B button. The All button should be active.
Drag the handle between the two sources while holding a note to hear the sound morph from the vocal (source A on the left) to the synth lead (source B on the right).
Click the Elements button to show the elemental morphing controls, then move the Pitch handle (green dot) to the far right while holding down C3 on your keyboard. You can also rotate the Pitch knob.
When the note cycle restarts, you will hear the vocal sample “singing” the melody provided by the synth lead phrase in source B. The pitch morph is particularly effective because the source A material contains no chordal content and does not change pitch, and the Source B material has a very clear melodic phrase that the pitch analysis can easily track. In general, files that work well for Flex Pitch in Logic work well for pitch morphing applications in Alchemy. Keep this example loaded for the next task.
Explore additive morphs in Alchemy
Elemental morphing can sometimes lead to sudden and dramatic level changes. Before adjusting the Additive control, click the Global button, then double-click the Volume knobs for sources A and B. This sets them both to –18 dB.
In Alchemy in MainStage, click the Morph button at the left to show the morphing section at the upper right, then click the Morph Lin button, the A-B button, and the Elements button (if required).
Drag the Additive handle (blue dot) to the right while holding C3 on your keyboard. You can also rotate the Additive knob to set this value.
As you move the control, the harmonic partials of the vocal sample transition to the partials of the synth lead. This doesn’t always produce pleasing results because partials in one sound may emphasize noise or artifacts in the other sound. The workflow is often one of sonic exploration in search of happy accidents rather than a predictable process. Play notes and chords above and below C3 as you experiment.
Set the Additive control to approximately 30%, Pitch to 100%, and Formant and Envelope to zero percent.
Click the A button at the left to view source A parameters, click the Additive button at the top right, then rotate the Fundamental knob toward the left.
This attenuates the fundamental partial which brightens the sound by making the higher frequency partials more pronounced.
Turn down the Odd/Even knob to create a more hollowed out sound, emphasizing the partials of the synth lead. Experiment with other controls to get a feel for their effect on the sound. Play octaves and fifths as you experiment.
Create envelope morphs in Alchemy
The Envelope control in the morph section primarily morphs between the timing of sources. This has little effect when files are close in length, but this behavior changes when the playback length of files is altered.
In Alchemy in MainStage, click the Morph button at the left to show the morphing section at the upper right, then move the Envelope handle (yellow dot) to the far left. You can also use the Envelope knob to move the Envelope handle.
Click the A button at the left to view source A parameters, and click the Edit button at the right of the source filename.
The source A edit window opens.
In the waveform editor at the bottom of the main edit window, drag the E handle to the very end of the audible part of the waveform.
This effectively removes the silence at the end of the vocal phrase by reducing the playback length of the overall file.
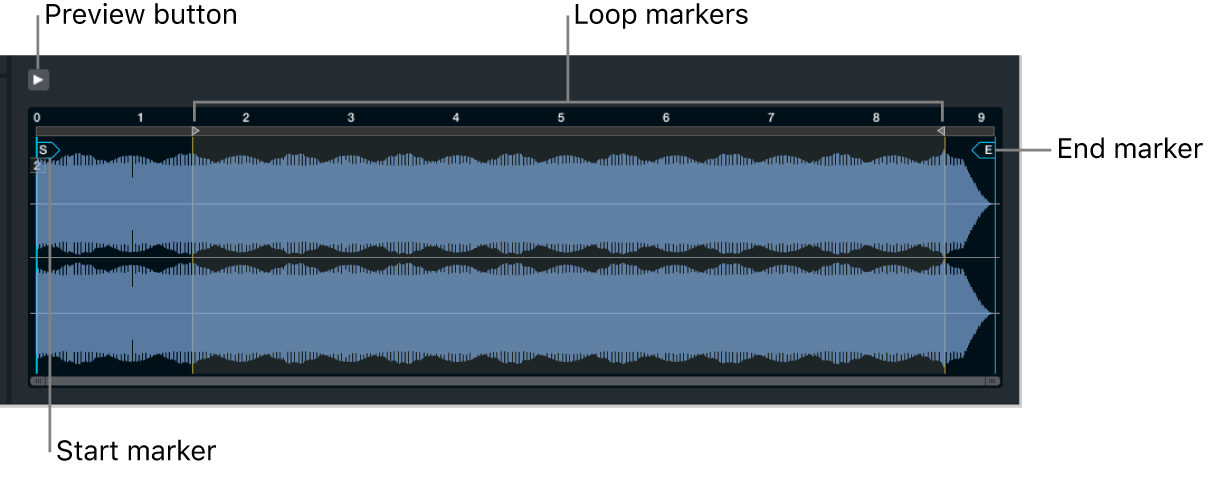
Play C3 on your keyboard, and note that the phrase plays faster because the timing for the sound is currently based on the timing of the vocal sample.
Also note that you can hear the entire synth lead phrase, which no longer fades away at the end. If you move the end marker further left, you can hear the entire phrase of the synth part played faster.
Click the X at the upper right to close the source A edit window.
Return to the morph controls, and adjust the Envelope knob to hear how it affects the behavior of samples with different lengths.

Use linked morph parameters in Alchemy
A green arc around a parameter indicates that it is morphed when you move dedicated morph controls. Setting general (non-morph area) parameters to different values for each source provides another technique that can influence morphing results.
In Alchemy in MainStage, click the source A button at the left, then click the Formant button at the upper right to view the Formant controls. Rotate the Smooth knob to the left until the Amanda vocal starts to break up and sound “fluttery.”
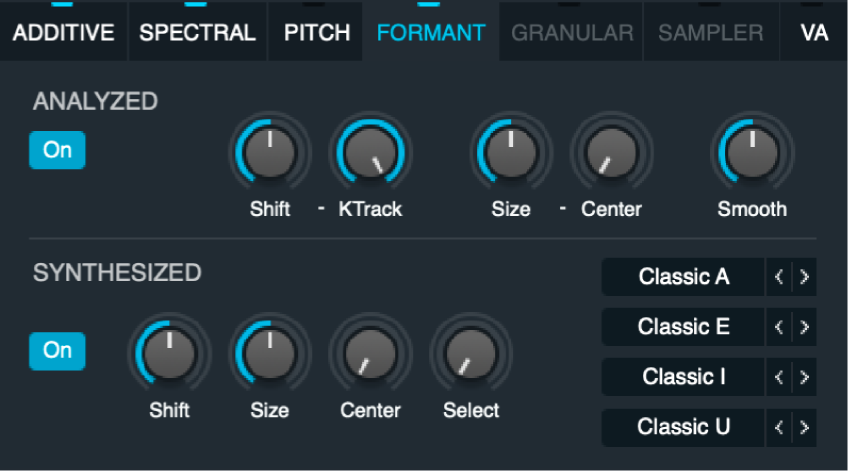
Click the source B button at the left, then click the Formant button at the upper right. Rotate the Smooth knob to the far left.
Click the Morph button at the left to show the morphing section at the upper right, then move the Formant handle (purple dot) horizontally while playing. You can also use the Formant knob to set this value.
You can hear the “fluttery” effect as you move the Formant control to the left, but this disappears as you move it to the right.