MainStage User Guide
- Welcome
-
- Overview of Edit mode
-
- Select patches and sets in the Patch List
- Copy, paste, and delete patches
- Reorder and move patches in the Patch List
- Add and rename patches
- Create a patch from several patches
-
- Overview of the Patch Settings Inspector
- Select patch settings in the Patch Library
- Set the time signature for patches
- Change the tempo when you select a patch
- Set program change and bank numbers
- Defer patch changes
- Instantly silence the previous patch
- Change patch icons
- Transpose the pitch of incoming notes for a patch
- Change the tuning for a patch
- Add text notes to a patch
-
- Overview of channel strips
- Add a channel strip
- Change a channel strip setting
- Configure channel strip components
- Show signal flow channel strips
- Hide the metronome channel strip
- Create an alias of a channel strip
- Add a patch bus
- Set channel strip pan or balance positions
- Set channel strip volume levels
- Mute and solo channel strips
- Use multiple instrument outputs
- Use external MIDI instruments
- Reorganize channel strips
- Delete channel strips
-
- Overview of the Channel Strip Inspector
- Choose channel strip settings
- Rename channel strips
- Change channel strip colors
- Change channel strip icons
- Use feedback protection with channel strips
- Set keyboard input for a software instrument channel strip
- Transpose individual software instruments
- Filter MIDI messages
- Scale channel strip velocity
- Set channel strips to ignore Hermode tuning
- Override concert- and set-level key ranges
- Add text notes to a channel strip in the Channel Strip Inspector
- Route audio via send effects
-
- Screen Control Inspector overview
- Replace parameter labels
- Choose custom colors for screen controls
- Change background or grouped screen control appearance
- Set screen controls to show the hardware value
- Set parameter change behavior for screen controls
- Set hardware matching behavior for screen controls
- Reset and compare changes to a patch
- Override concert- and set-level mappings
-
- Overview of mapping screen controls
- Map to channel strip and plug-in parameters
- Map screen controls to actions
- Map a screen control to multiple parameters
- Use screen controls to display PDF document pages
- Edit the saved value for a mapped parameter
- Set drum pads or buttons to use note velocity
- Map screen controls to all channel strips in a patch
- Undo screen control parameter mappings
- Remove screen control mappings
- Work with graphs
- Create controller transforms
- Share patches and sets between concerts
- Record the audio output of a concert
-
- Overview of concerts
- Create a concert
- Open and close concerts
- Save concerts
- How saving affects parameter values
- Clean up concerts
- Consolidate assets in a concert
- Rename the current concert
-
- Overview of the Concert Settings Inspector
- Set MIDI Routing to channel strips
- Transpose incoming note pitch for a concert
- Define the program change message source
- Send unused program changes to channel strips
- Set the time signature for a concert
- Change the tuning for a concert
- Set the pan law for a concert
- Add text notes to a concert
- Control the metronome
- Silence MIDI notes
- Mute audio output
-
- Layout mode overview
-
- Screen control parameter editing overview
- Lift and stamp screen control parameters
- Reset screen control parameters
- Common screen control parameters
- Keyboard screen control parameters
- MIDI activity screen control parameters
- Drum pad screen control parameters
- Waveform screen control parameters
- Selector screen control parameters
- Text screen control parameters
- Background screen control parameters
- How MainStage passes through MIDI messages
- Export and import layouts
- Change the aspect ratio of a layout
-
- Before performing live
- Use Perform mode
- Screen controls in performance
- Tempo changes during performance
- Tips for performing with keyboard controllers
- Tips for performing with guitars and other instruments
- Tune guitars and other instruments with the Tuner
- The Playback plug-in in performance
- Record your performances
- After the performance
- Tips for complex hardware setups
-
- Overview of keyboard shortcuts and command sets
-
- Concerts and layouts keyboard shortcuts
- Patches and sets (Edit mode) keyboard shortcuts
- Editing keyboard shortcuts
- Actions keyboard shortcuts
- Parameter mapping (Edit mode) keyboard shortcuts
- Channel strips (Edit mode) keyboard shortcuts
- Screen controls (Layout mode) keyboard shortcuts
- Perform in Full Screen keyboard shortcuts
- Window and view keyboard shortcuts
- Help and support keyboard shortcuts
-
-
- Use MIDI plug-ins
-
- Arpeggiator overview
- Arpeggiator control parameters
- Note order parameters overview
- Note order variations
- Note order inversions
- Arpeggiator pattern parameters overview
- Use Live mode
- Use Grid mode
- Arpeggiator options parameters
- Arpeggiator keyboard parameters
- Use keyboard parameters
- Assign controllers
- Modifier controls
- Note Repeater controls
- Randomizer controls
-
- Use Scripter
- Use the Script Editor
- Scripter API overview
- MIDI processing functions overview
- HandleMIDI function
- ProcessMIDI function
- GetParameter function
- SetParameter function
- ParameterChanged function
- Reset function
- JavaScript objects overview
- Use the JavaScript Event object
- Use the JavaScript TimingInfo object
- Use the Trace object
- Use the MIDI event beatPos property
- Use the JavaScript MIDI object
- Create Scripter controls
- Transposer controls
-
-
- Alchemy overview
- Alchemy interface overview
- Alchemy Name bar
- Alchemy file locations
-
- Alchemy source overview
- Source master controls
- Import browser
- Source subpage controls
- Source filter controls
- Source filter use tips
- Source elements overview
- Additive element controls
- Additive element effects
- Spectral element controls
- Spectral element effects
- Pitch correction controls
- Formant filter controls
- Granular element controls
- Sampler element controls
- VA element controls
- Wide unison mode
- Source modulations
- Morph controls
- Alchemy master voice section
- Alchemy Extended parameters
-
- Playback plug-in overview
- Add a Playback plug-in
- Playback interface
- Use the Playback waveform display
- Playback transport and function buttons
- Playback information display
- Playback Sync, Snap To, and Play From parameters
- Use the Playback group functions
- Use the Playback Action menu and File field
- Use markers with the Playback plug-in
-
- Sample Alchemy overview
- Interface overview
- Add source material
- Edit mode
- Play modes
- Source overview
- Synthesis modes
- Granular controls
- Additive effects
- Additive effect controls
- Spectral effect
- Spectral effect controls
- Filter module
- Lowpass, bandpass, and highpass filters
- Comb PM filter
- Downsampler filter
- FM filter
- Envelope generators
- Mod Matrix
- Modulation routing
- Motion mode
- Trim mode
- More menu
-
- Sculpture overview
- Sculpture interface
- Global parameters
- Amplitude envelope parameters
- Use the Waveshaper
- Filter parameters
- Output parameters
- Define MIDI controllers
- Extended parameters
-
- Studio Piano
- Copyright and trademarks
Alchemy morph use and tips for MainStage
Source components are shown only in advanced view. Click the Advanced button to switch to advanced view, then click the Morph button to view and use the morph controls. See Alchemy morph controls in MainStage.
It is important to choose the same analysis mode for all morphed sources. See Alchemy Import browser in MainStage.
Though you can morph with any synthesis type, the best morphing results are achieved with the spectral or additive engines. Spectral is the most suitable import method to use for the majority of audio material. Use Additive or Add + Spec import mode if dealing with pitched, monophonic sounds. Make sure the Formant button is turned on when importing sounds because this generally results in a higher quality morph.
If you aren't creating a pitched instrument that requires the root note to remain at the default pitch, irrespective of the morph position, turn off the Fixed Pitch button, because this will result in a higher quality morph.
The time alignment of sounds is crucial to achieving a good morph. Selecting sounds with similar timing and loop characteristics tends to deliver the best results. Aim to have a similar loop duration and loop location within the selected samples. If the sounds you are morphing are comprised of more than single note samples or the timing of your sources doesn’t align as you would like, adjust the warp marker positions. See the Manually time-aligning morphed sounds task in this section.
Morphs that move from 100% of all elements in a sound to 100% of another sound can often be suitable for sound effects but may be more difficult to shape into new playable instruments. You may find it better to mix the levels of individual elements for this type of use.
Note: Images shown in tutorials aren't specific to presets used in tasks. They're included as a guide to help you find areas and parameters in the Alchemy interface.
Manually time-aligning morphed sounds in Alchemy
This task covers manual alignment of sources. Alchemy features an auto align function (see Alchemy morph controls in MainStage) that can make this an automatic process, but in some cases you may need to manually intervene to achieve the best results.
When morphing is turned on for a source, warp markers are displayed in the zone waveform editor. See Alchemy zone waveform editor in MainStage.
When you morph from a sound with a fast attack to one with a slow attack, Alchemy smoothly adjusts the attack time according to the morph all position, or the envelope position if in elements mode. Warp markers define the attack phase boundaries of each sound. More generally, warp markers define the boundaries of a series of time-aligned segments when two or more sounds are morphed together.
In Alchemy in MainStage, click the source select field for the active source, then choose Import Audio from the pop-up menu.
In the Import browser, click the Additive, Spectral, or Granular import mode button.
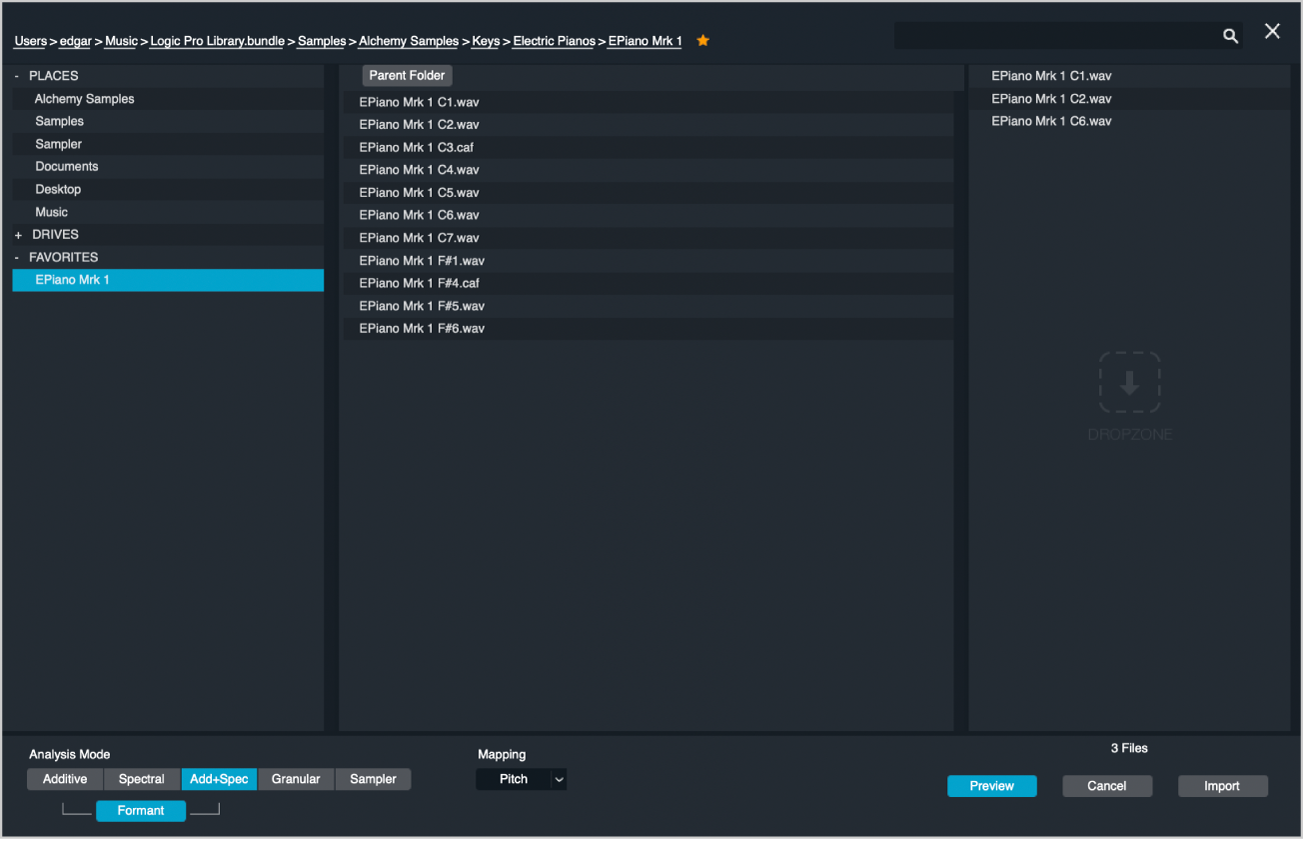
Select the files you want to use, then click the Import button.
When you import additive, spectral, or granular data, Alchemy automatically sets warp markers at the following positions:
The absolute start point of the sound.
The end of the attack portion.
The loop start point. If a sample does not have loop points, loop points are automatically chosen.
The loop end point. If a sample does not have loop points, loop points are automatically chosen.
The absolute end point of the sound.
If you need to edit warp markers, shown as light gray lines, click the source Edit button to open the main edit window. Depending on the source material and active morph mode, light blue lines may appear on the background between the start and end markers. These can help with manual alignment of warp markers.
Do any of the following in the zone waveform editor:
To move a warp marker, including the loop start and end, drag the marker handle left or right.
Note: The loop start and loop end markers also double as warp markers. You cannot position the loop start later than the loop end. However, it is possible to drag both the loop start and loop end markers to the same position, creating a sustain point rather than an extended loop region.
To insert a new warp marker, double-click a position in the waveform editor.
The number associated with each existing warp marker, inclusive of the loop markers, is updated accordingly.
To delete an existing warp marker, double-click its handle.

If your sounds are single notes, the placement of the five default warp markers usually delivers good results when morphing. You may want to change the position of marker 2, placing it at the point where it sounds like the end of the attack for each sound. This can produce a more convincing morph between sounds with contrasting attack qualities.
If your sounds consist of multiple events such as musical phrases, drum loops, or a spoken sentence, you may find it useful to create additional warp markers. If you are morphing between two voices speaking the same sentence, placing a warp marker at the start of each word helps to preserve the integrity of each word during the morph. You must make sure the same numbered warp marker is at the start of the same word in each sentence.
If you are morphing between musical phrases or drum loops with different grooves or timing nuances, placing a warp marker on every beat, half beat, or quarter beat helps you to achieve a smoother morph.
Explore source morphing options and controls in Alchemy
This tutorial makes use of the Morph Example preset, which you should load from the Name bar. The preset contains acoustic guitar, kalimba, a sustained solo vocal, and synth brass samples. Additive and Formant was used as the import method because the content contains more pitched info than noise, and this also allows access to the additive harmonic controls. This basic material provides enough scope to go in a number of directions.
Play the keyboard while changing parameters to get a feel for what each does.
In Alchemy in MainStage, click the Advanced button to view all parameters. Click the A, B, C, or D button, in turn, to look at parameter settings for all individual sources.
Note that PVar is set to zero for all sources. This isn’t always useful, but for this particular preset, no pitch variations are required.
Solo each source, in turn, and play a few notes, then unsolo before moving to the next source. This will give you a better understanding of the way the sound is constructed.
Click the Morph button at the left, and note the active Morph XY and Elements buttons. Experiment with the X and Y parameters, using either the points in the display or the X and Y knobs for the Additive, Pitch, Formant, and Envelope parameters.
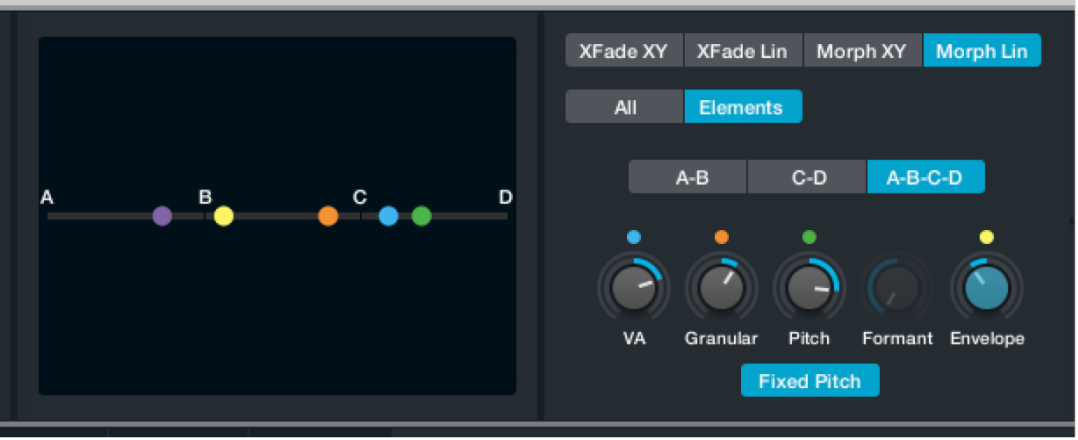
Click the XFade XY, XFade Lin, and Morph Lin buttons to hear the impact each type of crossfade or morph has on the sound. Experiment with the All, Elements, X and Y, A-B, C-D, and A-B-C-D parameters available in each morph or crossfade mode.
In the Perform section, drag the Transform Pad framing box to the “Bold Pluck,” “Glassy,” and other snapshots, repeating step 3 and playing as you audition each variation. You’ll see movements in the Transform Pad update the other Perform section controls.
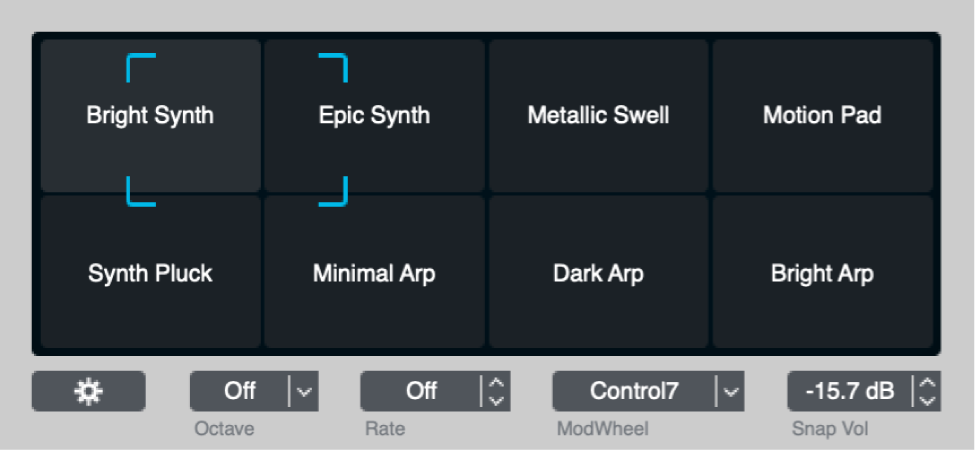
Click the Mod Targets button at the right of the modulation section and hover the pointer over the Perform menu item. Take a look at the number of, and the choice of, parameters assigned to each performance control.
As you can see, the preset is far more complex than it appears on the surface. The morphing controls aren't simply used to crossfade between sources, but between modulators, filter and effect parameters, mix settings, harmonic levels, and much more. You can view and use morphing to blend the sounds of each element as well as aspects of each synthesis type into a hybrid of synthesis methods.
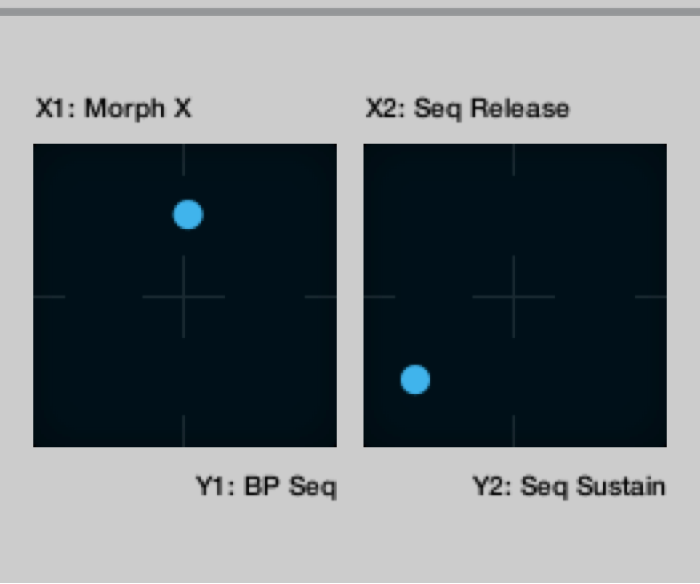
Crossfade all four sources using an X/Y pad performance control in Alchemy
Follow these steps to use the left X/Y pad in the performance controls section instead of the X/Y pad in the morph section. This allows you to control crossfades between sources in simple view and also allows you to include these modulations in Transform Pad snapshots.
In Alchemy in MainStage, click the File button in the Name bar and choose Initialize Preset from the pop-up menu to reset all Alchemy parameters to default settings.
Important: Use of Initialize Preset automatically turns on wide unison mode. See Alchemy wide unison mode.
Switch to advanced view, and set up each of the four sources with a different, but complementary sound.
Feel free to use any of the synthesis engines for each source or to blend multiple engines within one source.
Click the Morph button at the left to view morphing parameters, then click the XFade XY button.
Make sure the X knob is set to zero, then Control-click the X knob and choose Add Modulation > Perform > XYPad 1X from the shortcut menu.
Make sure the Y knob is set to zero, then Control-click the Y knob and choose Add Modulation > Perform > XYPad 1Y from the shortcut menu.
Morph four spectral sources using an X/Y pad performance control in Alchemy
Follow these steps to use the left X/Y pad in the performance controls section instead of the X/Y pad in the morph section. This allows you to control crossfades between sources in simple view and also allows you to include these modulations in Transform Pad snapshots.
In Alchemy in MainStage, click the File button in the Name bar and choose Initialize Preset from the pop-up menu to reset all Alchemy parameters to default settings.
Important: Use of Initialize Preset automatically turns on wide unison mode. See Alchemy wide unison mode.
Switch to advanced view, then click the Morph button at the left to show morphing parameters.
Click the source A select field, and choose Import Audio.
Select Spectral mode in the Import browser, choose a suitable sample, and import it. Turn on Formant mode before importing.
Repeat steps 3 and 4 for each of the other three sources. Make sure Spectral mode is chosen and the Formant button is on when importing to sources B, C, and D.
Click the Morph button at the left to view morphing parameters, then click the Morph XY button.
You can now morph between the four sources using the X and Y knobs. Follow steps 7 and 8 to assign the X and Y knobs to the left X/Y pad in the Perform section.
Double-click the X knob to set it to zero, then Control-click the X knob and choose Add Modulation > Perform > XYPad 1X from the shortcut menu.
Double-click the Y knob to set it to zero, then Control-click the Y knob and choose Add Modulation > Perform > XYPad 1Y from the shortcut menu.
Create a linear morph between two speech samples in Alchemy
In Alchemy in MainStage, click the File button in the Name bar and choose Initialize Preset from the pop-up menu to reset all Alchemy parameters to default settings.
Important: Use of Initialize Preset automatically turns on wide unison mode. See Alchemy wide unison mode.
Switch to advanced view, then click the Morph button to show morphing parameters.
Click the source A select field, and choose Import Audio.
Locate the first of your speech samples and import it, using Additive, Spectral, or Add+Spec mode. Turn on Formant mode before importing.
Repeat steps 3 and 4 for source B and your second speech sample. Use the same import mode as for the first sample, and make sure Formant mode is active.
Click the Morph button at the left to view morphing parameters, then click the Morph Lin button to view linear morphing parameters.
Click the A-B button to change the linear morphing mode.
You can now use the X knob to morph between the two speech samples. Each resynthesis method creates different sounding results even before morphing, and the results halfway through the morph are dramatically different. Experiment with each sample import method to determine which delivers the best outcome.
Control-click the X knob, then choose Add Modulation > Perform > Control 1 from the shortcut menu.
Click the Perform button to view performance controls, then click the Wheel pop-up menu under the Transform Pad, and choose Control 1.
You can now use the mod wheel to move performance control 1.
As optional steps, click the source A button, then click the Edit button to view the main edit window for this source.
You can also drag the S and E handles (start and end point markers) in the waveform display to trim the file.
Double-click above the waveform display to place additional warp markers at important syllables in your speech samples.
Click the B button in the main edit window to view source B parameters.
Double-click to create additional warp markers. Existing warp markers already correspond with those created for source A. The syllable tagged with warp marker n in source B is time-aligned with the syllable tagged with warp marker n in source A at the halfway point of the morph.
Morph four additive sources using a pair of MSEG envelopes in Alchemy
In Alchemy in MainStage, click the File button in the Name bar and choose Initialize Preset from the pop-up menu to reset all Alchemy parameters to default settings.
Important: Use of Initialize Preset automatically turns on wide unison mode. See Alchemy wide unison mode.
Switch to advanced view, then click the Morph button to show morphing parameters.
Click the source A select field, and choose Import Audio.
Select Additive mode in the Import browser, choose a suitable sample, and import it. Turn on Formant mode.
Repeat steps 3 and 4 for each of the other three sources. Make sure Spectral mode is chosen and the Formant button is on when importing to sources B, C, and D.
Click the Morph button at the left to view morphing parameters, then click the Morph XY button.
You can now morph between the four sources using the X and Y knobs. Follow the steps below to assign the X and Y knobs to MSEG 1 and MSEG 2, respectively.
Double-click the X knob to set it to zero, then Control-click the X knob and choose Add Modulation > MSEG > MSEG 1 from the shortcut menu.
You can now define morphing on the X axis with the MSEG 1 envelope in the modulation section.

Double-click the Y knob to set it to zero, then Control-click the Y knob and choose Add Modulation > MSEG > MSEG 2 from the shortcut menu.
You can now define morphing on the Y axis with the MSEG 2 envelope in the modulation section.