MainStage User Guide
- Welcome
-
- Overview of Edit mode
-
- Select patches and sets in the Patch List
- Copy, paste, and delete patches
- Reorder and move patches in the Patch List
- Add and rename patches
- Create a patch from several patches
-
- Overview of the Patch Settings Inspector
- Select patch settings in the Patch Library
- Set the time signature for patches
- Change the tempo when you select a patch
- Set program change and bank numbers
- Defer patch changes
- Instantly silence the previous patch
- Change patch icons
- Transpose the pitch of incoming notes for a patch
- Change the tuning for a patch
- Add text notes to a patch
-
- Overview of channel strips
- Add a channel strip
- Change a channel strip setting
- Configure channel strip components
- Show signal flow channel strips
- Hide the metronome channel strip
- Create an alias of a channel strip
- Add a patch bus
- Set channel strip pan or balance positions
- Set channel strip volume levels
- Mute and solo channel strips
- Use multiple instrument outputs
- Use external MIDI instruments
- Reorganize channel strips
- Delete channel strips
-
- Overview of the Channel Strip Inspector
- Choose channel strip settings
- Rename channel strips
- Change channel strip colors
- Change channel strip icons
- Use feedback protection with channel strips
- Set keyboard input for a software instrument channel strip
- Transpose individual software instruments
- Filter MIDI messages
- Scale channel strip velocity
- Set channel strips to ignore Hermode tuning
- Override concert- and set-level key ranges
- Add text notes to a channel strip in the Channel Strip Inspector
- Route audio via send effects
-
- Screen Control Inspector overview
- Replace parameter labels
- Choose custom colors for screen controls
- Change background or grouped screen control appearance
- Set screen controls to show the hardware value
- Set parameter change behavior for screen controls
- Set hardware matching behavior for screen controls
- Reset and compare changes to a patch
- Override concert- and set-level mappings
-
- Overview of mapping screen controls
- Map to channel strip and plug-in parameters
- Map screen controls to actions
- Map a screen control to multiple parameters
- Use screen controls to display PDF document pages
- Edit the saved value for a mapped parameter
- Set drum pads or buttons to use note velocity
- Map screen controls to all channel strips in a patch
- Undo screen control parameter mappings
- Remove screen control mappings
- Work with graphs
- Create controller transforms
- Share patches and sets between concerts
- Record the audio output of a concert
-
- Overview of concerts
- Create a concert
- Open and close concerts
- Save concerts
- How saving affects parameter values
- Clean up concerts
- Consolidate assets in a concert
- Rename the current concert
-
- Overview of the Concert Settings Inspector
- Set MIDI Routing to channel strips
- Transpose incoming note pitch for a concert
- Define the program change message source
- Send unused program changes to channel strips
- Set the time signature for a concert
- Change the tuning for a concert
- Set the pan law for a concert
- Add text notes to a concert
- Control the metronome
- Silence MIDI notes
- Mute audio output
-
- Layout mode overview
-
- Screen control parameter editing overview
- Lift and stamp screen control parameters
- Reset screen control parameters
- Common screen control parameters
- Keyboard screen control parameters
- MIDI activity screen control parameters
- Drum pad screen control parameters
- Waveform screen control parameters
- Selector screen control parameters
- Text screen control parameters
- Background screen control parameters
- How MainStage passes through MIDI messages
- Export and import layouts
- Change the aspect ratio of a layout
-
- Before performing live
- Use Perform mode
- Screen controls in performance
- Tempo changes during performance
- Tips for performing with keyboard controllers
- Tips for performing with guitars and other instruments
- Tune guitars and other instruments with the Tuner
- The Playback plug-in in performance
- Record your performances
- After the performance
- Tips for complex hardware setups
-
- Overview of keyboard shortcuts and command sets
-
- Concerts and layouts keyboard shortcuts
- Patches and sets (Edit mode) keyboard shortcuts
- Editing keyboard shortcuts
- Actions keyboard shortcuts
- Parameter mapping (Edit mode) keyboard shortcuts
- Channel strips (Edit mode) keyboard shortcuts
- Screen controls (Layout mode) keyboard shortcuts
- Perform in Full Screen keyboard shortcuts
- Window and view keyboard shortcuts
- Help and support keyboard shortcuts
-
-
- Use MIDI plug-ins
-
- Arpeggiator overview
- Arpeggiator control parameters
- Note order parameters overview
- Note order variations
- Note order inversions
- Arpeggiator pattern parameters overview
- Use Live mode
- Use Grid mode
- Arpeggiator options parameters
- Arpeggiator keyboard parameters
- Use keyboard parameters
- Assign controllers
- Modifier controls
- Note Repeater controls
- Randomizer controls
-
- Use Scripter
- Use the Script Editor
- Scripter API overview
- MIDI processing functions overview
- HandleMIDI function
- ProcessMIDI function
- GetParameter function
- SetParameter function
- ParameterChanged function
- Reset function
- JavaScript objects overview
- Use the JavaScript Event object
- Use the JavaScript TimingInfo object
- Use the Trace object
- Use the MIDI event beatPos property
- Use the JavaScript MIDI object
- Create Scripter controls
- Transposer controls
-
-
- Alchemy overview
- Alchemy interface overview
- Alchemy Name bar
- Alchemy file locations
-
- Alchemy source overview
- Source master controls
- Import browser
- Source subpage controls
- Source filter controls
- Source filter use tips
- Source elements overview
- Additive element controls
- Additive element effects
- Spectral element controls
- Spectral element effects
- Pitch correction controls
- Formant filter controls
- Granular element controls
- Sampler element controls
- VA element controls
- Wide unison mode
- Source modulations
- Morph controls
- Alchemy master voice section
- Alchemy Extended parameters
-
- Playback plug-in overview
- Add a Playback plug-in
- Playback interface
- Use the Playback waveform display
- Playback transport and function buttons
- Playback information display
- Playback Sync, Snap To, and Play From parameters
- Use the Playback group functions
- Use the Playback Action menu and File field
- Use markers with the Playback plug-in
-
- Sample Alchemy overview
- Interface overview
- Add source material
- Edit mode
- Play modes
- Source overview
- Synthesis modes
- Granular controls
- Additive effects
- Additive effect controls
- Spectral effect
- Spectral effect controls
- Filter module
- Lowpass, bandpass, and highpass filters
- Comb PM filter
- Downsampler filter
- FM filter
- Envelope generators
- Mod Matrix
- Modulation routing
- Motion mode
- Trim mode
- More menu
-
- Sculpture overview
- Sculpture interface
- Global parameters
- Amplitude envelope parameters
- Use the Waveshaper
- Filter parameters
- Output parameters
- Define MIDI controllers
- Extended parameters
-
- Studio Piano
- Copyright and trademarks
Alchemy spectral edit window in MainStage
Source components are shown only in advanced view. Click the Advanced button to switch to advanced view, then click the A, B, C, or D button to view detailed parameters for the selected source.
The source edit window is opened by clicking the Edit button on any source subpage. Click the close window icon (X) at the top right to close the window.
Use the Spectral button at the top of the main edit window to view the Spectral edit window.
Spectral edit window: Use to graphically edit spectral resynthesis data. You can also create new sounds by using simple paint tools directly in the display.
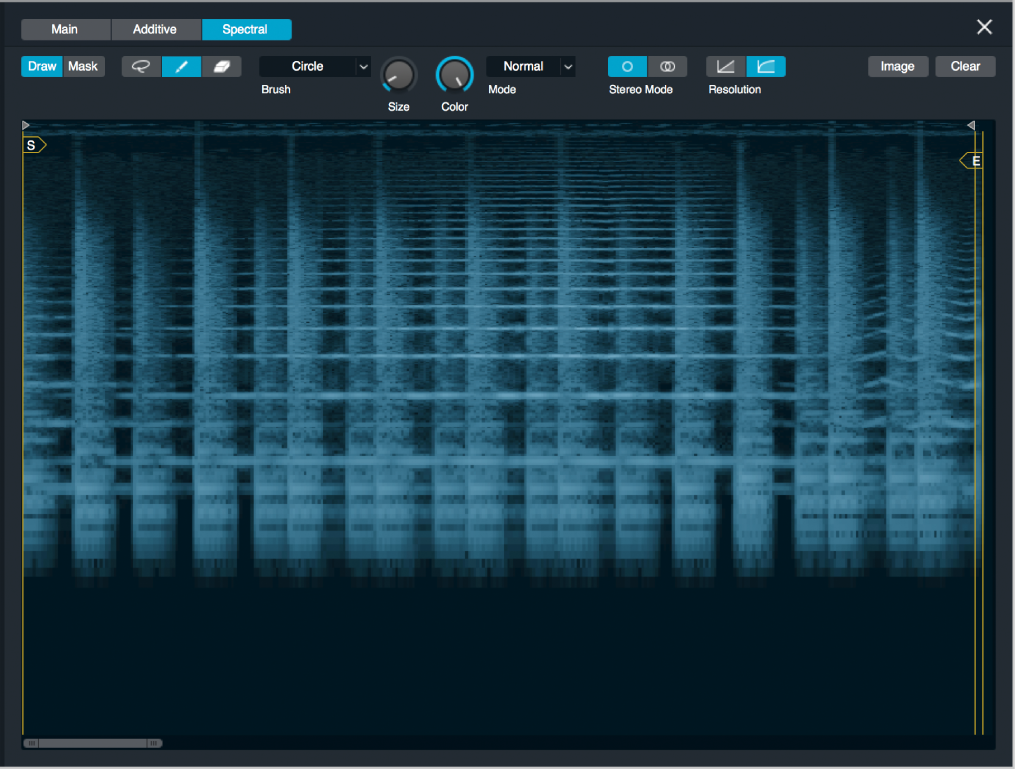
Spectral data is displayed as follows in the Spectral edit window, or “canvas.”
Time, expressed in seconds, is represented along the x-axis from left to right. It is also shown at the pointer position.
Frequency, in hertz, is represented along the y-axis from bottom to top. It is also shown at the pointer position.
Amplitude is represented by brightness, using shades of blue. Dark blues represent lower amplitude values, and light blues represent higher amplitude values. Silence is black, and the loudest amplitude is white.
A white play position indicator scrolls across the image for the most recently triggered voice.
Warp markers are also shown, allowing you to change the start and end points.
Note: Accurate resynthesis requires a much finer frequency resolution than the spectral display can accommodate. Frequency information depicted in the display is a coarse representation of the underlying data. Graphical data creation and editing are performed at the resolution of the display. This means that you cannot paint conventional melodies and chords consisting of precise notes, for example.
Spectral editor parameters
Draw/Mask buttons: Set a mode that affects the behavior of the paint tools.
Draw: The paint tools can be used to modify the image itself either by drawing new or deleting existing content or by increasing or decreasing the luminosity of specific parts of the spectrum.
Mask: The entire image is masked, as if covered with a layer of black wax. The paint tools can be used to selectively reveal parts of the underlying image, as if scraping away the wax to reveal the layer underneath.
Note: The most recent edit made in the Spectral editor can be undone by pressing Command-Z. Multiple edits can be reversed by pressing Option-Command-Z, then choosing the step you want to revert to from the Undo History window.
Lasso, Brush, and Erase buttons: Choose a select (Lasso) or brush mode. Erase uses the selected brush type to remove portions of the spectrogram.
Lasso button: Turn on to activate a select mode. Drag across the spectral canvas to select an area.
In mask mode, your selection only is played. The unselected portion of the canvas is silent.
In draw mode, your selection can be used as a brush shape.
Brush button: Turn on to activate brush mode. You can draw directly on the image when in draw mode, or scrape away the mask layer to reveal the underlying image when in mask mode. Any Lasso selection can be used as a brush shape that remains available until you select a different brush shape. See Brush pop-up menu.
Hold down Shift to limit painting to the vertical axis.
Hold down Command to limit painting to the horizontal axis.
Erase button: Turn on to selectively remove portions of the image with the selected brush type. See Brush pop-up menu.
Brush pop-up menu: Choose a predefined brush shape. Visible only when the Brush or Erase button is active.
Blurred Circle, Circle, Horizontal Line, and Vertical Line produce the brush shapes described.
Transient produces a vertical edge that slopes to the right, typical of a percussive drum hit.
Custom uses the Lasso selection as a brush shape.
Size knob: Scale the size of the brush chosen in the Brush pop-up menu.
Note: When a custom brush is active, the Size knob isn't available.
Color knob: Set the amplitude scaling of the brush. At 100%, brush strokes are white. At 50%, brush strokes are mid-blue. At zero, brush strokes are black. This knob is visible only when both the Draw and Brush buttons are active.
Note: When a custom brush is active, the maximum intensity is defined by the custom brush data.
Mode pop-up menu: Choose a mode that determines how the brush interacts with the existing canvas image in draw mode. This menu is visible only when both the Draw and Brush buttons are active.
Normal: Each pixel on the canvas is set identically to the corresponding brush pixel.
Add: Brush pixel values are added to the existing canvas pixel values. In this mode, painting multiple coats of blue results in increasingly higher amplitudes with each coat.
Multiply: Brush pixel values are multiplied with the existing canvas pixel values. Use this to selectively brighten parts of the image.
Mono/Stereo buttons: Switch the display mode between mono and stereo.
Note: This does not change the sound. In mono mode, stereo sounds are represented as a single image that represents both channels. Edits affect the left and right channels equally. In stereo mode, stereo sounds are shown in left and right lanes. Edits affect only the channel they're made in.
Resolution buttons: Switch the display between a linear and logarithmic representation of your spectral data on the vertical y-axis. Logarithmic (right button) is the default.
Linear (left): A simple linear scale with 11 kHz shown at the halfway point on the vertical y-axis. This mode is useful for detailed editing of very high frequency content.
Logarithmic (right): A logarithmic scale for frequency that corresponds more closely with human perception of pitch. Content at the halfway position on the y-axis is approximately 1 kHz. Log mode is useful for most vocal duties.
Image button: Choose an import image option from the pop-up menu.
Import Image: Opens a dialog where you can select a file in PNG format that is placed directly on the spectral canvas. The imported image is positioned at the far left of the canvas. The height of the image is scaled to fit the entire vertical range of the canvas, and the width of the image is scaled by the same factor as the height, retaining the original image proportions. All color information is discarded, and image brightness information is mapped to amplitude. If the imported image width does not extend fully to the right edge of the canvas, existing data beyond the image edge remains in place. Images with a height of 256 lines result in a one-to-one map of pixels to spectral bins. The spectral editor display is actually 381 lines tall, so edits involve some blurring between bins.
Import Image to Brush: Opens a dialog where you can select a file in PNG format to be used as a brush for painting on the spectral canvas. The original dimensions of the image are preserved. You can place the image at any position with a click, or you can drag to paint with it.
Clear button: all spectral data from the source, leaving only silence (a solid black image).
Scroll bar and zoom controls: Drag the middle of the scroll bar to view spectral data that isn't visible in the display area. Horizontally drag the zoom controls at either end of the scroll bar to resize the contents of the visible display area.