Mask controls in Final Cut Pro
The Shape Mask and Draw Mask controls appear in the Video inspector. You use these controls to adjust how the mask is drawn and how each mask operates upon an image. You can also fine-tune mask control point positions.
Shape Mask controls
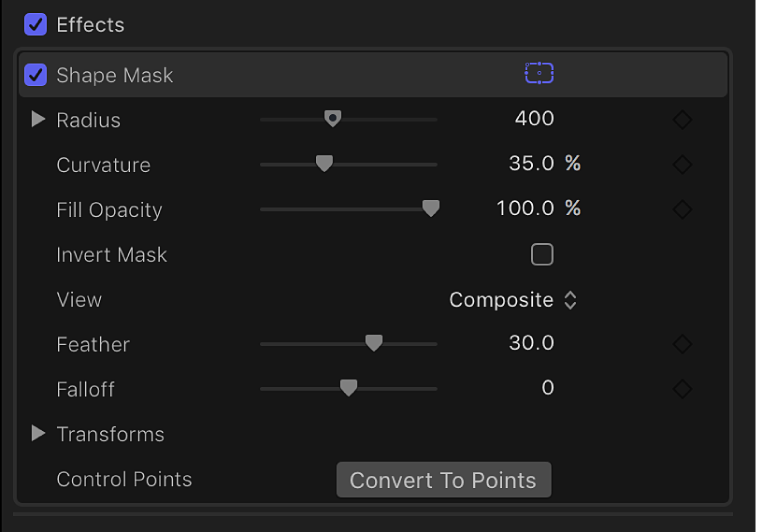
The Shape Mask contains the following adjustable controls:

Radius: A slider that changes the mask’s size.
X: A slider that adjusts the width of the mask.
Y: A slider that adjusts the height of the mask.
Curvature: A slider that changes the mask shape. One extreme of the curvature continuum is a perfect rectangle. The other extreme is an oval or a perfect circle.
Fill Opacity: A slider that adjusts the opacity of the image inside the mask selection.
Invert Mask: A checkbox that, when selected, reverses the mask—swapping its solid and transparent areas.
View: A pop-up menu that switches between the original image and the masked image (with its transparent areas).
Feather: A slider that feathers (softens) the edges of the mask. Positive feathering values soften the mask from its edge outward. Negative feathering values soften the mask from its edge inward. Feathering the edge of a mask can make the masked object blend better with the background.
Falloff: A slider that controls how “steep” the feathering is. Higher values result in feathering that’s pushed farther inward, so the edge of the feathering effect is more transparent. Lower values result in the “core” of the feathering effect being pushed farther outward, so the edge of the feathering effect is less transparent.
Transforms: A set of controls for adjusting the position, rotation, and size of your mask effect.
To show the controls, click the Transforms disclosure triangle.
Position X and Y: Controls that move the mask left and right (X) and up and down (Y).
Rotation: A dial control that rotates the mask around its anchor point.
Scale: A slider that changes the mask’s size as a percentage of the default mask size.
You can also scale the mask along a single axis. To show the controls, click the Scale disclosure triangle.
Scale X and Y: Controls that scale the mask left and right (X) and up and down (Y).
Control Points: When a Shape Mask is selected, the Convert To Points button is available. Click this button to convert a Shape Mask to a Draw Mask with editable control points.
Draw Mask controls
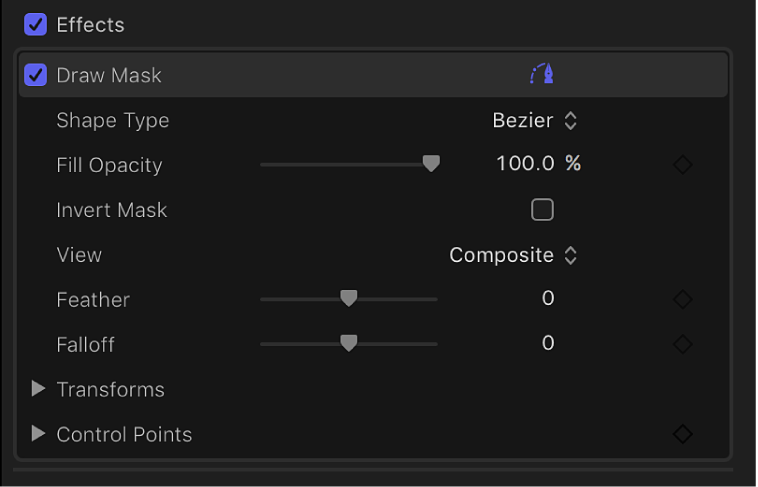
The Draw Mask contains the following adjustable controls:

Shape Type: A pop-up menu that sets the type of control points used to define the mask. For example, if you originally created a Bezier mask, you can choose B-Spline from this menu to change how the mask is drawn. Changing the shape type might dramatically change the mask’s form even though its control points remain fixed at their original coordinates. There are three options:
Linear: All of a mask’s control points are joined by hard angles, and the resulting mask is a polygon. The control points of a Linear mask lie directly on its edge.
Bezier: Control points can be a mix of Bezier curves and hard angles, creating any sort of mask. The control points of a Bezier mask lie directly on its edge.
B-Spline: Control points are all B-Spline points, with different degrees of curvature. B-Spline control points lie outside the surface of the mask but are connected by the B-Spline frame.
Fill Opacity: A slider that adjusts the opacity of the image inside the mask selection.
Invert Mask: A checkbox that, when selected, reverses the mask—swapping its solid and transparent areas.
View: A pop-up menu that switches between the original image and the masked image (with its transparent areas).
Feather: A slider that feathers (softens) the edges of the mask. Positive feathering values soften the mask from its edge outward. Negative feathering values soften the mask from its edge inward. Feathering the edge of a mask can make the masked object blend better with the background.
Falloff: A slider that controls how “steep” the feathering is. Higher values result in feathering that’s pushed farther inward, so the edge of the feathering effect is more transparent. Lower values result in the “core” of the feathering effect being pushed farther outward, so the edge of the feathering effect is less transparent.
Transforms: A set of controls for adjusting the position, rotation, and size of your mask effect.
To show the controls, click the Transforms disclosure triangle.
Position X and Y: Controls that move the mask left and right (X) and up and down (Y).
Rotation: A dial control that rotates the mask around its anchor point.
Scale: A slider that changes the mask’s size as a percentage of the default mask size.
You can also scale the mask along a single axis. To show the controls, click the Scale disclosure triangle.
Scale X and Y: Controls that scale the mask left and right (X) and up and down (Y).
Control Points: When a Draw Mask is selected, click the disclosure triangle to display a list of the position parameters for the mask control points. Use the value sliders to adjust the position of control points. The left value slider represents X, and the right value slider represents Y. Move the pointer over the Control Points heading to display a single Keyframe button (at the far right) that affects all the points, letting you add keyframes, reset the mask’s animation, display the animation curve in the Video Animation editor, and so on. See Animate a mask in Final Cut Pro and Intro to video keyframing in Final Cut Pro.
Download this guide: Apple Books | PDF