Final Cut Pro User Guide for Mac
- Welcome
- What’s new
-
- Intro to importing media
- If it’s your first import
- Organize files during import
-
- Import from Image Playground
- Import from iMovie for macOS
- Import from iMovie for iOS or iPadOS
- Import from Final Cut Pro for iPad
- Import from Final Cut Camera
- Import from Photos
- Import from Music
- Import from Apple TV
- Import from Motion
- Import from GarageBand and Logic Pro
- Import using workflow extensions
- Record into Final Cut Pro
- Memory cards and cables
- Supported media formats
-
- Intro to effects
-
- Intro to transitions
- How transitions are created
- Add transitions and fades
- Quickly add a transition with a keyboard shortcut
- Set the default duration for transitions
- Delete transitions
- Adjust transitions in the timeline
- Adjust transitions in the inspector and viewer
- Merge jump cuts with the Flow transition
- Adjust transitions with multiple images
- Modify transitions in Motion
- Add adjustment clips
-
- Add storylines
- Use the precision editor
- Conform frame sizes and rates
- Use XML to transfer projects
- Glossary
- Copyright and trademarks
Use custom LUT effects to color correct ProRes RAW video in Final Cut Pro for Mac
You can use a custom LUT effect (instead of a built-in camera LUT) to color correct ProRes RAW video as though it were log video.
The LUT effect provides the conversion from log to the output color space. You can purchase and download LUT effects from a variety of sources, or you can create one yourself using inexpensive color correction software or plug-ins. You import and apply LUT effects using the Custom LUT effect in the Final Cut Pro Effects browser.
Step 1: Change the Camera LUT setting to None
In Final Cut Pro, select one or more video clips recorded with ProRes RAW.
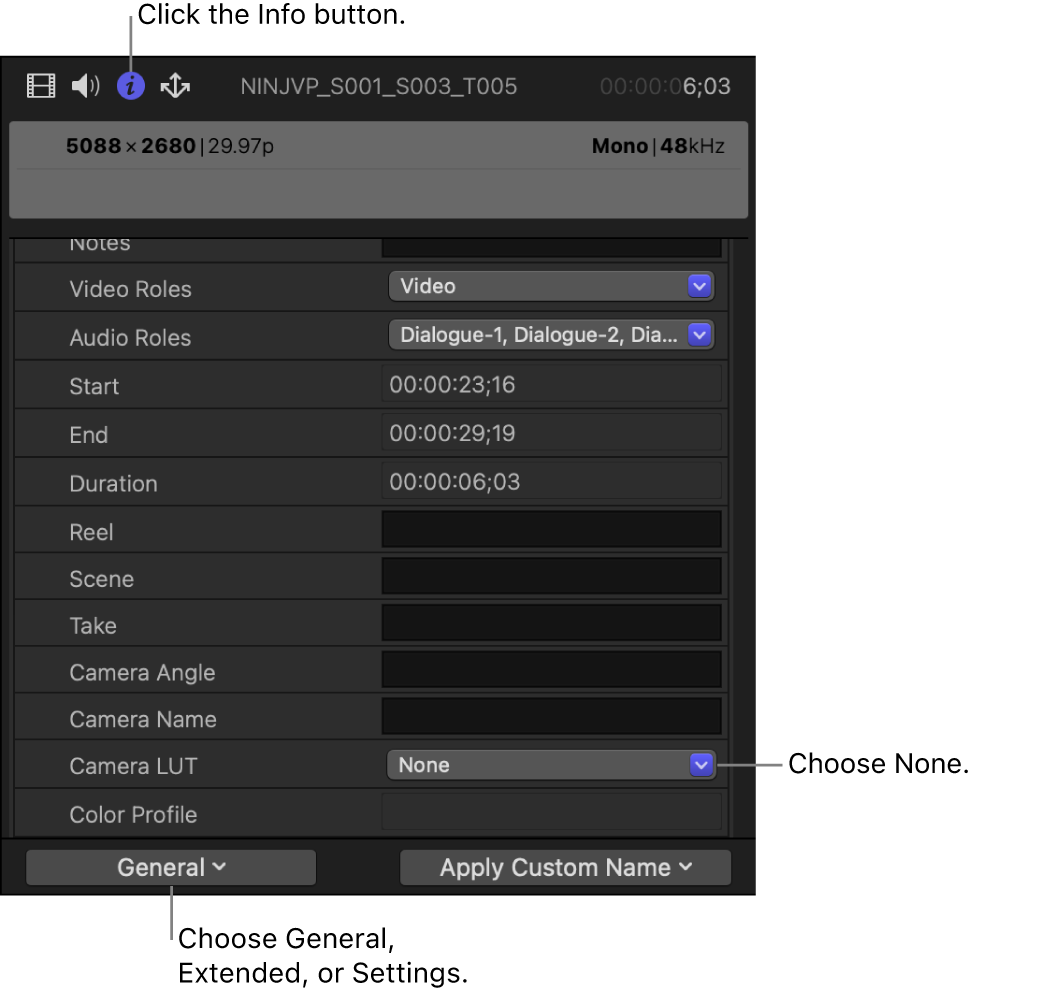
If the Info inspector isn’t already shown, choose Window > Show in Workspace > Inspector, then click the Info button at the top.

Click the Metadata View pop-up menu in the bottom-left corner, then choose either General, Extended, or Settings.
Click the Camera LUT pop-up menu and choose None.
When Camera LUT is set to None, the color correction tools (such as Color Adjustments, Color Wheels, and Color Curves) and other effects operate on the log-encoded values. No tone mapping is applied to the source, and no dynamic range is lost.
Step 2: Apply color correction and any other video effects
Make adjustments to color balance, exposure, and white balance.
In Final Cut Pro, with a ProRes RAW clip selected in the timeline, do any of the following:
Adjust the ISO setting and color temperature: See Adjust ProRes RAW camera settings.
Apply color correction: See Intro to color correction.
Apply video effects: See Intro to clip effects.
Step 3: Import and apply a custom LUT effect
You use the Custom LUT effect in the Effects browser (added as the last effect in the effects list) to import and apply a 3DLUT file that provides the conversion from log to the output color space.
In Final Cut Pro, select the ProRes RAW clips in the timeline.
To open the Effects browser, choose Window > Show in Workspace > Effects.
Select the Color category on the left, then double-click Custom LUT to apply the effect to the selected clip.
If the Video inspector isn’t already shown, choose Window > Show in Workspace > Inspector, then click the Video button at the top.
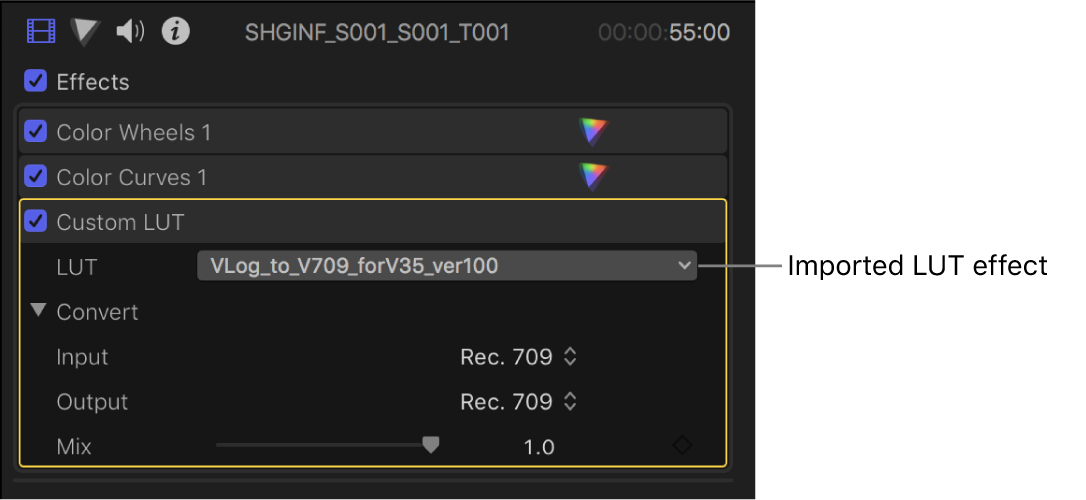
In the Custom LUT section of the Video inspector, click the LUT pop-up menu and choose “Choose Custom LUT.”
Note: If you previously imported a LUT effect, you can choose Recent and then choose from a list of recently used LUT effects.
In the window that appears, navigate to the LUT file you want to import, select it, then click Open.
The LUT effect you imported appears as the selected LUT at the top of the Custom LUT section.

Click the Input pop-up menu and choose the color space the LUT effect converts from.
Click the Output pop-up menu and choose the color space the LUT effect converts to.
Note: Make sure the Custom LUT effect is the last effect in the effects list. If it isn’t, you can simply drag it to the bottom of the list.
Download this guide: PDF