Final Cut Pro User Guide
- Welcome
- What’s new
-
- Intro to effects
-
- Intro to transitions
- How transitions are created
- Add transitions and fades
- Quickly add a transition with a keyboard shortcut
- Set the default duration for transitions
- Delete transitions
- Adjust transitions in the timeline
- Adjust transitions in the inspector and viewer
- Merge jump cuts with the Flow transition
- Adjust transitions with multiple images
- Modify transitions in Motion
-
- Add storylines
- Use the precision editor
- Conform frame sizes and rates
- Use XML to transfer projects
- Glossary
- Copyright

Play media on an external display in Final Cut Pro for Mac
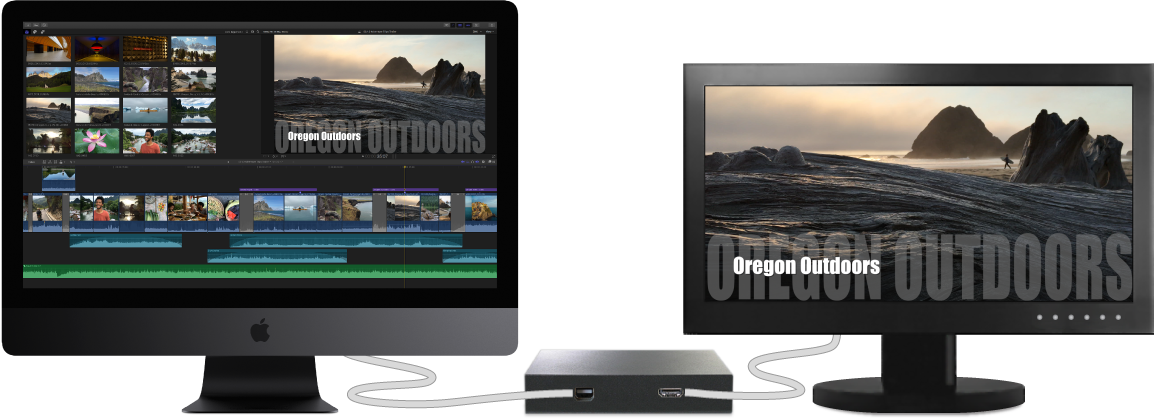
Final Cut Pro includes an A/V Output option to send video and audio from your Mac to an external video monitor. The A/V Output feature shows you how video and audio look and sound on a reference SDR or HDR video monitor. In addition, this feature allows you to test output with sophisticated external devices such as vectorscopes and waveform monitors.
A/V Output also lets you use the Pro Display XDR as a dedicated HDR color reference monitor for video editing and color correction.
Note: If you have a second computer display connected to your Mac, you can expand your workspace by showing the viewer, browser, or timeline on the second display. See Use a second display with Final Cut Pro for Mac.
View playback on an external monitor using a third-party video interface
Install the video interface hardware and software according to the manufacturer’s instructions.
Connect an external video monitor to the video interface, and make sure the monitor and all other external devices are connected to power and turned on.
To select an A/V output device in Final Cut Pro, choose Final Cut Pro > Settings (or press Command-Comma), click Playback, then click the A/V Output pop-up menu and choose the external monitor.
In Final Cut Pro, choose Window > A/V Output.
The viewer contents appear on the broadcast monitor. Viewer features (such as onscreen controls and the title-safe and action-safe overlays) appear only in Final Cut Pro.
Note: Video and audio are synced at the video frame (not audio sample) level.

To turn off A/V Output, choose Window > A/V Output.
Use the Pro Display XDR as a dedicated HDR color reference monitor
On a system with a Pro Display XDR, Final Cut Pro provides the maximum color and brightness accuracy in HDR video playback. This makes the Pro Display XDR the ideal professional reference monitor for critical work such as HDR color correction.

You can enable A/V Output to set up an HDR color correction system with at least two displays: the Pro Display XDR as the external HDR reference monitor and a display for working with the Final Cut Pro interface.
For instructions, see Color correct HDR video with Pro Display XDR and Final Cut Pro for Mac.
View playback on an external monitor using HDMI
If you’re using Final Cut Pro 10.1 or later on a 4K-capable Mac with an HDMI port or a Thunderbolt port and an HDMI adapter, you can play 4K or HD 1080 video on an external video monitor connected to the HDMI port.
Use an HDMI cable to connect the external HDMI video monitor to the HDMI port on your Mac, and make sure the monitor is connected to power and turned on.
To configure the HDMI monitor, choose Apple menu > System Settings, then click Displays.
In Displays settings, set the HDMI monitor to be a secondary display.
Select Scaled, and in the list that appears, select 4096 x 2160, 3840 x 2160, 1080i, or 1080p.
Note: You may need to press the Option key while you click Scaled to see additional resolutions for the HDMI monitor.
To select the monitor in Final Cut Pro, choose Final Cut Pro > Settings (or press Command-Comma), click Playback, then click the A/V Output pop-up menu and choose the HDMI monitor.
In Final Cut Pro, choose Window > A/V Output.
The viewer contents appear on the HDMI monitor. Viewer features (such as onscreen controls and the title-safe and action-safe overlays) appear only in Final Cut Pro.
Note: If you’re viewing HDR video on a system with macOS Catalina 10.15 or later, you can have Final Cut Pro show the HDR image as tone mapped. Tone mapping compresses bright image content and reduces the apparent dynamic range of the video to fit the viewable range of the connected display. To turn on tone mapping, open the Playback pane of Final Cut Pro settings and select the Show HDR as Tone Mapped checkbox at the bottom of the pane.
Video and audio are synced at the video frame (not audio sample) level.

To turn off A/V Output, choose Window > A/V Output.
For more information about third-party devices and software, contact the device manufacturer or go to the Final Cut Pro Resources webpage.
Download this guide: Apple Books | PDF