Final Cut Pro User Guide
- Welcome
- What’s new
-
- Intro to effects
-
- Intro to transitions
- How transitions are created
- Add transitions and fades
- Quickly add a transition with a keyboard shortcut
- Set the default duration for transitions
- Delete transitions
- Adjust transitions in the timeline
- Adjust transitions in the inspector and viewer
- Merge jump cuts with the Flow transition
- Adjust transitions with multiple images
- Modify transitions in Motion
-
- Add storylines
- Use the precision editor
- Conform frame sizes and rates
- Use XML to transfer projects
- Glossary
- Copyright

Adjust ProRes RAW camera settings in Final Cut Pro for Mac
Apple ProRes RAW brings to RAW video the same great performance, quality, and ease of use that Apple ProRes has brought to conventional video, in a format ideal for HDR content creation. ProRes RAW captures raw sensor data from compatible cameras. This wealth of data allows you to flexibly adjust camera settings in Final Cut Pro without losing quality.
With the standard RAW conversion built into Final Cut Pro for Mac, you can view and adjust the ISO setting, exposure offset, and color temperature of ProRes RAW media using controls in the inspector.
You can also install a software plug-in from a camera manufacturer to view and adjust ProRes RAW camera settings optimized specifically for that manufacturer’s camera sensors.
Adjust ProRes RAW camera settings for the standard conversion
Import ProRes RAW media into Final Cut Pro.
Important: When you import the media, make sure to deselect the “Create optimized media” and “Create proxy media” options, because any transcoding work done during import will be discarded if you adjust the RAW settings in the next steps.
For more information about importing media, see Import into Final Cut Pro for Mac from file-based cameras and Import into Final Cut Pro for Mac from your Mac or storage device.
In the Final Cut Pro browser or timeline, select the clip or clips you want to inspect or adjust.
Note: Compound clips cannot be adjusted.
Do one of the following:
Choose Window > Show in Workspace > Inspector (or press Command-4).
Click the Inspector button in the toolbar.

Click the Info button at the top of the inspector.

At the bottom of the Info inspector, click Modify ProRes RAW Settings.
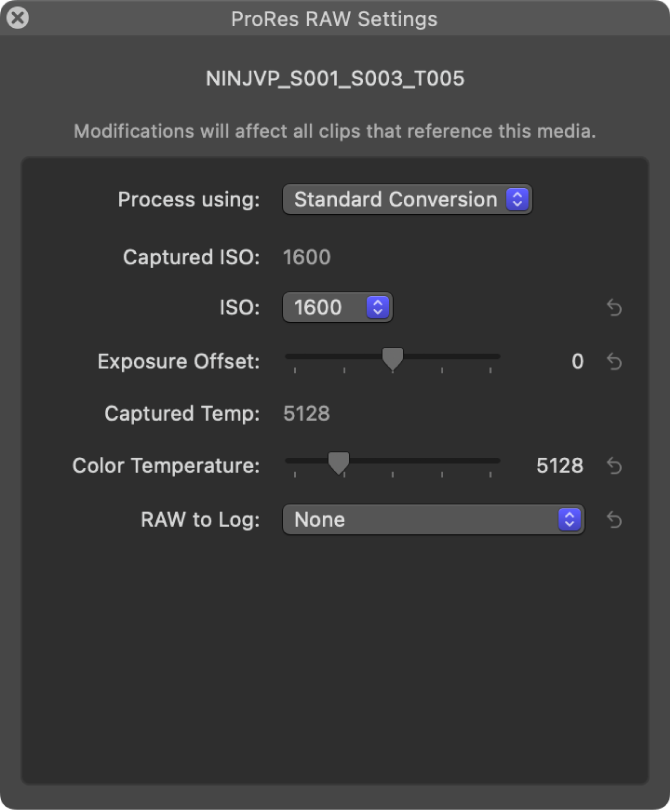
In the ProRes RAW Settings window, click the “Process using” pop-up menu and choose Standard Conversion (if it’s not already chosen).
In the ProRes RAW Settings window, view or adjust any of the following settings:
Note: These settings appear only if the corresponding information is found in the clip metadata.
Captured ISO: Displays the as-shot ISO setting of ProRes RAW clips. (Not adjustable.)
ISO: Adjusts the ISO setting of ProRes RAW clips.
Exposure Offset: Adjusts the ISO setting of ProRes RAW clips up or down by as much as one stop.
Captured Temp: Displays the as-shot color temperature of ProRes RAW clips. (Not adjustable.)
Color Temperature: Adjusts the color temperature of ProRes RAW clips. This slider is available only for clips shot with supported cameras.
RAW to Log: Converts RAW to various log formats for use in LUT-based workflows. Choose the setting corresponding to your camera LUT. See Color correct ProRes RAW in Final Cut Pro for Mac.

As needed, generate optimized or proxy media from the ProRes RAW media.
Use a camera manufacturer’s ProRes RAW plug-in
Download the appropriate plug-in from the camera manufacturer’s website, and install it.
Import ProRes RAW media compatible with the plug-in.
Important: When you import the media, make sure to deselect the “Create optimized media” and “Create proxy media” options, because any transcoding work done during import will be discarded if you adjust the RAW settings in the next steps.
For more information about importing media, see Import into Final Cut Pro for Mac from file-based cameras and Import into Final Cut Pro for Mac from your Mac or storage device.
In the Final Cut Pro browser or timeline, select the clip or clips you want to inspect or adjust.
Note: Compound clips cannot be adjusted.
Do one of the following:
Choose Window > Show in Workspace > Inspector (or press Command-4).
Click the Inspector button in the toolbar.

Click the Info button at the top of the inspector.

At the bottom of the Info inspector, click Modify ProRes RAW Settings.
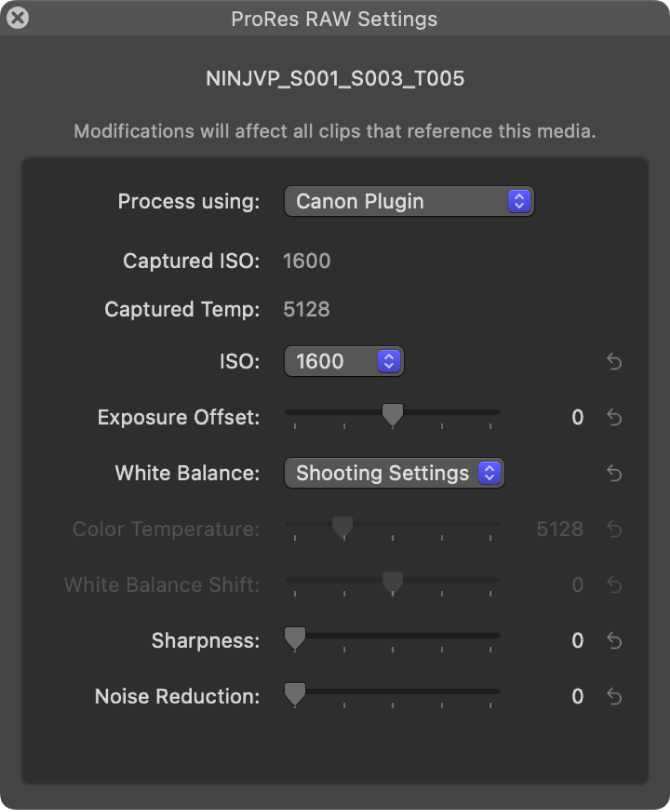
In the ProRes RAW Settings window, click the “Process using” pop-up menu and choose the plug-in you want to use.
View or adjust any of the plug-in settings.
The example below shows settings for a camera manufacturer plug-in.

As needed, generate optimized or proxy media from the ProRes RAW media.
For information about cameras that are compatible with Apple ProRes RAW, see the Apple Support article Cameras supported by Final Cut Pro.
Download this guide: Apple Books | PDF