Motion User Guide
- Welcome
-
- Intro to basic compositing
-
- Intro to transforming layers
-
- Intro to transforming layers in the canvas
- Transform layer properties in the canvas
- Transform tools
- Change layer position, scale, or rotation
- Move a layer’s anchor point
- Add a drop shadow to a layer
- Distort or shear a layer
- Crop a layer
- Modify shape or mask points
- Transform text glyphs and other object attributes
- Align layers in the canvas
- Transform layers in the HUD
- Transform 2D layers in 3D space
-
- Intro to behaviors
- Behaviors versus keyframes
-
- Intro to behavior types
-
- Intro to Parameter behaviors
- Audio behavior
- Average behavior
- Clamp behavior
- Custom behavior
- Add a Custom behavior
- Exponential behavior
- Link behavior
- Logarithmic behavior
- MIDI behavior
- Add a MIDI behavior
- Negate behavior
- Oscillate behavior
- Create a decaying oscillation
- Overshoot behavior
- Quantize behavior
- Ramp behavior
- Randomize behavior
- Rate behavior
- Reverse behavior
- Stop behavior
- Track behavior
- Wriggle behavior
-
- Intro to Simulation behaviors
- Align to Motion behavior
- Attracted To behavior
- Attractor behavior
- Drag behavior
- Drift Attracted To behavior
- Drift Attractor behavior
- Edge Collision behavior
- Gravity behavior
- Orbit Around behavior
- Random Motion behavior
- Repel behavior
- Repel From behavior
- Rotational Drag behavior
- Spring behavior
- Vortex behavior
- Wind behavior
- Additional behaviors
-
- Intro to using generators
- Add a generator
-
- Intro to image generators
- Caustics generator
- Cellular generator
- Checkerboard generator
- Clouds generator
- Color Solid generator
- Concentric Polka Dots generator
- Concentric Shapes generator
- Gradient generator
- Grid generator
- Japanese Pattern generator
- Lens Flare generator
- Manga Lines generator
- Membrane generator
- Noise generator
- One Color Ray generator
- Op Art 1 generator
- Op Art 2 generator
- Op Art 3 generator
- Overlapping Circles generator
- Radial Bars generator
- Soft Gradient generator
- Spirals generator
- Spiral Drawing generator
- Use Spiral Drawing onscreen controls
- Star generator
- Stripes generator
- Sunburst generator
- Truchet Tiles generator
- Two Color Ray generator
- Save a modified generator
-
- Intro to filters
- Browse and preview filters
- Apply or remove filters
-
- Intro to filter types
-
- Intro to Color filters
- Brightness filter
- Channel Mixer filter
- Color Adjustments filter
- Color Balance filter
- Example: Color-balance two layers
- Color Curves filter
- Use the Color Curves filter
- Color Reduce filter
- Color Wheels filter
- Use the Color Wheels filter
- Colorize filter
- Contrast filter
- Custom LUT filter
- Use the Custom LUT filter
- Gamma filter
- Gradient Colorize filter
- HDR Tools filter
- Hue/Saturation filter
- Hue/Saturation Curves filter
- Use the Hue/Saturation Curves filter
- Levels filter
- Negative filter
- OpenEXR Tone Map filter
- Sepia filter
- Threshold filter
- Tint filter
-
- Intro to Distortion filters
- Black Hole filter
- Bulge filter
- Bump Map filter
- Disc Warp filter
- Droplet filter
- Earthquake filter
- Fisheye filter
- Flop filter
- Fun House filter
- Glass Block filter
- Glass Distortion
- Insect Eye filter
- Mirror filter
- Page Curl filter
- Poke filter
- Polar filter
- Refraction filter
- Ring Lens filter
- Ripple filter
- Scrape filter
- Sliced Scale filter
- Use the Sliced Scale filter
- Sphere filter
- Starburst filter
- Stripes filter
- Target filter
- Tiny Planet filter
- Twirl filter
- Underwater filter
- Wave filter
-
- Intro to Stylize filters
- Add Noise filter
- Bad Film filter
- Bad TV filter
- Circle Screen filter
- Circles filter
- Color Emboss filter
- Comic filter
- Crystallize filter
- Edges filter
- Extrude filter
- Fill filter
- Halftone filter
- Hatched Screen filter
- Highpass filter
- Indent filter
- Line Art filter
- Line Screen filter
- MinMax filter
- Noise Dissolve filter
- Pixellate filter
- Posterize filter
- Relief filter
- Slit Scan filter
- Slit Tunnel filter
- Texture Screen filter
- Vignette filter
- Wavy Screen filter
- About filters and color processing
- Publish filter controls to Final Cut Pro
- Using filters on alpha channels
- Filter performance
- Save custom filters
-
- Intro to 3D objects
- Add a 3D object
- Move and rotate a 3D object
- Reposition a 3D object’s anchor point
- Exchange a 3D object file
- 3D object intersection and layer order
- Using cameras and lights with 3D objects
- Save custom 3D objects
- Guidelines for working with 3D objects
- Working with imported 3D objects
-
- Intro to 360-degree video
- 360-degree projects
- Create 360-degree projects
- Add 360-degree video to a project
- Create a tiny planet effect
- Reorient 360-degree media
- Creating 360-degree templates for Final Cut Pro
- 360-degree-aware filters and generators
- Export and share 360-degree projects
- Guidelines for better 360-degree projects
-
- Intro to settings and shortcuts
-
- Intro to Keyboard shortcuts
- Use function keys
- General keyboard shortcuts
- Audio list keyboard shortcuts
-
- Tools keyboard shortcuts
- Transform tool keyboard shortcuts
- Select/Transform tool keyboard shortcuts
- Crop tool keyboard shortcuts
- Edit Points tool keyboard shortcuts
- Edit shape tools keyboard shortcuts
- Pan and Zoom tools keyboard shortcuts
- Shape tools keyboard shortcuts
- Bezier tool keyboard shortcuts
- B-Spline tool keyboard shortcuts
- Paint Stroke tool keyboard shortcuts
- Text tool keyboard shortcuts
- Shape mask tools keyboard shortcuts
- Bezier Mask tool keyboard shortcuts
- B-Spline Mask tool keyboard shortcuts
- Transport control keyboard shortcuts
- View option keyboard shortcuts
- HUD keyboard shortcuts
- Inspector keyboard shortcuts
- Keyframe Editor keyboard shortcuts
- Layers keyboard shortcuts
- Library keyboard shortcuts
- Media list keyboard shortcuts
- Timeline keyboard shortcuts
- Keyframing keyboard shortcuts
- Shape and Mask keyboard shortcuts
- 3D keyboard shortcuts
- Miscellaneous keyboard shortcuts
- Touch Bar shortcuts
- Move assets to another computer
- Work with GPUs
- Glossary
- Copyright

Use the Green Screen Keyer filter in Motion
You apply a Green Screen Keyer filter like any other filter in Motion—from the Library or the Filters pop-up menu in the toolbar. See Apply or remove filters in Motion.
After you apply the filter and create a basic key, you can fine-tune the default color sampling or set the key colors manually. If necessary, further refine the key using advanced color-selection controls and matte tools in the Filters Inspector.
Tip: If you’re applying the Green Screen Keyer filter to HDR media in an Automatic project (or using the filter in a Final Cut template), set Render Color Space (in the View pull-down menu) to HDR Rec. 2020 HLG (or PQ) before applying the filter. Once you’ve applied and adjusted the filter, set Render Color Space to Rec. 709 and further refine the key. When you change the project’s color space (or apply the template to the Final Cut Pro timeline), the key now remains consistent.
Create a basic key
Import a background image into your Motion project.
Import a foreground image or video clip of a subject positioned in front of a green screen or blue screen.
This example uses video footage of an actor standing in front of a green screen. Make sure the foreground layer (the actor and green screen) is above the background layer in the Layers list.

Move the playhead to a frame where the green screen is visible in the canvas, then select the foreground layer in the Layers list (the layer with the green screen).
In the toolbar, click Filters, then choose Masks and Keying > Green Screen Keyer from the pop-up menu.
The Green Screen Keyer filter removes the dominant color in the image (if blue or green). For best results, apply the filter to the frame with the greatest amount of the color to key.
If the filter removes the wrong color, you can manually set the color. See Override automatic color sampling and set your own key colors.
The background layer shows through as long as the View control in the Filters Inspector is set to Composite.

Note: If the clip you add a Green Screen Keyer filter to is not visible in the canvas, the initial key is pulled based on the first or last frame of the clip, whichever is closest to the playhead.
If the automatic key is too aggressive (keying out soft details of the foreground subject that you want to preserve), open the Filters Inspector, then slowly drag the Strength slider left to reduce the tolerance (core transparency) of the matte until you’re satisfied with the amount of edge detail in the key.
Doing so allows areas of marginal transparency like hair, smoke, and reflections to show through. In general, it’s better to err on the side of a less aggressive key, using the parameters within the Matte Tools group to fine-tune the soft details you’re trying to preserve. See Refine a key using matte tools, below.

Tip: To see how the Chroma and Luma parameters are affected as you adjust the Strength slider, look at the Color Selection controls in the Filters Inspector. (Click the disclosure triangle beside the Color Selection parameter to see the controls.)
Override automatic color sampling and set your own key colors
Although the Green Screen Keyer filter automatically samples your keying color, you can override that sampling and set the key colors manually. You might want to do this if you use a background screen color other than green or blue, or if the green screen or blue screen was unevenly lit.
In Motion, select an applied Green Screen Keyer filter in the Layers list, then open the Filters Inspector or HUD.
Set the Strength slider to 0.
Automatic color sampling is disabled, and the color screen background becomes visible in the canvas.
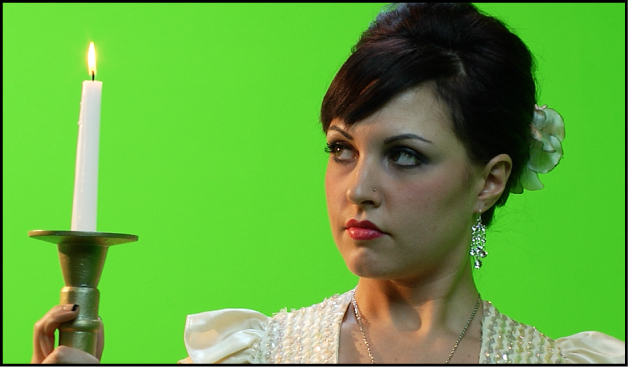
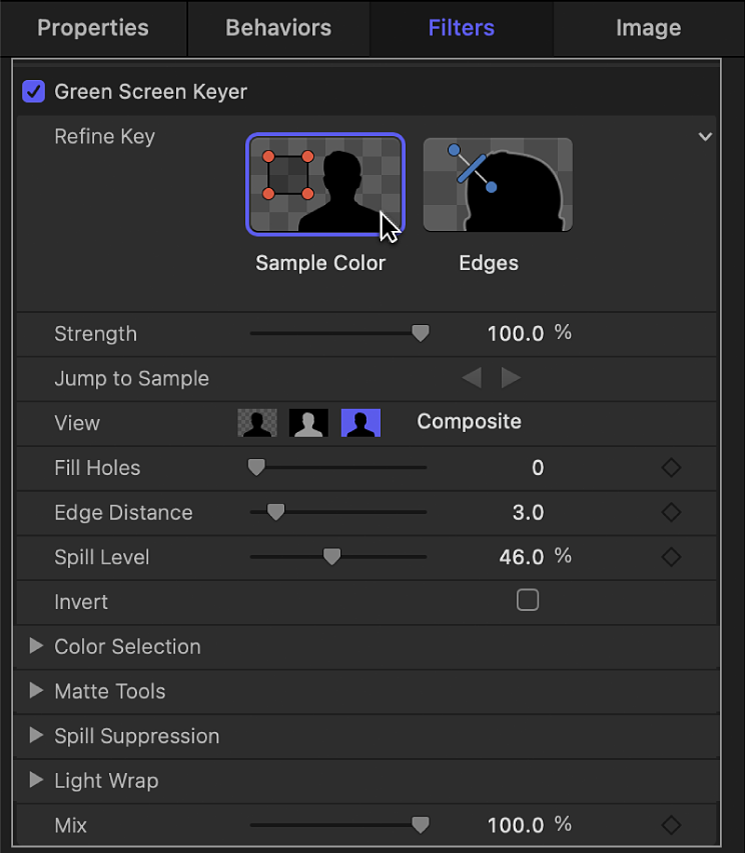
In the Filters Inspector (or HUD), click to select the Sample Color tool.
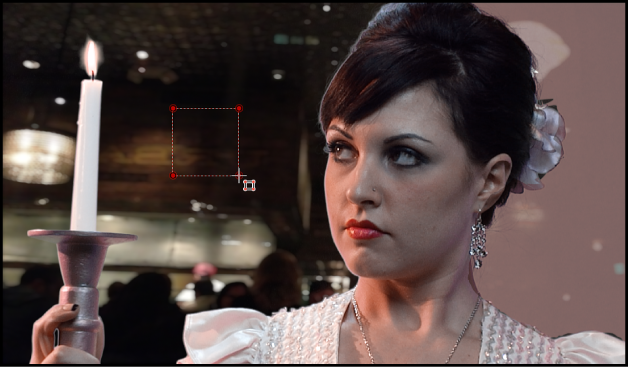
In the canvas, drag a selection rectangle over an area of the screen color you want to key.
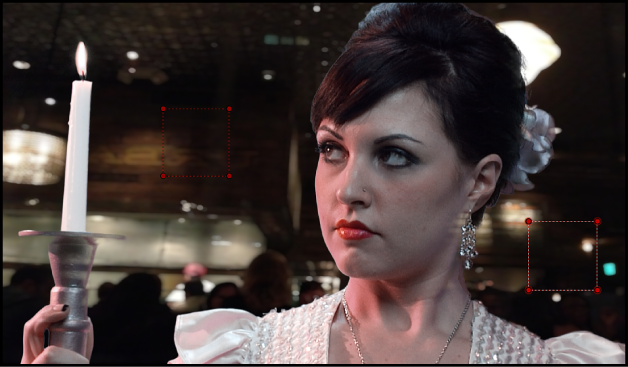
Most of the color screen should disappear and be replaced by the image in the layer underneath the foreground layer in the Layers list. You can add as many selection rectangles as necessary to sample areas of the color screen (for example, highlights or shadows on the color screen) to achieve a better result.
If the edges of the foreground subject are too sharp, use the Edges tool to soften the foreground edges. The Edges tool is also effective for fine-tuning semitransparent features such as smoke, glass reflections, and shadows.
In the Filters Inspector or HUD, click to select the Edges tool.
In the canvas, drag over the edge of the foreground subject and, when an Edges control line appears, keep dragging so that one end point lies in the interior of the foreground subject and the other end point lies in the background.
In the canvas, drag the center handle of the Edges control line to adjust the edge transparency of the keyed subject.
You can also set the View mode to Matte in the Filters Inspector, which helps you see the effect of using the Edges tool.
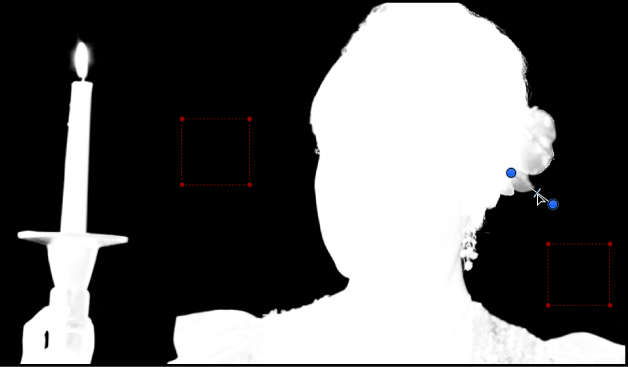
Tip: To see how the Edges control alters the outer softness graph of the Chroma control and the bottom softness handles of the Luma controls, look at the Color Selection controls in the Filters Inspector as you make adjustments. (Click the disclosure triangle beside the Color Selection parameter to see the controls.)
Set your own key colors using keyboard shortcuts
When manually sampling colors to create a key, you can use keyboard shortcuts instead of clicking the Sample Color tool and Edge tool in the Inspector.
In the Layers list in Motion, select the Green Screen Keyer filter to adjust.
Do one of the following:
To create a Sample Color selection rectangle, press and hold the Shift key while dragging over the color you want to key in the canvas.
To create an Edges sampling control, press and hold the Command key while dragging to draw a line that crosses over the edge of the subject you’re keying in the canvas.
To remove a Sample Color or an Edges control, Option-click anywhere in the sample control you want to delete, or click to select a sample control, then press the Delete key.
Refine a key using the Color Selection controls
With the Green Screen Keyer filter selected in the Layers list in Motion, set the View mode in the Filters Inspector to Matte.
Matte mode lets you see how your adjustments affect the transparency of the image. The keyed image now appears in grayscale: white areas represent solid pixels in the final matte; black areas represent transparent pixels in the final matte; and varying levels of gray represent translucent pixels in the final matte (darker gray is more transparent; lighter gray is more opaque).
Click the disclosure triangle in the Color Selection row of the Filters Inspector to reveal additional controls.
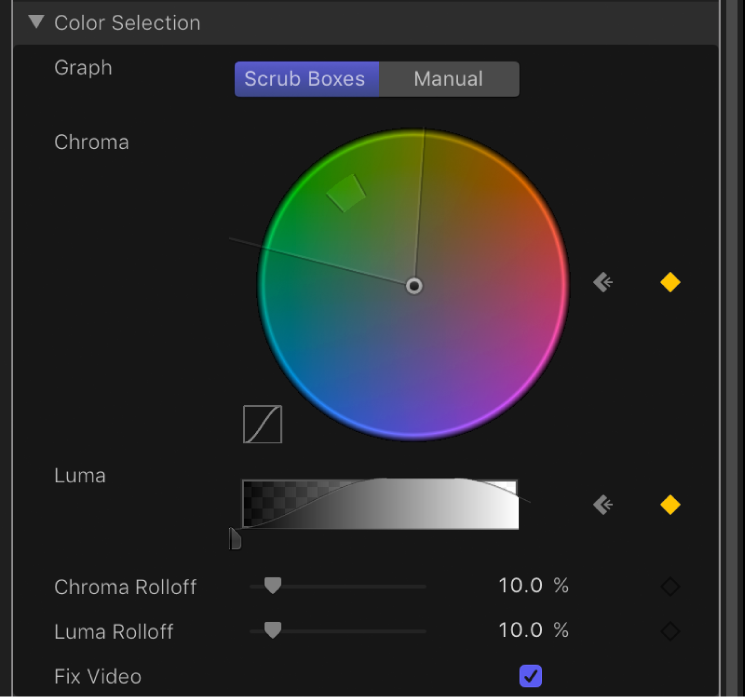
Click one of the two Graph views to select a mode for the adjustments you need:
Scrub Boxes: Remain in Scrub Boxes mode (the default) if you’re satisfied with the current key but want to adjust the edge softness of the resulting matte. In Scrub Boxes mode, you can adjust the outer graph of the Chroma control and the lower handles of the Luma control to increase or decrease the translucency of the edges of the matte.
Manual: Click Manual to make substantial alterations to tolerance (core transparency) and edge softness in the matte. In Manual mode, you can adjust the inner and outer graphs of the Chroma control, as well as the upper and lower handles of the Luma control to alter all aspects of transparency in the matte. In Manual mode, you cannot alter the Strength parameter or add more Sample Color or Edges controls in the canvas.
After you enter Manual mode, do not return to Scrub Boxes mode.
Note: For more information on keyframing the Color Selection controls, see Animating color key parameters in Motion.
Depending on the mode you selected in the previous step, adjust the controls to alter your matte:
In Scrub Boxes mode, drag any side of the outer graph in the Chroma control to alter the range of hue and saturation contributing to the matte’s edge softness (transparency around the edges of the key).
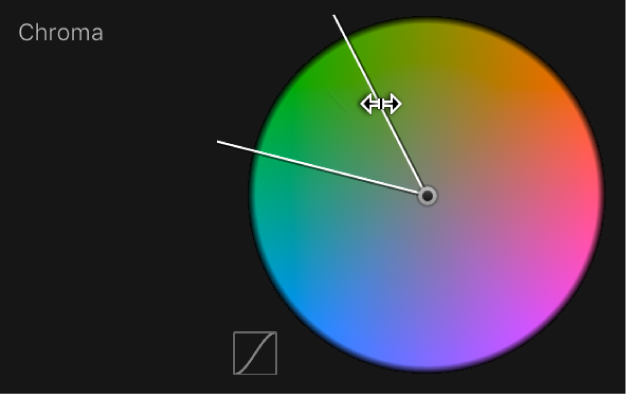
Note: In Scrub Boxes mode, you can also drag the two lower handles of the Luma control to alter the range of lightness and darkness contributing to the matte’s edge softness.
In Manual mode, drag any side of the outer graph in the Chroma control to alter the range of hue and saturation contributing to the matte’s edge softness. Drag any side of the inner graph to alter the range of hue and saturation contributing to the matte’s tolerance (core softness). Drag in the center of the inner graph to rotate the graph to a new position in the color wheel.
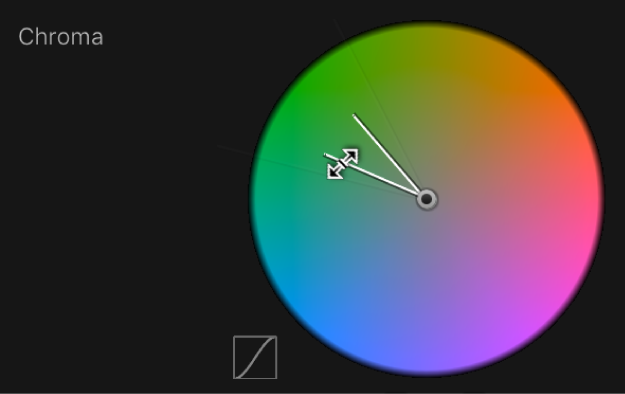
Note: In Manual mode, you can also drag any of the four Luma control handles. The two upper Luma handles alter the range of lightness and darkness contributing to the matte’s tolerance (core transparency); the two lower handles alter the range of lightness and darkness contributing to matte’s edge softness.
In either mode, expanding the Chroma graph or Luma handle outward increases the regions of transparency in the keyed image. Dragging the side of a Chroma graph or a Luma handle inward diminishes the transparent regions in the keyed image. In the example below, the top image shows the holes in the matte that result from increasing edge softness using the outer graph of the Chroma control. The bottom image shows how reducing edge softness closes these holes.
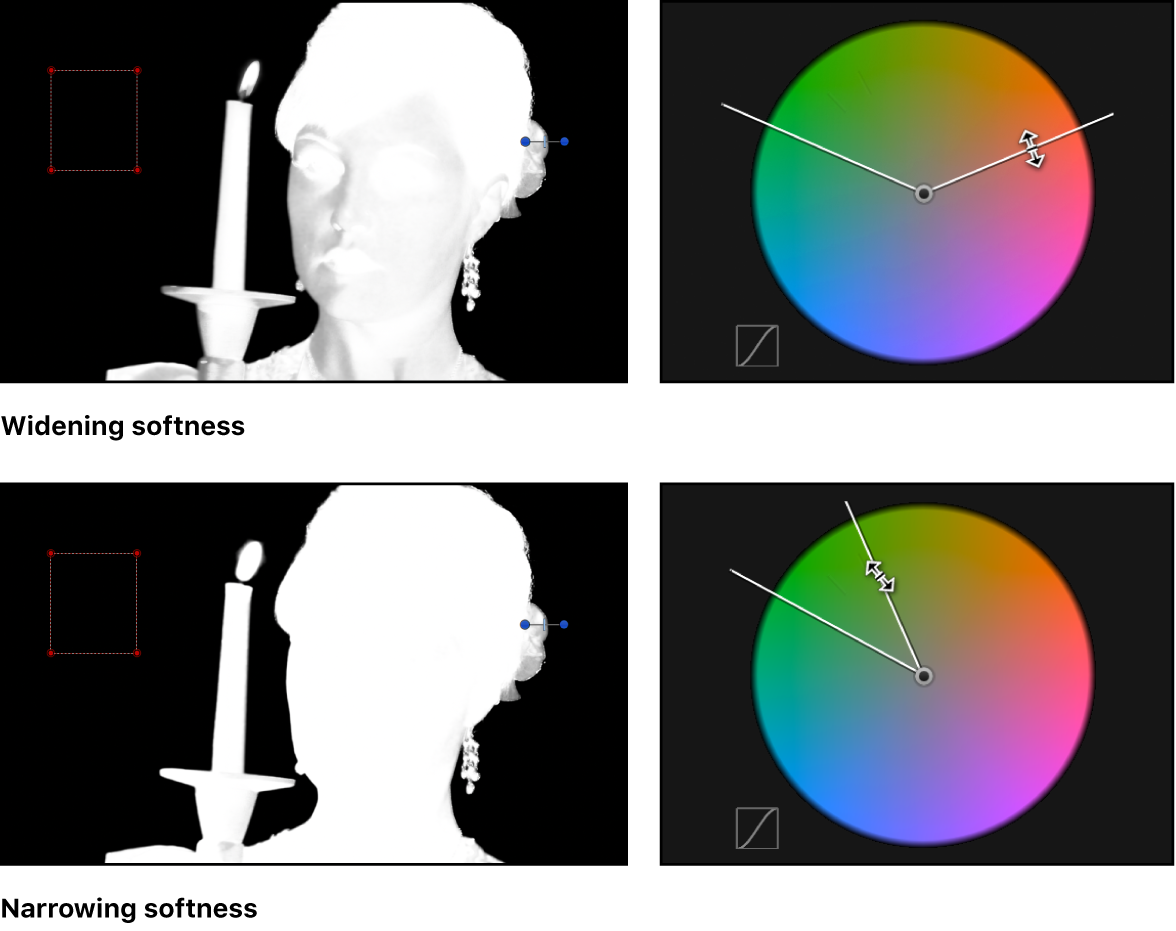
If you haven’t adjusted the Luma control, drag the left or right lower handles to alter the softness of the luma component of the image.

Tip: In Manual mode, you can adjust the lower handles by dragging the bar connecting the top and bottom handles. To adjust all handles simultaneously, drag inside the curve in the graph.
Adjust the Chroma and Luma Rolloff sliders to subtly alter the falloff between the tolerance and softness of the key.

Refine a key using matte tools
With the Green Screen Keyer filter selected in the Layers list in Motion, set the View mode in the Filters Inspector to Matte.
Matte mode lets you see how adjustments affect the transparency of the image. The keyed image appears in grayscale: white areas represent solid pixels in the final matte; black areas represent transparent pixels in the final matte; and varying levels of gray represent translucent pixels in the final matte (darker gray is more transparent; lighter gray is more opaque).
In the Filters Inspector, click the disclosure triangle of the Matte Tools row.
The row expands to reveal the Levels control, which adjusts the contrast of the matte. Also revealed are the Shrink/Expand slider, the Soften slider, and the Erode slider.
Use the Levels control to modify transparency and contrast in the matte.
A general rule for using the Levels control is to drag the center Bias handle left to decrease transparency in the matte or right to increase transparency in the matte. The Black slider on the left and the White slider on the right modify contrast in the shadows and highlights of the matte.
The effects of Levels adjustments are best seen when View is set to Matte. In this view, the white area of the matte is the solid part, and the black area of the matte is the transparent part. Gray is translucent, with lighter grays creating progressively more transparency. With this in mind, here are some guidelines:
Dragging the black bias handle right pushes gray areas to black, expanding areas of transparency within the matte.
Dragging the center bias handle left pushes the grays in the matte towards white, widening solid areas of the key as semitransparent areas are made solid.
Dragging the center bias handle right pushes the grays in the matte towards black, widening transparent areas of the key as semitransparent areas are made transparent.
Dragging the white bias handle left pushes the grays in the matte towards white, expanding areas of solidity within the matte.
Drag the Shrink/Expand slider left to shrink the matte inwards, widening holes in the matte; drag the Shrink/Expand slider right to expand the matte outward, filling in holes in the matte.

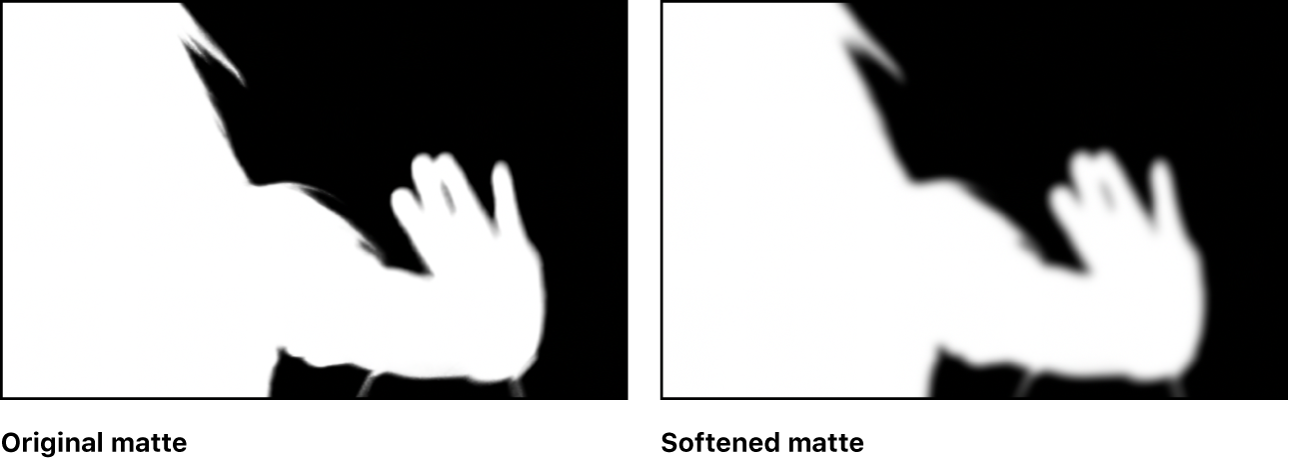
Drag the Soften slider right to blur the matte overall, resulting in softer edges throughout the matte.
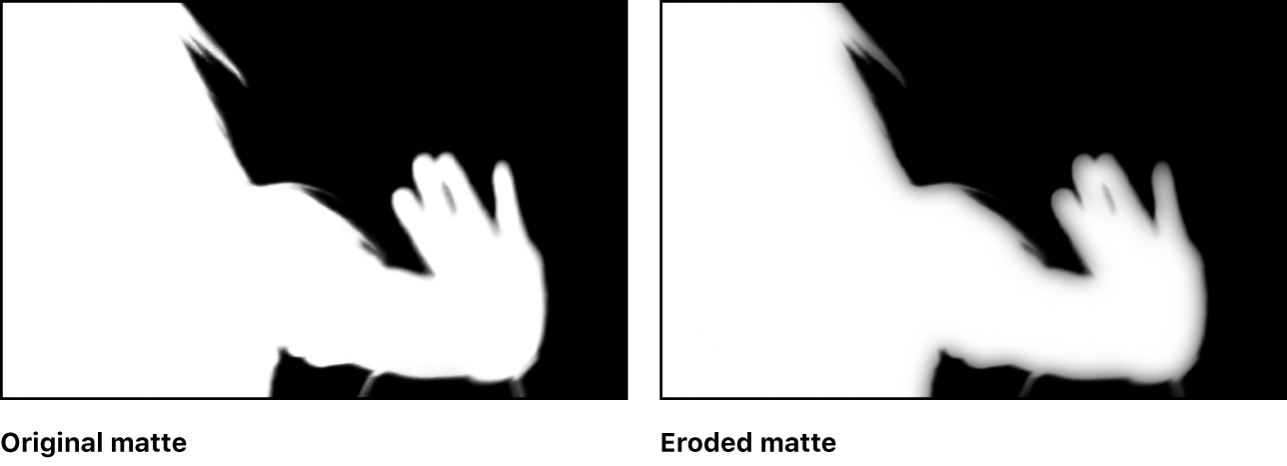
Drag the Erode slider right to soften the matte from the edge inward, while preserving the original matte outlines as a translucent outer boundary.
Download this guide: Apple Books | PDF