Motion User Guide
- Welcome
-
- Intro to basic compositing
-
- Intro to transforming layers
-
- Intro to transforming layers in the canvas
- Transform layer properties in the canvas
- Transform tools
- Change layer position, scale, or rotation
- Move a layer’s anchor point
- Add a drop shadow to a layer
- Distort or shear a layer
- Crop a layer
- Modify shape or mask points
- Transform text glyphs and other object attributes
- Align layers in the canvas
- Transform layers in the HUD
- Transform 2D layers in 3D space
-
- Intro to behaviors
- Behaviors versus keyframes
-
- Intro to behavior types
-
- Intro to Parameter behaviors
- Audio behavior
- Average behavior
- Clamp behavior
- Custom behavior
- Add a Custom behavior
- Exponential behavior
- Link behavior
- Logarithmic behavior
- MIDI behavior
- Add a MIDI behavior
- Negate behavior
- Oscillate behavior
- Create a decaying oscillation
- Overshoot behavior
- Quantize behavior
- Ramp behavior
- Randomize behavior
- Rate behavior
- Reverse behavior
- Stop behavior
- Track behavior
- Wriggle behavior
-
- Intro to Simulation behaviors
- Align to Motion behavior
- Attracted To behavior
- Attractor behavior
- Drag behavior
- Drift Attracted To behavior
- Drift Attractor behavior
- Edge Collision behavior
- Gravity behavior
- Orbit Around behavior
- Random Motion behavior
- Repel behavior
- Repel From behavior
- Rotational Drag behavior
- Spring behavior
- Vortex behavior
- Wind behavior
- Additional behaviors
-
- Intro to using generators
- Add a generator
-
- Intro to image generators
- Caustics generator
- Cellular generator
- Checkerboard generator
- Clouds generator
- Color Solid generator
- Concentric Polka Dots generator
- Concentric Shapes generator
- Gradient generator
- Grid generator
- Japanese Pattern generator
- Lens Flare generator
- Manga Lines generator
- Membrane generator
- Noise generator
- One Color Ray generator
- Op Art 1 generator
- Op Art 2 generator
- Op Art 3 generator
- Overlapping Circles generator
- Radial Bars generator
- Soft Gradient generator
- Spirals generator
- Spiral Drawing generator
- Use Spiral Drawing onscreen controls
- Star generator
- Stripes generator
- Sunburst generator
- Truchet Tiles generator
- Two Color Ray generator
- Save a modified generator
-
- Intro to filters
- Browse and preview filters
- Apply or remove filters
-
- Intro to filter types
-
- Intro to Color filters
- Brightness filter
- Channel Mixer filter
- Color Adjustments filter
- Color Balance filter
- Example: Color-balance two layers
- Color Curves filter
- Use the Color Curves filter
- Color Reduce filter
- Color Wheels filter
- Use the Color Wheels filter
- Colorize filter
- Contrast filter
- Custom LUT filter
- Use the Custom LUT filter
- Gamma filter
- Gradient Colorize filter
- HDR Tools filter
- Hue/Saturation filter
- Hue/Saturation Curves filter
- Use the Hue/Saturation Curves filter
- Levels filter
- Negative filter
- OpenEXR Tone Map filter
- Sepia filter
- Threshold filter
- Tint filter
-
- Intro to Distortion filters
- Black Hole filter
- Bulge filter
- Bump Map filter
- Disc Warp filter
- Droplet filter
- Earthquake filter
- Fisheye filter
- Flop filter
- Fun House filter
- Glass Block filter
- Glass Distortion
- Insect Eye filter
- Mirror filter
- Page Curl filter
- Poke filter
- Polar filter
- Refraction filter
- Ring Lens filter
- Ripple filter
- Scrape filter
- Sliced Scale filter
- Use the Sliced Scale filter
- Sphere filter
- Starburst filter
- Stripes filter
- Target filter
- Tiny Planet filter
- Twirl filter
- Underwater filter
- Wave filter
-
- Intro to Stylize filters
- Add Noise filter
- Bad Film filter
- Bad TV filter
- Circle Screen filter
- Circles filter
- Color Emboss filter
- Comic filter
- Crystallize filter
- Edges filter
- Extrude filter
- Fill filter
- Halftone filter
- Hatched Screen filter
- Highpass filter
- Indent filter
- Line Art filter
- Line Screen filter
- MinMax filter
- Noise Dissolve filter
- Pixellate filter
- Posterize filter
- Relief filter
- Slit Scan filter
- Slit Tunnel filter
- Texture Screen filter
- Vignette filter
- Wavy Screen filter
- About filters and color processing
- Publish filter controls to Final Cut Pro
- Using filters on alpha channels
- Filter performance
- Save custom filters
-
- Intro to 3D objects
- Add a 3D object
- Move and rotate a 3D object
- Reposition a 3D object’s anchor point
- Exchange a 3D object file
- 3D object intersection and layer order
- Using cameras and lights with 3D objects
- Save custom 3D objects
- Guidelines for working with 3D objects
- Working with imported 3D objects
-
- Intro to 360-degree video
- 360-degree projects
- Create 360-degree projects
- Add 360-degree video to a project
- Create a tiny planet effect
- Reorient 360-degree media
- Creating 360-degree templates for Final Cut Pro
- 360-degree-aware filters and generators
- Export and share 360-degree projects
- Guidelines for better 360-degree projects
-
- Intro to settings and shortcuts
-
- Intro to Keyboard shortcuts
- Use function keys
- General keyboard shortcuts
- Audio list keyboard shortcuts
-
- Tools keyboard shortcuts
- Transform tool keyboard shortcuts
- Select/Transform tool keyboard shortcuts
- Crop tool keyboard shortcuts
- Edit Points tool keyboard shortcuts
- Edit shape tools keyboard shortcuts
- Pan and Zoom tools keyboard shortcuts
- Shape tools keyboard shortcuts
- Bezier tool keyboard shortcuts
- B-Spline tool keyboard shortcuts
- Paint Stroke tool keyboard shortcuts
- Text tool keyboard shortcuts
- Shape mask tools keyboard shortcuts
- Bezier Mask tool keyboard shortcuts
- B-Spline Mask tool keyboard shortcuts
- Transport control keyboard shortcuts
- View option keyboard shortcuts
- HUD keyboard shortcuts
- Inspector keyboard shortcuts
- Keyframe Editor keyboard shortcuts
- Layers keyboard shortcuts
- Library keyboard shortcuts
- Media list keyboard shortcuts
- Timeline keyboard shortcuts
- Keyframing keyboard shortcuts
- Shape and Mask keyboard shortcuts
- 3D keyboard shortcuts
- Miscellaneous keyboard shortcuts
- Touch Bar shortcuts
- Move assets to another computer
- Work with GPUs
- Glossary
- Copyright

Keyframe Editor controls in Motion
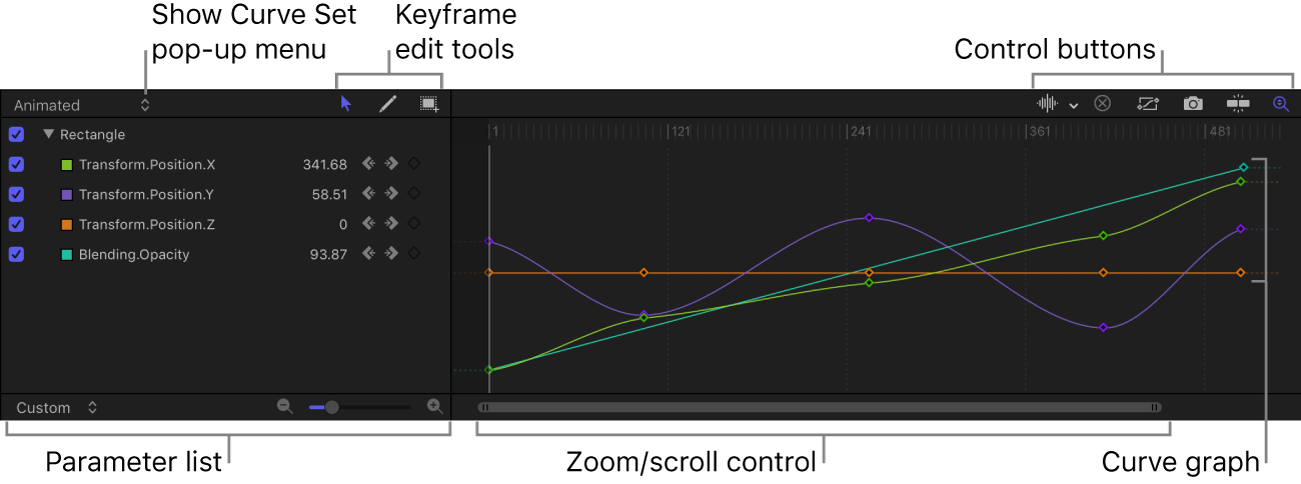
The Keyframe Editor comprises a list of parameters on the left, a multifunctional graph on the right where keyframes and curves for each parameter are displayed, and tools for modifying keyframes and curves. These elements are described below:

Show Curve Set pop-up menu: Choose an item from the menu to filter the parameters shown in the Keyframe Editor. See Choose a curve view in Motion.
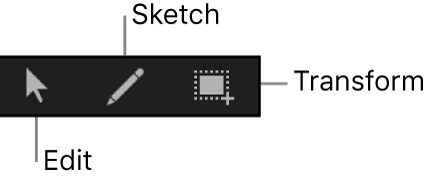
Keyframe editing tools: Select any of three tools for editing keyframes and curves in the graph:

Edit Keyframes tool: Select and edit keyframes the same way you edit Bezier curves.
Sketch Keyframes tool: Manually draw curves that generate keyframes conforming to the shape drawn.
Transform Keyframes tool: Drag a selection box to enclose and manipulate a group of keyframes simultaneously.
For more information about using these tools, see Modify keyframes in the Keyframe Editor in Motion.
Parameter list: View keyframeable parameters of selected objects, including image layers, filters, and behaviors. When you select multiple objects in the Layers list or Timeline, you can compare their parameters here. The parameter list contains the following items:
Activation checkbox: Checkboxes in the left column set which parameters are displayed in the graph. Deselect a checkbox to hide a parameter’s keyframes and curves from the graph on the right.
Parameter name: Object and parameter names appear in the second column of the parameter list. Control-click a parameter name to apply a Parameter behavior from the shortcut menu.
Value: Parameter values at the playhead position appear in the third column. Modify a parameter value by dragging left or right over the number in this field. Or double-click the field, then enter a new value. The value displayed and editing options depend on several factors: If the playhead is on a keyframe, this field shows the value for that keyframe, and adjusting the value alters the keyframe. If the playhead is not on a keyframe, this field shows the value of that parameter at the current frame. If the parameter has keyframes, adjusting the value creates a new keyframe at that frame. (For more information on changing the values of keyframes, see Modify keyframes in the Keyframe Editor in Motion.)
Keyframe and keyframe navigation buttons: Keyframe controls appear in the fourth column. These controls are identical to those found in the Inspector: the Previous Keyframe button, Add/Delete Keyframe button, and Next Keyframe button. See Animate from the Inspector in Motion.
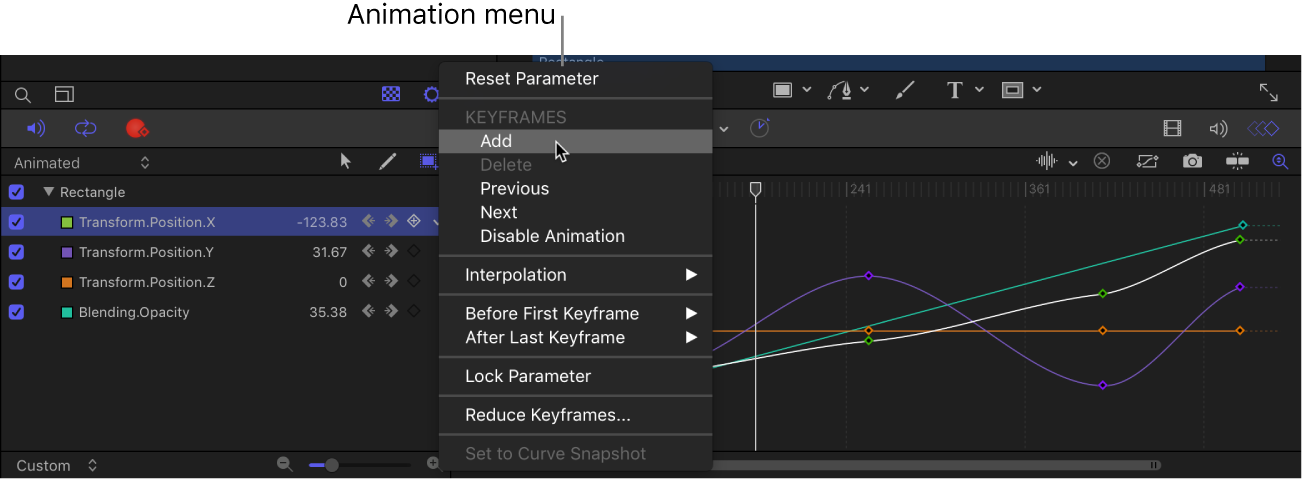
Animation menu: The Animation menu appears for each parameter in the list. To open this menu, position the pointer over the far-right side of a parameter row, then click the down arrow that appears. The Animation menu in the Keyframe Editor contains all commands found in the Inspector’s Animation menu, plus several additional commands:

Reset Parameter: Removes keyframes and settings for the parameter, restoring the default value.
Add: Adds a keyframe at the current frame in the Keyframe Editor. If the playhead is positioned on a frame where a keyframe has been added, this command is unavailable. (Alternatively, you can use a keyboard shortcut—Control-K—to add a keyframe.)
Delete: Deletes the current keyframe. This command is available if the playhead is positioned on a frame where a keyframe exists.
Previous: Moves the playhead to the previous keyframe for this parameter. This command is available if a keyframe exists earlier in the project.
Next: Moves the playhead to the next keyframe for this parameter. This command is available if a keyframe exists later in the project.
Enable/Disable Animation: Activates or deactivates the keyframed value. Choosing Disable Animation hides the keyframes you set, restoring the parameter to its default value. However, the keyframes are not thrown away. Choosing Enable Animation returns the parameter to its last keyframed state.
Interpolation: Sets the type of curve for the parameter. See Curve interpolation methods in Motion for examples of the different interpolation methods. Choose Constant, Linear, Bezier, Continuous, Exponential, or Logarithmic. Exponential and Logarithmic are only visible from the Interpolation submenu when you Control-click a keyframe in the Keyframe Editor.
Before First Keyframe: Defines what happens between the first keyframe and the beginning of the clip. See Set curve extrapolation in Motion for examples of extrapolation methods. Choose Constant, Linear, Ping-Pong, Repeat, or Progressive. You can also turn the extrapolation into keyframes by choosing Generate Keyframes.
After Last Keyframe: Defines what happens between the last keyframe and the end of the clip. See Set curve extrapolation in Motion for examples of extrapolation methods. Choose Constant, Linear, Ping-Pong, Repeat, or Progressive. You can also turn the extrapolation into keyframes by choosing Generate Keyframes.
Lock/Unlock Parameter: Locks the parameter from changes. When a parameter is locked, neither keyframes nor curves are adjustable.
Reduce Keyframes: Opens the Reduce Keyframes dialog, which lets you apply a thinning algorithm to the keyframes for the parameter. This reduces the number of keyframes in a parameter while preserving the shape of the curve. The thinning algorithm can be adjusted in two ways: Increasing the Maximum Error Tolerance results in fewer keyframes; increasing the Smoothing Factor makes smoother curves between keyframe values.
Set to Curve Snapshot: Reverts keyframe changes made in the selected curve to the most recent snapshot. This command is available when Take/Show Curve Snapshot is turned on (the camera button in the upper-right corner of the Keyframe Editor). See Compare curve snapshots in Motion.
Graph area: Shows the keyframes and curves of active parameters (those in the parameters list). Each curve is a different color, although some colors are duplicated. Areas before the first keyframe and after the last keyframe are represented by dotted lines. Selected parameters and keyframes appear white.
A time ruler shows the locations of keyframes, project markers, playback In and Out points, and the playhead. Zoom controls at the bottom of the graph let you focus on specific regions of the sequence. For more information on using the zoom/scroll controls, see Customize the Timeline in Motion.
Audio Waveform pop-up menu: Turns on the display of audio waveforms for the selected item in the background of the graph. This lets you line up a video effect with an audio event. If there are multiple audio tracks in the project, you can use this menu to view the waveform of any individual audio track in the project, or the overall audio mix in the Output audio track.

Clear Curve List button: Deletes all items in the parameter list from a custom set.

Fit Visible Curves in Window button: Scales the graph area vertically and horizontally so that the curve is entirely visible. This button does not change the value of your keyframes.

Take/Show Curve Snapshot button: Turns on and turns off the state of all curves in the Keyframe Editor. With a snapshot turned on, the original unaltered curve is represented by a lighter color—visible in the background behind the curves you’re adjusting—and can be used as a reference showing the curve’s original values. As long as you remain in the Keyframe Editor editing the current set of curves, the snapshot curve remains available. Clicking this button again causes the current snapshot to disappear. For more information about curve snapshots, see Compare curve snapshots in Motion.

Snapping button: Enables snapping. When this control is enabled, keyframes snap to markers, other keyframes, and other snappable items.

Auto-Scale Vertically to Fit Curves button: Rescales the graph vertically so that the curve is entirely visible. This does not change the value of your keyframes.

Tip: You can show the Keyframe Editor on a second display, providing a larger workspace for modifying keyframes and curves. See Use a second display in Motion.
Download this guide: Apple Books | PDF