
Program a basic bass sound in Sculpture in MainStage
This section covers programming of a basic bass sound which serves as the foundation for a number of different bass sound examples. See Program a picked bass sound in Sculpture, Program a slap bass sound in Sculpture, and Program a fretless bass sound in Sculpture.
Sequentially follow the tasks in this section and Refine the basic Sculpture bass sound to learn how different components can be modeled and to gain a fuller understanding of how Sculpture parameters interact.
In MainStage, make sure the range from C 0 to C 3 is available on your keyboard by either transposing your master keyboard, or by using the Transpose function in the Region parameters of your host application.
Note: You can, of course, transpose sounds within Sculpture, but this isn’t the best solution in this case, for the following reason: Sounds would not be compatible with MIDI regions in which note number 60 as middle C is considered to be the measure of all things.
Choose the #default setting from the Settings pop-up menu in Sculpture.
In MainStage, set the Attack value of the amplitude envelope to its minimum value (0.00 ms). The A(ttack) slider is just to the right of the Material Pad.
Shorten the Release time of the amplitude envelope to a value between 4 and 5 ms.
Play a key on your keyboard. The note should stop abruptly when you release the key and should be free of artifacts (a digital crackle or snap). If you encounter any artifacts, carefully increase the Release time.
Play some sustained notes in the range above E 0. These die away too quickly. Correct this quick die-out with the Media Loss parameter by dragging the slider to the left of the Material Pad almost all the way down to the bottom. Note that the low E string on a high-quality bass can sound for over a minute.
Your basic bass should simulate a fingered articulation, which means that the sound is created by striking the strings with fingers.
Choose Pick from the Type pop-up menu of Object 1.
Don’t be confused by the name of the object type; despite the name pick, this model is appropriate for simulating the playing of strings with your fingers.
Play some notes in the lower range. You’ll hear that the sound is very muffled, hollow, and distorted. Before you adjust further parameters in Object 1, you need to set the position of the pickup.
This is accomplished in the Pickup display to the left of the Material Pad. You’ll find three arrow-shaped sliders, representing Objects 1 to 3. The two transparent bell-shaped curves help you to visualize the position and width of Pickup A and Pickup B.
On electric basses the pickups are found quite a way off to the side and near the bridge. This particular bass has only a single pickup.
The behavior of a single pickup is simulated by placing both pickups at exactly the same position.
Drag Pickup B to the exact position of Pickup A while keeping an eye on the help tag. The two thin orange lines should overlap perfectly. As a suitable value for the example, set both pickups to 0.10.
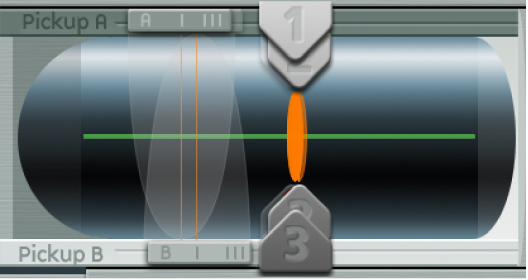
Note: Make sure the Invert switch to the lower left of the Pickup display isn’t turned on, because this would cause the pickups to completely cancel each other out.
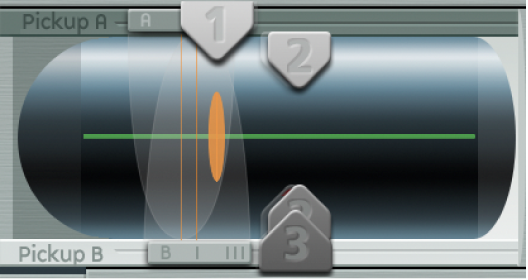
It’s now time to determine the playing position.
Drag the Object 1 slider in the Pickup display in a horizontal direction. Play the keyboard while doing so, to hear the changes it makes.
You’ll quickly realize that you can achieve a precise, crisp sound only when you drag the slider relatively far away from the middle of the string. Move Object 1 closer to the pickup (position 0.15 in the figure below).
The low notes are still distorted. You can remedy this by adjusting the Level knob to the right of the amplitude envelope. Set a value of −10 dB.
Although you can already recognize the sound of an electric bass, it doesn’t sound wiry enough yet. Now it’s time to focus on the bass strings themselves.
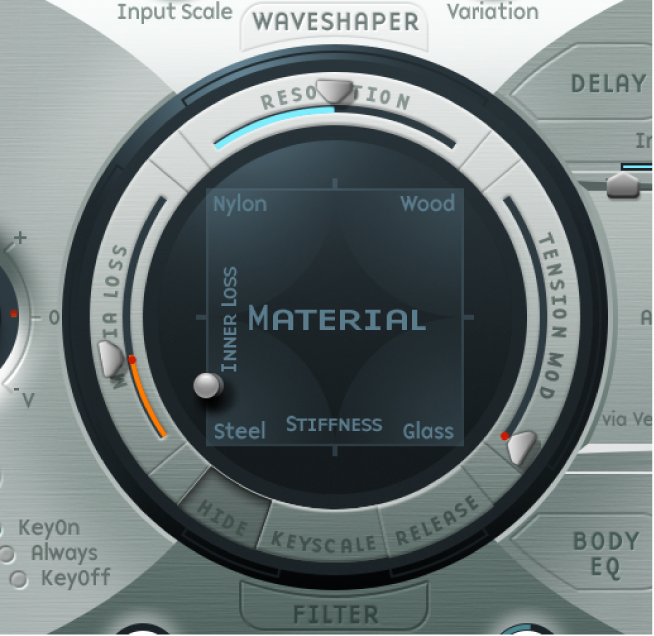
In MainStage, drag the ball in the Material Pad up and down at the left edge. Pay attention to how the overtones react.
Drag the ball to the lower-left corner. The sound should vaguely remind you of the sound of a low piano string. Because the overtones sustain too long, the tone sounds somewhat unnatural.
Drag the ball upward until you hear an acceptable sound. Try the position shown in the figure:
Note: In general, a splaying of the overtones in low wound strings is typical. You can recognize it by the slightly impure, metallic sound. This occurs because the partials (overtones) are not exact whole number multiples of the fundamental frequency but rather are shifted somewhat higher. An example of this effect in the real world of electro-acoustic instruments is the low strings on a Yamaha CP70. This is overkill, but your bass model may benefit from a small amount of this effect.
In MainStage, drag the ball in the Material Pad gradually to the right.
The sound takes on a more pure, bell-like character.
To realistically simulate the splaying of overtones, try the following example setting:

The vibration of a bass string does not occur in a vacuum. The antinode of the string frequently encounters the natural, physical limitations of the instrument. This is heard as the typical buzzing and rattling that occurs when the strings touch the frets.
In MainStage, activate Object 2, and choose Bouncing from the Type pop-up menu.
The sound should now vaguely remind you of a mandolin tremolo. This is far too strong an effect for this kind of sound.
Move Object 2 all the way to the right (a value of 1.00).
Experiment with Object 2 parameters. A discrete and realistic result can be achieved with the following parameter values: Strength 0.33, Timbre −1.00, and Variation −0.69.
Play some low notes, and you’ll find that once again the overtones sustain a little too long—somewhat like the lowest notes or strings on a piano. this can be corrected by dampening the string.
In MainStage, activate Object 3 and choose Damp from the Type pop-up menu.
Move Object 3 all the way to the right (value 1.00).
Set the Strength parameter to 0.18.
Note: Experiment with how the Strength parameter of Object 3 interacts with the Inner Loss Material Pad parameter. The higher the Inner Loss value, the smaller the Strength value can be, and vice versa.
To more realistically replicate the different tonal ranges of the bass, use the scaling function.
When turned on, the key-scaling function is used to adjust the timbre of the sound, independent of pitch. Before using the blue sliders to do this, try the Resolution parameter.
In MainStage, click the Keyscale button at the bottom of the Material Pad. The key scale below C3 is displayed in green, the range above in light blue. The Material Pad with its Keyscale parameters activated is shown here:
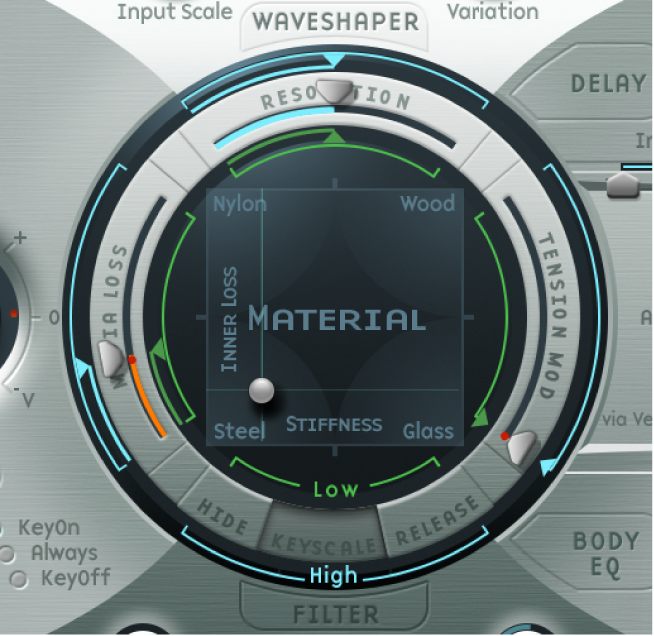
Note: The most relevant performance range for basses is found exclusively below C3. For this reason, you should make use of the green sliders to set the actual timbre of the sound. The primary sliders found around the ring determine the timbre of the sound above C3. For the moment, ignore the blue sliders (which control high key scaling) and simply set them to the same positions as the main sliders.