Create closed captions in Final Cut Pro for Mac
You can use Generate Captions to create closed captions automatically from any spoken English-language audio, or you can create closed captions manually, by adding text in the closed caption editor or by importing closed caption files.
In Final Cut Pro, closed captions are assigned special closed caption roles. To create a new set of closed captions manually, you first choose a closed caption format (CEA-608, iTT, or SRT), then you create a closed caption role specific to that format and a subrole for each language version.
Closed captions are always connected clips. Closed captions can also be connected to other connected clips.
Use Generate Captions to create closed captions automatically
You can use Generate Captions to automatically create closed captions in the timeline from speech in your video.
Note: The Generate Captions feature requires a Mac with Apple silicon and is available in U.S. English only.
Do one of the following:
Control-click the selection and choose Generate Captions > Closed Captions.
Choose Edit > Generate Captions > Closed Captions (or press Shift-Command-C).
Click the Enhancements pop-up menu below the viewer and choose Generate Captions > Closed Captions.
Final Cut Pro transcribes each clip in the selection and automatically connects the resulting closed caption clips to the clips they were transcribed from. The closed caption clips appear in a dedicated closed captions lane at the top of the timeline (see Show or hide closed captions in the timeline).
If you’re creating closed captions for clips that have split edits (J-cuts and L-cuts), Final Cut Pro connects closed caption clips to adjacent clips that overlap the transcribed audio.
Note: If you’re creating captions automatically for the first time, Final Cut Pro downloads the language model and then creates the captions. The download happens only once (an internet connection is required).
When you use Generate Captions to create closed captions automatically, they are created in the iTT format. To convert the closed captions to a different format, see Convert closed captions to another format.
Tip: Background noises, music, or overlapping dialogue might affect the accuracy and timing of automatically generated captions. Try enhancing the spoken audio with Voice Isolation and Noise Removal to improve the quality of the captions. See Enhance audio.
Create closed caption roles and subroles manually
To open the Final Cut Pro role editor, do one of the following:
Choose Modify > Edit Roles.
In the Roles pane of the timeline index, click Edit Roles.
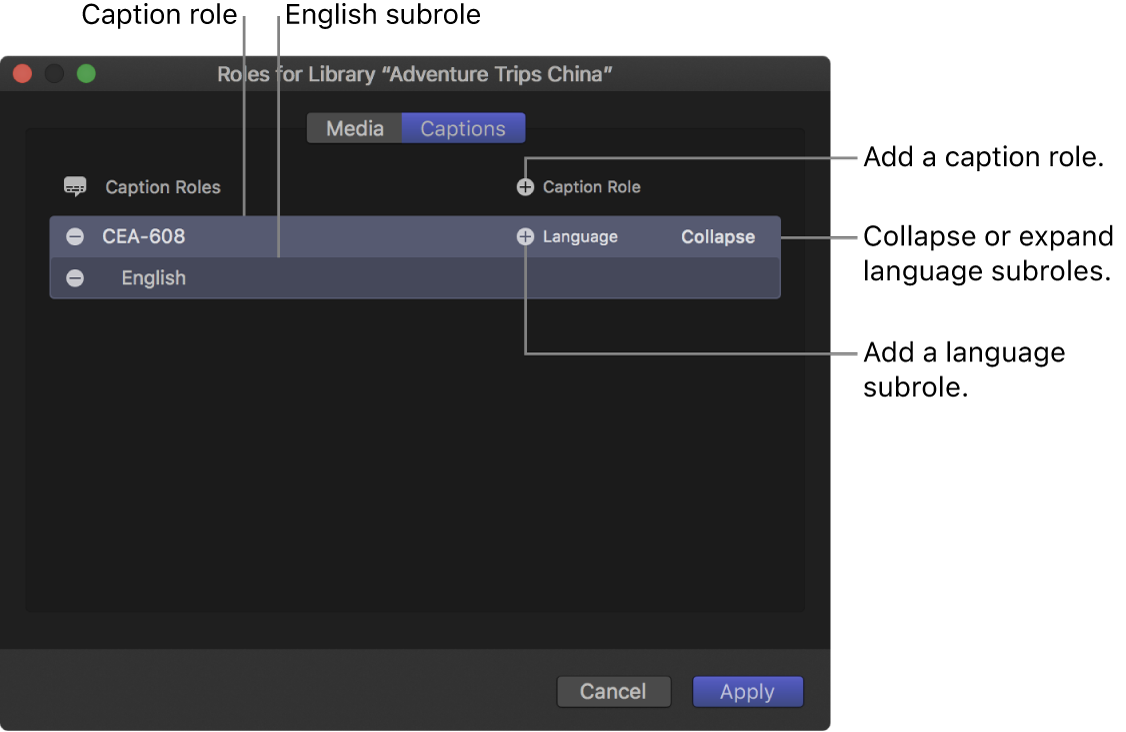
Click Captions at the top of the role editor to open the Captions pane.
To create a closed caption role, click the Caption Role button, then choose a closed caption format from the pop-up menu: iTT, CEA-608, or SRT.
A new closed caption role appears in the Caption Roles list in the format you chose. You can change the name of a role at any time by clicking it.
By default, Final Cut Pro creates a closed caption language subrole based on the preferred language setting in macOS System Settings. For example, if macOS is set to English, Final Cut Pro creates a subrole for the English language. To change the preferred language, choose Apple menu

Type a name for the closed caption role.
To add another language subrole, move the pointer over the closed caption role in the Captions pane, click the Language button, then choose a language from the pop-up menu.

The new language subrole appears in the list below the role.
To delete a closed caption role or a language subrole, move the pointer over the role or subrole, then click the Delete button (–) to the left of the role or subrole name.
Click Apply.
The closed caption roles and subroles you created are now available to any project in the library. To create the actual closed captions and assign them to subroles, see Create closed captions manually, below.


Note: Choosing a language does not affect what kind of characters can be typed into the closed captions. Additional steps may be required for some languages. See Write in another language on Mac in the Mac User Guide.
Create closed captions manually
For the most efficient workflow, make sure the dialogue and related audio in your project are “locked” (completely finished) before you create, sync, or edit the closed captions.
For example, if you were to add closed captions and then make changes to dialogue clips later, you might cause the closed captions to go out of sync with the audio.
In the Final Cut Pro timeline, position the playhead where you want a closed caption to appear.
Choose Edit > Closed Captions > Add Caption (or press Option-C, or Control-Option-C if the closed caption editor is already open).
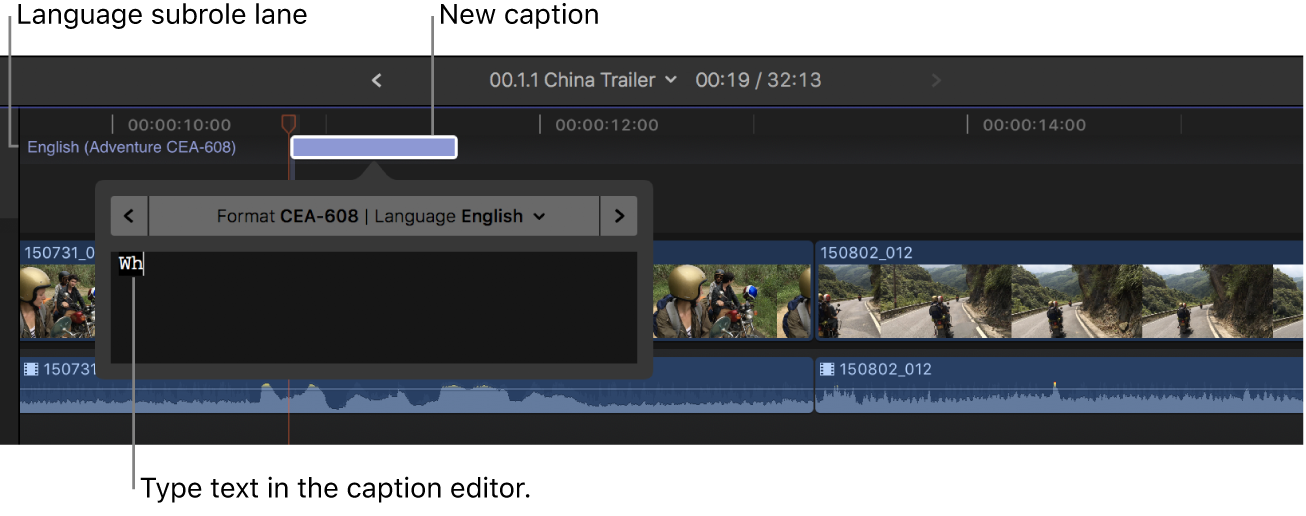
A new closed caption clip appears at the top of the timeline (in a dedicated closed caption lane), and the closed caption editor opens.
The closed caption is connected to the primary storyline at the playhead position. If a connected clip at the playhead position is selected, the closed caption is connected to that clip instead. See Connect a closed caption to a connected clip.
Important: If you move clips earlier or later in the timeline, any connected closed captions move with those clips. If you delete clips, any connected closed captions are deleted.
Type text for your closed caption in the closed caption editor.
For information about adjusting a closed caption’s text style, see Format closed caption text.
Do any of the following:
Create additional closed captions: Repeat steps 1 through 3 for each new closed caption.
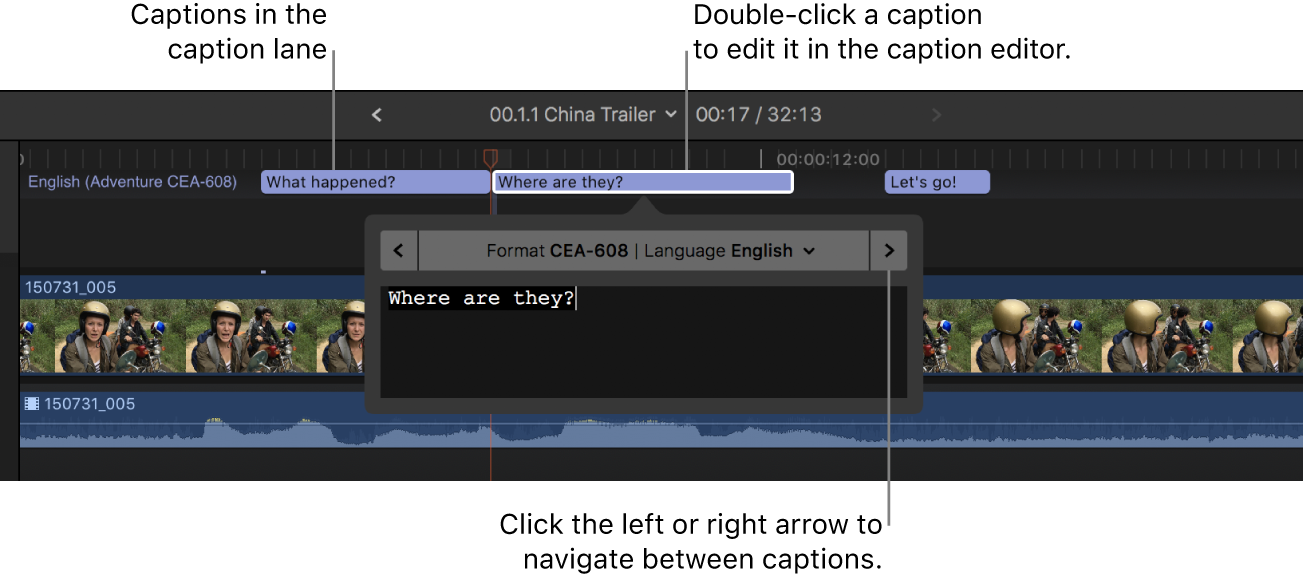
Edit a closed caption’s text: Double-click the closed caption in the timeline (or select it and press Control-Shift-C), then enter your changes in the closed caption editor.
Tip: You can also double-click a closed caption in the Captions pane of the timeline index to open it in the closed caption editor.
If your closed caption doesn’t conform to the specifications of the closed caption format you chose (for example, if the closed caption is too long), the closed caption turns red in the timeline and in the Captions pane of the timeline index, and a warning message appears in the inspector. See the Apple Support article Learn about Final Cut Pro closed caption validation.
Note: When the closed caption editor is open, many single-key keyboard shortcuts (such as J, K, L, I, O, and Space bar) are interpreted as text characters rather than as shortcuts. To use these shortcuts in the closed caption editor, add the Control key. For example, to play in reverse when the closed caption editor is open, press Control-J.
Navigate between closed captions: Click the arrows on either side of the closed caption editor (or press Command-Right Arrow or Command-Left Arrow).
Adjust a closed caption’s duration: Drag its start point or end point. See Arrange and trim closed caption clips in the timeline.
You can also use powerful trimming techniques with closed caption clips. See Cut clips in two and Extend or shorten clips.
Adjust a closed caption’s sync with the clip it’s connected to: Drag the closed caption left or right in the timeline. (When you drag a closed caption clip, it overwrites adjacent closed captions.)


Download this guide: PDF