Logic Pro User Guide for iPad
- Welcome
-
- What is Logic Pro?
- Working areas
- Work with the menu bar
- Work with function buttons
- Work with numeric values
- Undo and redo edits in Logic Pro for iPad
-
- Intro to tracks
- Create tracks
- Create tracks using drag and drop
- Choose the default region type for a software instrument track
- Select tracks
- Duplicate tracks
- Reorder tracks
- Rename tracks
- Change track icons
- Change track colors
- Use the tuner on an audio track
- Show the output track in the Tracks area
- Delete tracks
- Edit track parameters
- How to get help
-
- Intro to recording
-
- Before recording software instruments
- Record software instruments
- Record additional software instrument takes
- Record to multiple software instrument tracks
- Record multiple MIDI devices to multiple tracks
- Record software instruments and audio simultaneously
- Merge software instrument recordings
- Spot erase software instrument recordings
- Replace software instrument recordings
- Route MIDI internally to software instrument tracks
- Record with Low Latency Monitoring mode
- Use the metronome
- Use the count-in
-
- Intro to arranging
-
- Intro to regions
- Select regions
- Cut, copy, and paste regions
- Move regions
- Remove gaps between regions
- Delay region playback
- Trim regions
- Loop regions
- Repeat regions
- Mute regions
- Split and join regions
- Stretch regions
- Separate a MIDI region by note pitch
- Bounce regions in place
- Change the gain of audio regions
- Normalize audio regions in the Tracks area in Logic Pro for iPad
- Create regions in the Tracks area
- Convert a MIDI region to a Session Player region or a pattern region
- Replace a MIDI region with a Session Player region in Logic Pro for iPad
- Rename regions
- Change the color of regions
- Delete regions
-
- Intro to chords
- Add and delete chords
- Select chords
- Cut, copy, and paste chords
- Move and resize chords
- Loop chords on the Chord track
- Color chords on the Chord track
- Edit chords
- Work with chord groups
- Use chord progressions
- Change the chord rhythm
- Choose which chords a Session Player region follows
- Analyze the key signature of a range of chords
- Use Chord ID to analyze the chords in an audio or MIDI region
- Create fades on audio regions
- Extract vocal and instrumental stems with Stem Splitter
- Access mixing functions using the Fader
-
- Intro to Step Sequencer
- Use Step Sequencer with Drum Machine Designer
- Chords and pitch in Step Sequencer
- Record Step Sequencer patterns live
- Step record Step Sequencer patterns
- Load and save patterns
- Modify pattern playback
- Edit steps
- Edit rows
- Edit Step Sequencer pattern, row, and step settings in the inspector
- Customize Step Sequencer
-
- Intro to mixing
-
- Channel strip types
- Channel strip controls
- Peak level display and clipping
- Set channel strip volume
- Set channel strip input format
- Set the output for a channel strip
- Set channel strip pan position
- Mute and solo channel strips
- Reorder channel strips
- Replace a patch on a channel strip using drag and drop
- Work with plug-ins in the Mixer
- Search for plug-ins in the Mixer
-
-
- Effect plug-ins overview
-
- Instrument plug-ins overview
-
- ES2 overview
-
- Modulation overview
- Use the Mod Pad
-
- Vector Envelope overview
- Use Vector Envelope points
- Use Vector Envelope solo and sustain points
- Set Vector Envelope segment times
- Vector Envelope XY pad controls
- Vector Envelope Actions menu
- Vector Envelope loop controls
- Vector Envelope point transition shapes
- Vector Envelope release phase behavior
- Use Vector Envelope time scaling
- Modulation source reference
- Via modulation source reference
- Use macro controls
-
- Sample Alchemy overview
- Interface overview
- Add source material
- Save a preset
- Edit mode
- Play modes
- Source overview
- Synthesis modes
- Granular controls
- Additive effects
- Additive effect controls
- Spectral effect
- Spectral effect controls
- Filter module
- Low, bandpass, and highpass filters
- Comb PM filter
- Downsampler filter
- FM filter
- Envelope generators
- Mod Matrix
- Modulation routing
- Motion mode
- Trim mode
- More menu
- Sampler
- Studio Piano
- Copyright and trademarks
Edit a Synth Bass Player performance in Logic Pro for iPad
You can use the Synth Bass Player styles in Logic Pro for iPad to quickly add authentic synth bass lines to your project.
In addition to the common settings available for all Session Players, the Synth Bass Player styles come with settings unique to each Synth Bass Player. They appear in the Session Player Editor when you use one of the Synth Bass Player styles for the selected Session Player region.
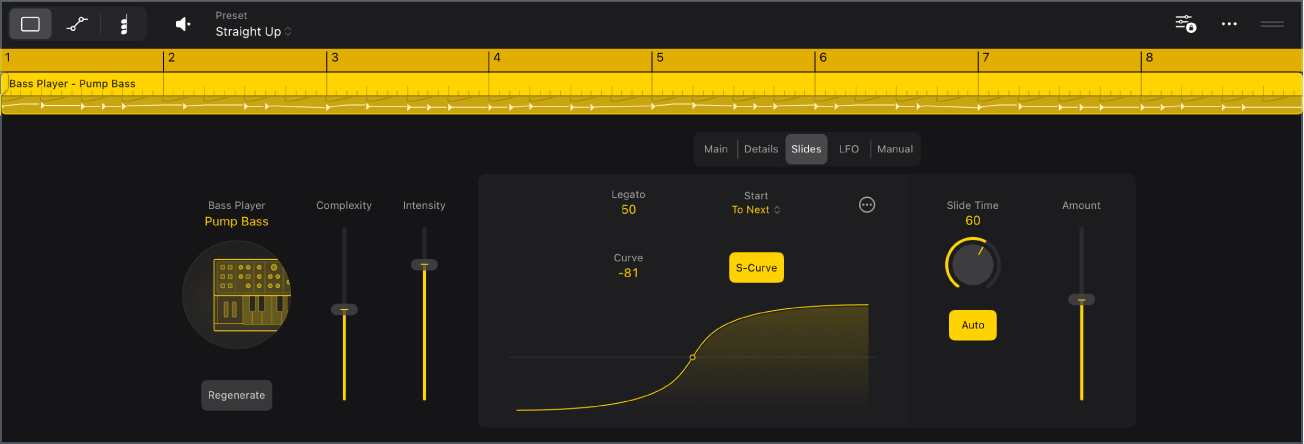
The Synth Bass Player styles are Pump Bass, 808 Bass, and Sequenced Bass.
Adjust the octave and melody for synth basses
In the Main view of the Logic Pro Session Player Editor for the Synth Bass Player styles, drag the puck to a different position in the XY pad.
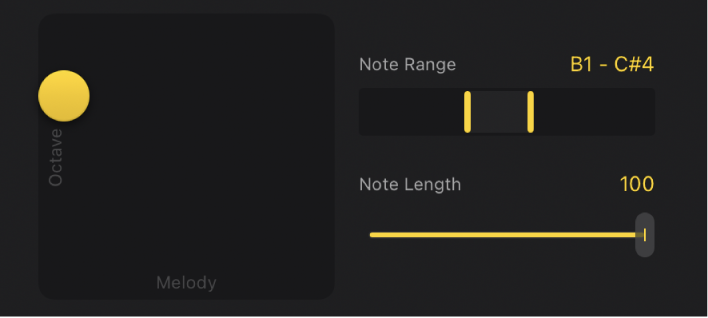
The farther to the right you place the puck, the more notes are played in addition to the root note; the higher you place the puck, the more often notes move up or down in octaves (with the number of octaves depending on the note range setting).
Set the note range for synth basses
You can set the range of notes within a Synth Bass Player bass line.
In the Main view of the Logic Pro Session Player Editor, drag the left and right sliders to set the range of notes used by the Synth Bass Player.
Tip: You can shift the range up or down by touching the area between the handles and dragging left or right.
Add repeats and triplets to the 808 Bass style
For the 808 Bass style, you can embellish the bass line with repeated notes and triplets.
In the Logic Pro Session Player Editor for the 808 Bass, tap the Details button, then do either of the following:
Add repeats: Drag the Repeats knob vertically.
Add triplets: Drag the Triplets knob vertically.
Adjust the sound of the Pump Bass style
The Pump Bass style uses modulated ducking to create a pumping effect similar to a sidechained compressor.
In the Logic Pro Session Player Editor for the Pump Bass style, tap the Details button, then do any of the following:
Change the intensity of the ducking effect: Drag the Amount knob vertically.
Change the shape of the ducking curve: Drag the Shape knob vertically.
Change the phrase length
In Details view for the Synth Bass Player styles, you can change the length of the phrase. The phrase is a sequence of notes that forms a distinct musical idea, such as a repeating bass line. You can set the phrase length to different musical values or to the length of the chords that the region is following.
In the Logic Pro Session Player Editor, tap the Details button, tap the Phrase Length pop-up menu, then choose a different length from the menu.
Add phrase variations to Synth Bass Player styles
In Logic Pro, you can use additional settings with the Synth Bass Player styles to add variations to each repeated phrase of the performance.
In the Session Player Editor, tap the Details button, then do any of the following:
To adjust the probability of rhythmic variations over time: Drag the Rhythm value.
To adjust the probability of notes being transposed by an octave over time: Drag the Octave value.
To adjust the probability of melodic variations over time: Drag the Melody value.
Add slides for Synth Bass Players
For Synth Bass Player styles in Logic Pro, you can add portamento, or slides, to the bass lines.
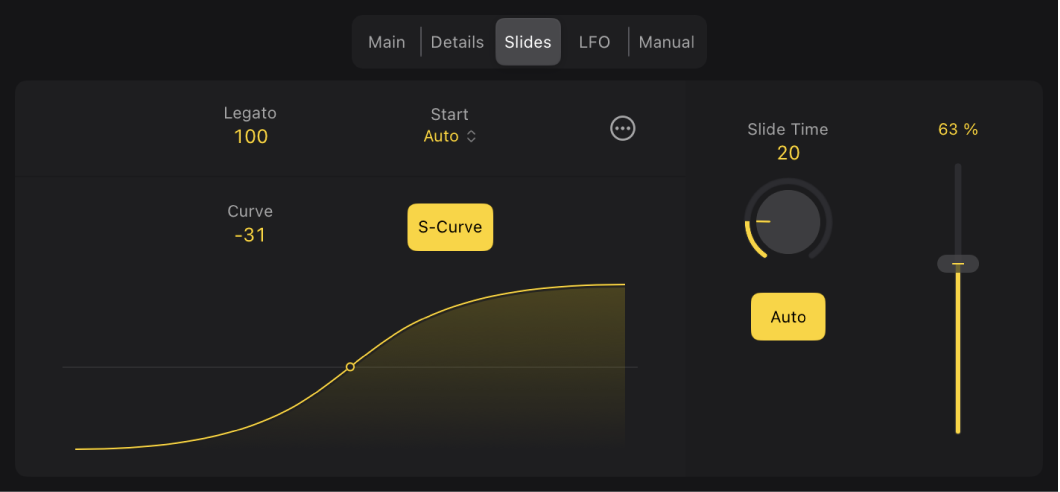
In the Logic Pro Session Player Editor, tap the Slides button for the Synth Player you're using, then do any of the following:
To change the amount of slides: Drag the Amount slider.
To change the length of the slides: Drag the Slide Time knob vertically.
To scale slide length if it extends past the start of the next note: Tap the Auto button.
To change the number of notes that are retriggered when sliding: Drag the Legato value. When the Legato value is 0, all notes get retriggered when the slide reaches the note; when the value is set to 100, no notes are retriggered.
To change where the slide starts in relation to the notes: Choose an option from the Start pop-up menu.
To add curves to the slides: Drag the Curve value vertically. You can also drag vertically on the slide curve to set and alter the curve shape.
To add S-shaped curves to the slides: Tap the S-Curve button. This has no effect when the Curve value is set to 0.
Change the slide mode for use with other software instrument plug-ins
In Logic Pro, if you use the Synth Bass Players with the Studio Bass or another synthesizer plug-in, you can set the slide mode to send slide information to those plug-ins.
In the Session Player Editor, in Slides view for a Synth Bass Player, tap the More button
 , tap Mode, then choose any of the following:
Pitch Bend: Pitch bend automation is used to generate slides. This is the default setting for use with Alchemy.
Studio Bass: Slide information is sent to the Studio Bass plug-in. Curve and S-Curve parameters are not sent when this option is activated.
Overlap: Overlaps are created between notes where slides should occur. The receiving synth plays slides if it’s in mono legato mode and has a glide or portamento set. When Overlap is activated, all slide parameters with the exception of the Amount slider have no effect.
Change MIDI Mono mode slide settings
If you want to send slide information to a MIDI Polyphonic Expression (MPE)–compatible software instrument or synthesizer, you can change the pitch bend range and the MIDI Mono Mode.
In the Logic Pro Session Player Editor, in Slides view for a Synth Bass Player, tap the More button
 , then change one of the following settings:
MIDI Mono Mode pop-up menu: Choose one of the following:
Off
On (Base Channel 1)
On (Base Channel 16)
Pitch Bend Range: Set a value from 0 to 96.
Add 8th or 16th notes to Sequenced Bass patterns
For the Sequenced Bass style, the Add Notes setting adds extra 8th or 16th root notes to the bass line.
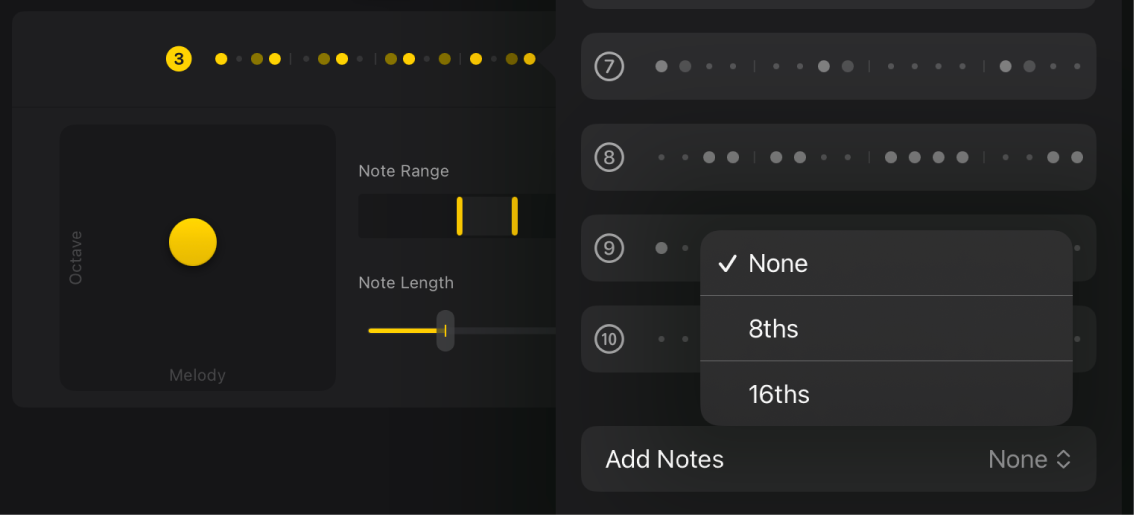
In the Logic Pro Session Player Editor for the Sequenced Bass, tap the Patterns button, then choose a setting from the Add Notes pop-up menu.
Emphasize accents for the Sequenced Bass
For the Sequenced Bass style, you can use velocity, note length, or a MIDI CC target to emphasize the accents derived from the chosen pattern.
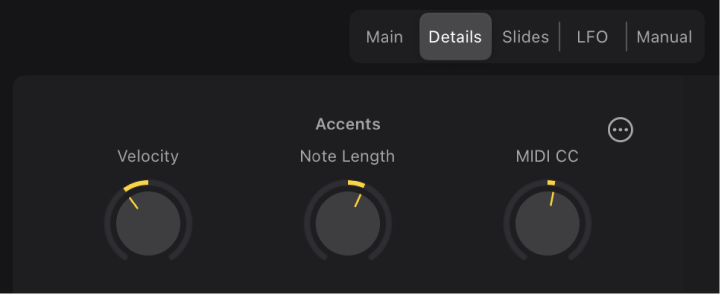
In the Logic Pro Session Player Editor for Sequenced Bass, tap Details, then do any of the following:
Change note velocity accents: Drag vertically on the Velocity knob.
Change note length accents: Drag vertically on the Note Length knob.
Change MIDI CC accents: Drag vertically on the MIDI CC knob.
Change the MIDI CC target: Tap the More button
 , then choose a new CC number in the CC Target pop-up menu.
Change the MIDI CC target for Sequenced Bass accents
In the Logic Pro Session Player Editor for Sequenced Bass, you can change the MIDI CC target assigned to the MIDI CC knob.
Tap Details, tap the More button
 , then choose a new CC number in the CC Target pop-up menu.
Change how Sequenced Bass notes respond to chord changes
The Chord Response setting determines how notes react to chord changes.
In the Logic Pro Session Player Editor for Sequenced Bass, tap the Details button.
Tap the Chord Response pop-up menu, then choose one of the following options:
All: Shift all notes to the new chord.
Shift Bass Notes: Only the bass notes shift to the new chord.
Shift First Note in Chord: Only the first bass note shifts to the new chord.
Shift on Phrase Start: Notes shift to the new chord at the start of a new phrase.
Shift None: All notes stay the same for the length of the region except for those required to adhere to the scale.
Download this guide: PDF