Final Cut Pro User Guide for Mac
- Welcome
- What’s new
-
- Intro to importing media
- If it’s your first import
- Organize files during import
-
- Import from Image Playground
- Import from iMovie for macOS
- Import from iMovie for iOS or iPadOS
- Import from Final Cut Pro for iPad
- Import from Final Cut Camera
- Import from Photos
- Import from Music
- Import from Apple TV
- Import from Motion
- Import from GarageBand and Logic Pro
- Import using workflow extensions
- Record into Final Cut Pro
- Memory cards and cables
- Supported media formats
-
- Intro to effects
-
- Intro to transitions
- How transitions are created
- Add transitions and fades
- Quickly add a transition with a keyboard shortcut
- Set the default duration for transitions
- Delete transitions
- Adjust transitions in the timeline
- Adjust transitions in the inspector and viewer
- Merge jump cuts with the Flow transition
- Adjust transitions with multiple images
- Modify transitions in Motion
- Add adjustment clips
-
- Add storylines
- Use the precision editor
- Conform frame sizes and rates
- Use XML to transfer projects
-
- Intro to sharing projects
- Share to Apple devices
- Share on the web
- Send a video frame to Pixelmator Pro
- Share in email
- Share stereo or spatial video
- Batch sharing
- Share using Compressor
- Create share destinations
- Change metadata for shared items
- View the status of shared items
- Speed up exports with simultaneous processing
- Glossary
- Copyright and trademarks
Send a video frame to Pixelmator Pro in Final Cut Pro for Mac
You can send a single video frame from your timeline directly to Pixelmator Pro to edit it with the app’s professional photo editing, graphic design, digital painting, and illustration tools.
Important: Before you share an image from Final Cut Pro to Pixelmator Pro, update to the latest version of each app, and make sure the apps are compatible. Both apps must be either part of Apple Creator Studio or one-time purchases.
In the Final Cut Pro timeline, position the playhead on the video frame you want to export to Pixelmator Pro as a still image.
Do one of the following:
Choose File > Share > Send Frame to Pixelmator Pro.
Click the Share button in the toolbar, then click Send Frame to Pixelmator Pro.

In the Share window that appears, do any of the following:
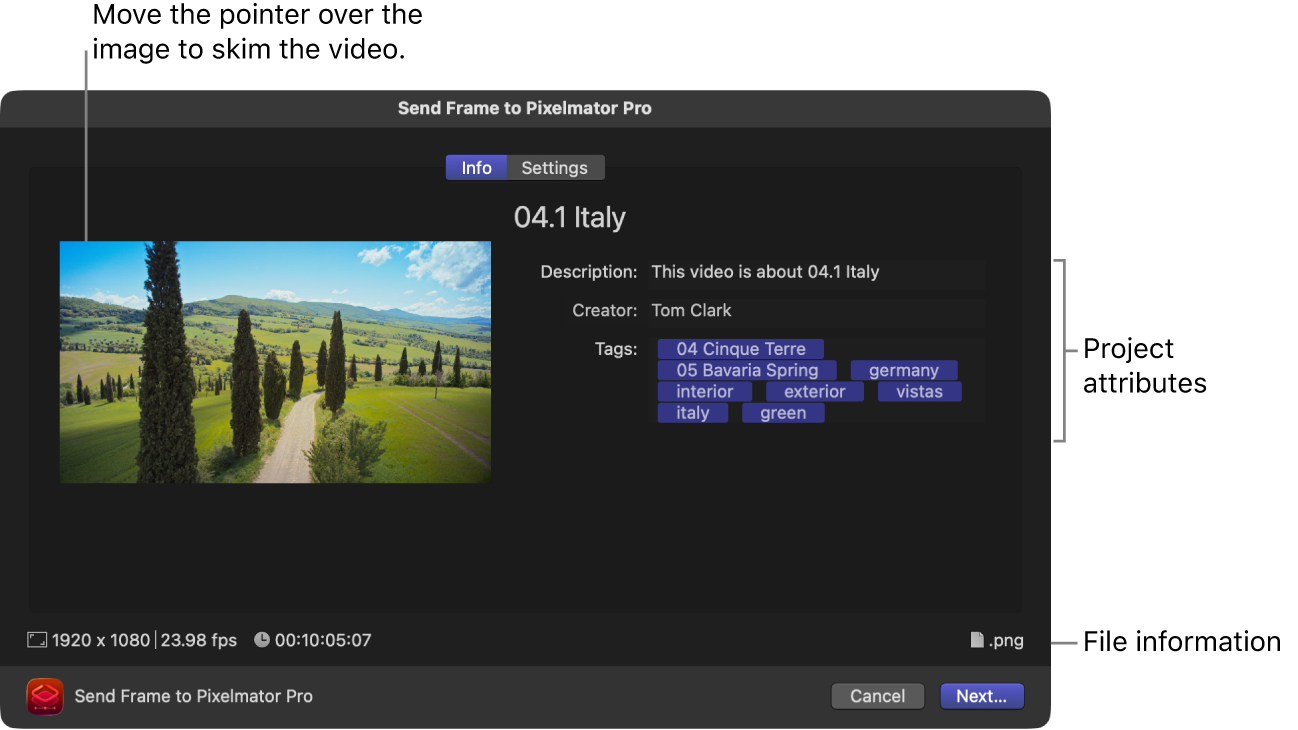
Move the pointer over the image to skim the video.
In the Info pane, view and modify the still-image attributes, such as the title and description.
See Change metadata for shared items. All of the attributes associated with the project or clip are included in the still-image output file.
Important: By default, the title field lists the project or clip name. Changing the title does not change the project or clip name, which is the name used for the exported file.
At the bottom of the window, view information about the file that will be exported, including frame size and output file type.
Click Settings to confirm the export settings or make any necessary adjustments:
Export: Choose an output file type for the still image you’re exporting.
Action: Leave this pop-up menu set to Open in Pixelmator Pro.
Scale image to preserve aspect ratio: Leave this checkbox selected unless your project uses a non-square pixel format (such as 1440 x 1080) and you want to use the exported still image in another video project with the same non-square pixel properties.
Burn in captions: If you added captions to your project, you can choose a caption language to burn in to the output media file.
Note: Burned-in captions are permanently visible in the output file and are not the same as embedded captions.
Click Next.
Enter a name and choose a location for the exported file, then click Save.

The image opens in Pixelmator Pro.
Download this guide: PDF