Logic Pro User Guide for iPad
-
- What is Logic Pro?
- Working areas
- Work with function buttons
- Work with numeric values
-
- Intro to tracks
- Create tracks
- Create tracks using drag and drop
- Choose the default region type for a software instrument track
- Select tracks
- Duplicate tracks
- Reorder tracks
- Rename tracks
- Change track icons
- Change track colors
- Use the tuner on an audio track
- Show the output track in the Tracks area
- Delete tracks
- Edit track parameters
- Start a Logic Pro subscription
- How to get help
-
- Intro to recording
-
- Before recording software instruments
- Record software instruments
- Record additional software instrument takes
- Record to multiple software instrument tracks
- Record multiple MIDI devices to multiple tracks
- Record software instruments and audio simultaneously
- Merge software instrument recordings
- Spot erase software instrument recordings
- Replace software instrument recordings
- Capture your most recent MIDI performance
- Use the metronome
- Use the count-in
-
- Intro to arranging
-
- Intro to regions
- Select regions
- Cut, copy, and paste regions
- Move regions
- Remove gaps between regions
- Delay region playback
- Trim regions
- Loop regions
- Repeat regions
- Mute regions
- Split and join regions
- Stretch regions
- Separate a MIDI region by note pitch
- Bounce regions in place
- Change the gain of audio regions
- Create regions in the Tracks area
- Convert a MIDI region to a Drummer region or a pattern region
- Rename regions
- Change the color of regions
- Delete regions
- Create fades on audio regions
- Access mixing functions using the Fader
-
- Intro to Step Sequencer
- Use Step Sequencer with Drum Machine Designer
- Record Step Sequencer patterns live
- Step record Step Sequencer patterns
- Load and save patterns
- Modify pattern playback
- Edit steps
- Edit rows
- Edit Step Sequencer pattern, row, and step settings in the inspector
- Customize Step Sequencer
-
- Effect plug-ins overview
-
- Instrument plug-ins overview
-
- ES2 overview
- Interface overview
-
- Modulation overview
-
- Vector Envelope overview
- Use Vector Envelope points
- Use Vector Envelope solo and sustain points
- Set Vector Envelope segment times
- Vector Envelope XY pad controls
- Vector Envelope Actions menu
- Vector Envelope loop controls
- Vector Envelope release phase behavior
- Vector Envelope point transition shapes
- Use Vector Envelope time scaling
- Use the Mod Pad
- Modulation source reference
- Via modulation source reference
-
- Sample Alchemy overview
- Interface overview
- Add source material
- Save a preset
- Edit mode
- Play modes
- Source overview
- Synthesis modes
- Granular controls
- Additive effects
- Additive effect controls
- Spectral effect
- Spectral effect controls
- Filter module
- Low and Highpass filter
- Comb PM filter
- Downsampler filter
- FM filter
- Envelope generators
- Mod Matrix
- Modulation routing
- Motion mode
- Trim mode
- More menu
- Sampler
- Copyright
Arpeggiator MIDI plug-in Grid mode in Logic Pro for iPad
The Arpeggiator MIDI plug-in operates in two distinct functional modes: Live and Grid. The modes are mutually exclusive, so turning on one turns off the other. It also provides a unique Live Capture to Grid facility.
When Grid mode is active, it controls the arpeggio velocity, cycle length, step length, rests, ties, and chords. All live input of available grid parameters, such as velocities, is ignored.
When in the default Live mode, the arpeggio performance is controlled by your input. For example, the velocities of arpeggiated notes are determined by the way you played them. Any existing grid values are retained but are disabled until you return to Grid mode.
Note: When you capture a live performance, grid values are not retained.
In Live mode, you can add rests, ties, and chords in real time by tapping the onscreen buttons or by using equivalent MIDI keyboard remote keys. See Assign Arpeggiator controllers.
The grid consists of 16 steps. Each step controls the step velocity as well as its length, rest, tie, and chord status. In addition, a cycle length can be set. The current grid pattern is automatically saved with the project or concert. You can also save and load your own or factory grid patterns. The Arpeggiator plug-in assigns incremental position identification numbers in the order they were received, regardless of the initially selected note order preset. These position identification numbers are used to “lock” an event, such as a note, a rest, or a tie to a particular step.

Grid mode parameters
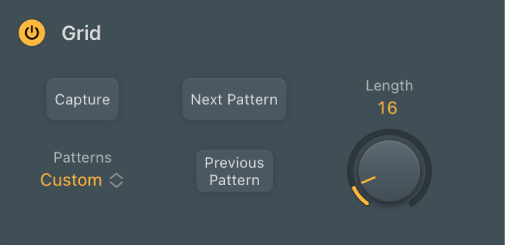
On/Off button: Turn on Grid mode. The grid has 16 steps. Each step controls velocity, length, rest, tie, and chord status.
Capture button: Tap to capture the current arpeggiator settings as a grid pattern. This appears as the Custom entry in the Patterns pop-up menu.
Patterns pop-up menu: Choose a menu item to load user grid patterns or to load a factory grid pattern.
Custom: This menu item is shown automatically when any pattern changes have been made. It can be considered the “current state” pattern preset.
App Patterns submenu: Tap to choose a factory pattern preset.
Next/Previous Pattern buttons: Choose the next or previous pattern preset.
Length knob: Change the grid length.
Note: The (grid) Length value is independent from the Cycle Length parameter (which sets the length of the arpeggiated note pattern) described in the options parameters. The grid length cycles independently of the effective note pattern. This prevents disruptions to the perceived rhythmic pattern created by the grid, which can occur when you change the arpeggio length.
Download this guide: PDF