Logic Pro User Guide for iPad
-
- What is Logic Pro?
- Working areas
- Work with function buttons
- Work with numeric values
- Undo and redo edits in Logic Pro for iPad
-
- Intro to tracks
- Create tracks
- Create tracks using drag and drop
- Choose the default region type for a software instrument track
- Select tracks
- Duplicate tracks
- Reorder tracks
- Rename tracks
- Change track icons
- Change track colors
- Use the tuner on an audio track
- Show the output track in the Tracks area
- Delete tracks
- Edit track parameters
- Start a Logic Pro subscription
- How to get help
-
- Intro to recording
-
- Before recording software instruments
- Record software instruments
- Record additional software instrument takes
- Record to multiple software instrument tracks
- Record multiple MIDI devices to multiple tracks
- Record software instruments and audio simultaneously
- Merge software instrument recordings
- Spot erase software instrument recordings
- Replace software instrument recordings
- Route MIDI internally to software instrument tracks
- Record with Low Latency Monitoring mode
- Use the metronome
- Use the count-in
-
- Intro to arranging
-
- Intro to regions
- Select regions
- Cut, copy, and paste regions
- Move regions
- Remove gaps between regions
- Delay region playback
- Trim regions
- Loop regions
- Repeat regions
- Mute regions
- Split and join regions
- Stretch regions
- Separate a MIDI region by note pitch
- Bounce regions in place
- Change the gain of audio regions
- Normalize audio regions in the Tracks area in Logic Pro for iPad
- Create regions in the Tracks area
- Convert a MIDI region to a Session Player region or a pattern region
- Replace a MIDI region with a Session Player region in Logic Pro for iPad
- Rename regions
- Change the color of regions
- Delete regions
-
- Intro to chords
- Add and delete chords
- Select chords
- Cut, copy, and paste chords
- Move and resize chords
- Loop chords on the Chord track
- Color chords on the Chord track
- Edit chords
- Work with chord groups
- Use chord progressions
- Change the chord rhythm
- Choose which chords a Session Player region follows
- Analyze the key signature of a range of chords
- Create fades on audio regions
- Extract vocal and instrumental stems with Stem Splitter
- Access mixing functions using the Fader
-
- Intro to Step Sequencer
- Use Step Sequencer with Drum Machine Designer
- Record Step Sequencer patterns live
- Step record Step Sequencer patterns
- Load and save patterns
- Modify pattern playback
- Edit steps
- Edit rows
- Edit Step Sequencer pattern, row, and step settings in the inspector
- Customize Step Sequencer
-
- Intro to mixing
-
- Channel strip types
- Channel strip controls
- Peak level display and clipping
- Set channel strip volume
- Set channel strip input format
- Set the output for a channel strip
- Set channel strip pan position
- Mute and solo channel strips
- Reorder channel strips in the Mixer in Logic Pro for iPad
- Replace a patch on a channel strip using drag and drop
- Work with plug-ins in the Mixer
- Search for plug-ins in the Mixer in Logic Pro for iPad
-
- Effect plug-ins overview
-
- Instrument plug-ins overview
-
- ES2 overview
- Interface overview
-
- Modulation overview
- Use the Mod Pad
-
- Vector Envelope overview
- Use Vector Envelope points
- Use Vector Envelope solo and sustain points
- Set Vector Envelope segment times
- Vector Envelope XY pad controls
- Vector Envelope Actions menu
- Vector Envelope loop controls
- Vector Envelope point transition shapes
- Vector Envelope release phase behavior
- Use Vector Envelope time scaling
- Modulation source reference
- Via modulation source reference
-
- Sample Alchemy overview
- Interface overview
- Add source material
- Save a preset
- Edit mode
- Play modes
- Source overview
- Synthesis modes
- Granular controls
- Additive effects
- Additive effect controls
- Spectral effect
- Spectral effect controls
- Filter module
- Low, bandpass, and highpass filters
- Comb PM filter
- Downsampler filter
- FM filter
- Envelope generators
- Mod Matrix
- Modulation routing
- Motion mode
- Trim mode
- More menu
- Sampler
- Studio Piano
- Copyright
Intro to Details view for plug-ins in Logic Pro for iPad
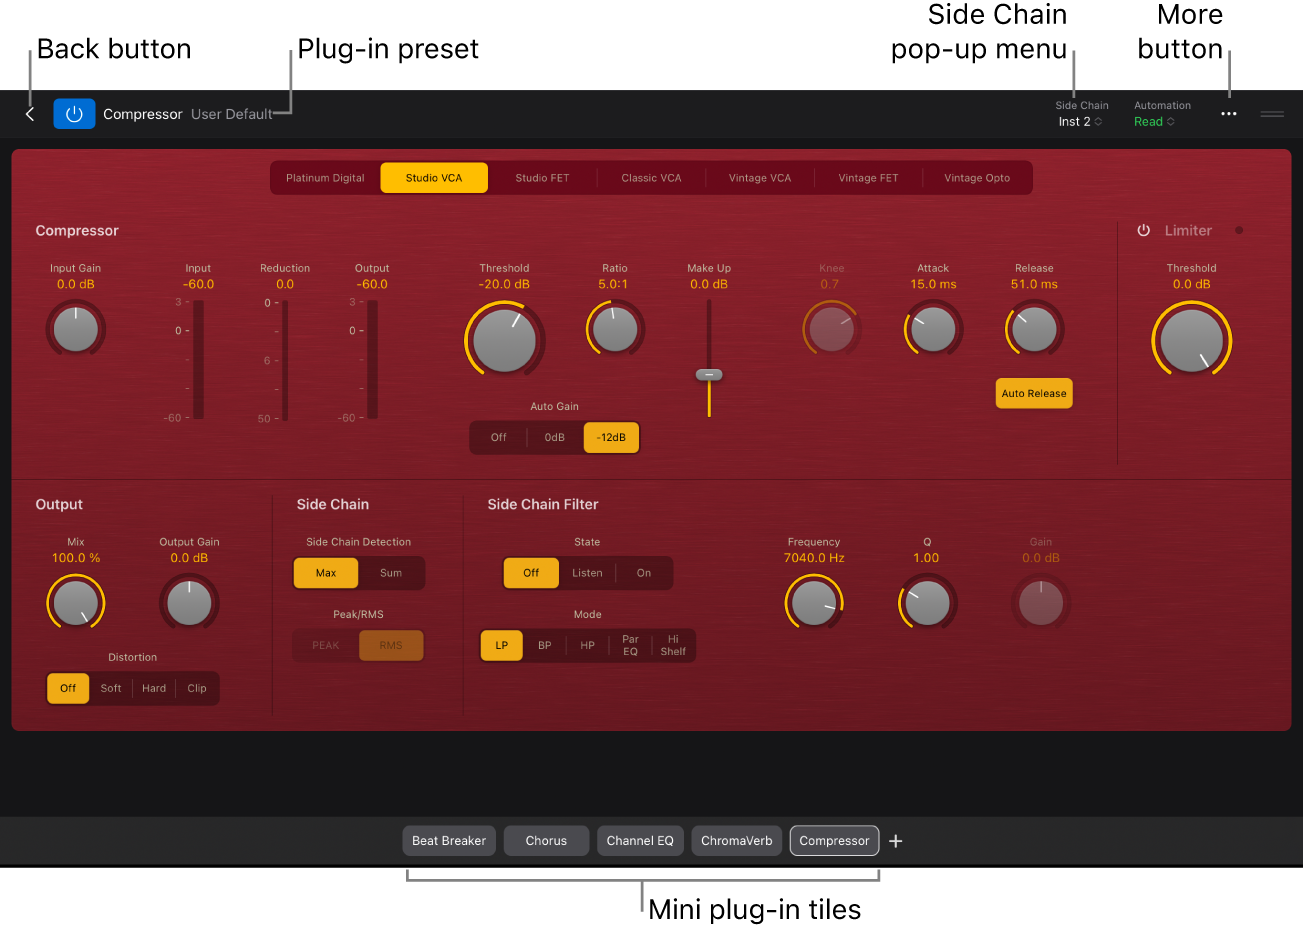
You can open a plug-in in Details view from either Track view or Output view in the Plug-ins area, or from the Mixer. In Details view, the plug-in appears in a full-width view with all of the plug-in’s parameters available to view and edit.
Below the open plug-in in Details view, other plug-ins on the track appear as mini plug-in tiles. You can use the tiles to switch between plug-ins, and also to remove, bypass, or replace another plug-in on the track, or to add a plug-in before another plug-in on the track.
Logic Pro for iPad Effects includes descriptions of every effect plug-in, including lists of plug-in parameters and usage tips. Similarly, Logic Pro for iPad Instruments includes descriptions of every instrument plug-in, including lists of plug-in parameters and usage tips.
Open a plug-in in Details view
In the Plug-ins area, tap the name of a plug-in tile to select it, then tap it again.
In the Mixer, do one of the following:
Tap the Setup button
 , tap a plug-in in any effect or instrument slot, then tap Show Details.
Tap the Mix button
 , tap a plug-in in any effect or instrument slot.
Resize a plug-in in Details view
To resize the plug-in, drag the resize handle
 on the right side of the plug-in menu bar up or down.
You can also tap the resize handle to expand the plug-in to its maximum size, and tap the handle again to return to the previous size.
Adjust plug-in parameters in Details view
In Logic Pro, open a plug-in in Details view.
Do any of the following:
To adjust a slider: Swipe on the slider vertically or horizontally (depending on its orientation).
To adjust a rotary knob: Swipe up or down on the knob.
To adjust a numeric value: Do one of the following:
Drag the value up or down to edit it.
Tap the value, then edit the value in the numeric input dialog that appears using the Decrement/Increment buttons, the scroll wheel, or the numeric keypad.
Show patches for an instrument plug-in in Details view
Tap the More button
 in the plug-in menu bar, then tap Show Patches.
The Browser opens, showing patches for the instrument plug-in.
Change the size of plug-in controls
Tap the More button
in the plug-in menu bar, then tap Plug-in Control Size.Choose a new size for plug-in controls.
Quickly navigate to plug-in sections
You can show an overlay of the sections of a plug-in and quickly navigate to different parts of the plug-in. This is especially useful for complex plug-ins that require scrolling to view all plug-in parameters.
Tap the More button
 in the plug-in menu bar, then tap Show/Hide Section Overlay.
In the Section overlay, tap the section you want to access.
Adjust any plug-in parameters.
When you finish, tap the Close button
 in the upper-right corner of the Section overlay.
Choose the source for a side chain signal to a plug-in
For plug-ins with a Side Chain pop-up menu, you can use audio from an audio or software instrument track, hardware input, or bus to trigger the plug-in. For example, the dynamics of a drum groove can be used to rhythmically change the compression, and therefore dynamics, of a guitar, synthesizer, or bass part. The side chain signal is used to control the plug-in, but is not processed by the plug-in.
In the plug-in menu bar, tap the Side Chain menu, then choose one of the available sources. To close the Side Chain menu, tap outside it.
When a plug-in has a side chain source, an indicator with a left-pointing arrow appears after the plug-in name in the plug-in slot.
Switch between plug-ins in Details view
Tap the mini plug-in tiles that appear below the plug-in that is open in Details view.
Remove a plug-in in Details view
Touch and hold a mini plug-in tile below the plug-in that is open in Details view.
Tap Remove.
Bypass a plug-in in Details view
Touch and hold a mini plug-in tile below the plug-in that is open in Details view.
Tap Bypass.
When a plug-in is bypassed, its mini plug-in tile appears dimmed.
To turn on a bypassed plug-in, touch and hold its mini plug-in tile, then tap Turn On.
Replace a plug-in in Details view
Touch and hold a mini plug-in tile below the plug-in that is open in Details view.
Tap Replace.
Tap to choose a different plug-in from the list (or search using the Search field).
Add a plug-in to the left of another plug-in in Details view
Touch and hold a mini plug-in tile below the plug-in that is open in Details view.
Tap Add Plug-in Before.
Tap to choose a different plug-in from the list (or search using the Search field).
Note: You can add a plug-in before an effect plug-in, but not before an instrument plug-in.
Close Details view and return to the Plug-ins area
Tap the Back button
 on the left side of the plug-in menu bar.
Download this guide: PDF