
Color correct ProRes RAW in Final Cut Pro for Mac
Apple ProRes RAW lets you work with the camera sensor’s raw data in Final Cut Pro. Because ProRes RAW preserves the full dynamic range and color gamut captured by the camera, it’s an ideal format for creating and color correcting wide-gamut, high-dynamic-range (HDR) content. If you want to create standard-dynamic-range (SDR) content, such as high-definition broadcast (Rec. 709) video, the high dynamic range of a ProRes RAW source file must be restricted to a dynamic range suitable for viewing on an SDR display. This process is called tone mapping.
Most professional cameras today support recording in a log format. Using log enables a higher dynamic range of light levels to be represented. Because many color correction workflows are based on working with log video, Final Cut Pro can automatically apply a log conversion setting to ProRes RAW media files during import. You can also apply a custom log conversion setting using a lookup table (LUT) effect. For more information about LUTs and log conversion, see Apply LUTs in Final Cut Pro for Mac.
There are three primary ways to color correct ProRes RAW video in Final Cut Pro:
Use log conversion with built-in camera LUTs: Use the automatic log conversion applied by Final Cut Pro to color correct ProRes RAW video as if it were SDR video. Setting library color processing to Wide Gamut HDR lets you work with ProRes RAW video as if it were HDR video.
Use log conversion with custom LUT effects: Use a custom LUT effect (instead of a built-in camera LUT) to apply log conversion to ProRes RAW video, so you can color correct it as if it were log video.
Color correct directly without LUTs: Turn off automatic log conversion, which lets you color correct ProRes RAW video as HDR video, whether library color processing is set to Standard or Wide Gamut HDR.
For more information, see Apple ProRes RAW.
Use log conversion with built-in camera LUTs
With the RAW to Log Conversion setting applied, ProRes RAW files behave just like conventional log video and can be edited the same way. Because ProRes RAW files contain metadata that identifies the camera manufacturer, Final Cut Pro can apply the correct log function (such as Canon Log 2, Panasonic V-Log, or Sony S-Log3) during import.
You can also manually adjust the RAW to Log Conversion setting in the General, Extended, or Settings view of the Info inspector.
In Final Cut Pro, select one or more video clips recorded with ProRes RAW.
If the Info inspector isn’t already shown, choose Window > Show in Workspace > Inspector, then click the Info button at the top.
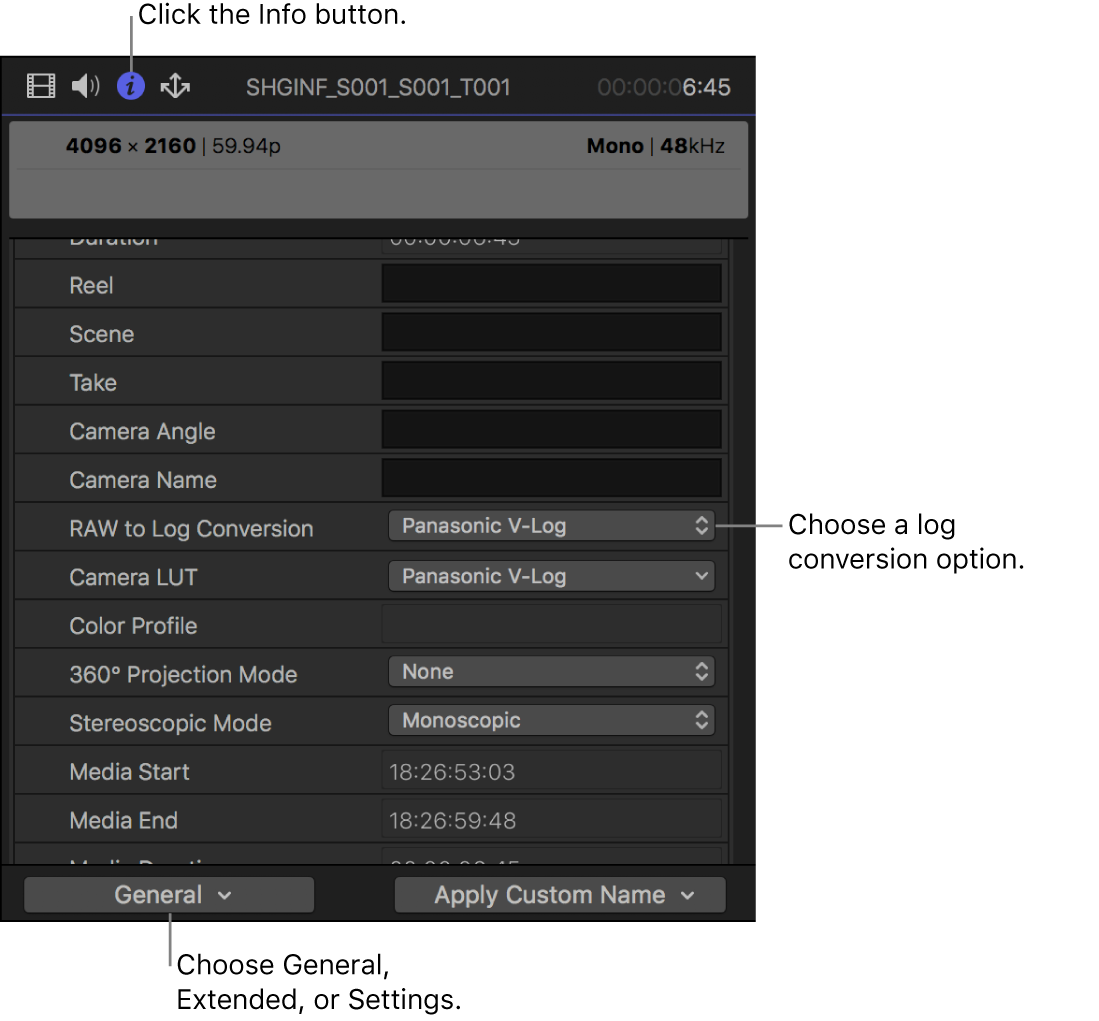
Click the Metadata View pop-up menu in the bottom-left corner, then choose either General, Extended, or Settings.
Click the RAW to Log Conversion pop-up menu and choose an option.
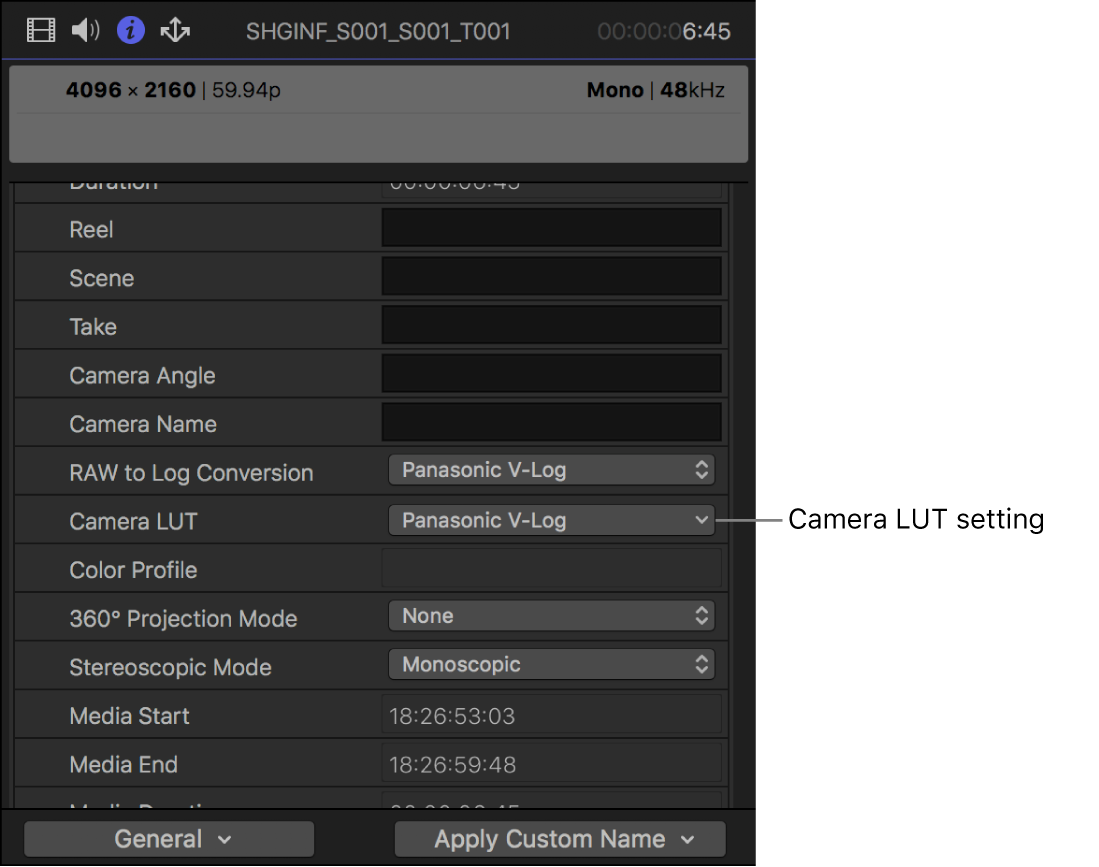
As with all video shot with log encoding, Final Cut Pro automatically applies the Camera LUT setting based on metadata in the file that identifies the camera manufacturer. You can view the Camera LUT setting in the Info inspector.
To change the library color processing setting so that the full dynamic range of the original video is available in the working color space, select the library in the Libraries sidebar, choose File > Library Properties, then click the Modify button at the top of the inspector.

Select Wide Gamut HDR.
When color processing is set to Wide Gamut HDR, the built-in camera LUT does not apply tone mapping and preserves the full dynamic range for color correction and effects.
Use log conversion with custom LUT effects
You can use a custom LUT effect (instead of a built-in camera LUT) to color correct ProRes RAW video as though it were log video.
The LUT effect provides the conversion from log to the output color space. You can purchase and download LUT effects from a variety of sources, or you can create one yourself using inexpensive color correction software or plug-ins. You import and apply LUT effects using the Custom LUT effect in the Final Cut Pro Effects browser.
In Final Cut Pro, select one or more video clips recorded with ProRes RAW.
If the Info inspector isn’t already shown, choose Window > Show in Workspace > Inspector, then click the Info button at the top.
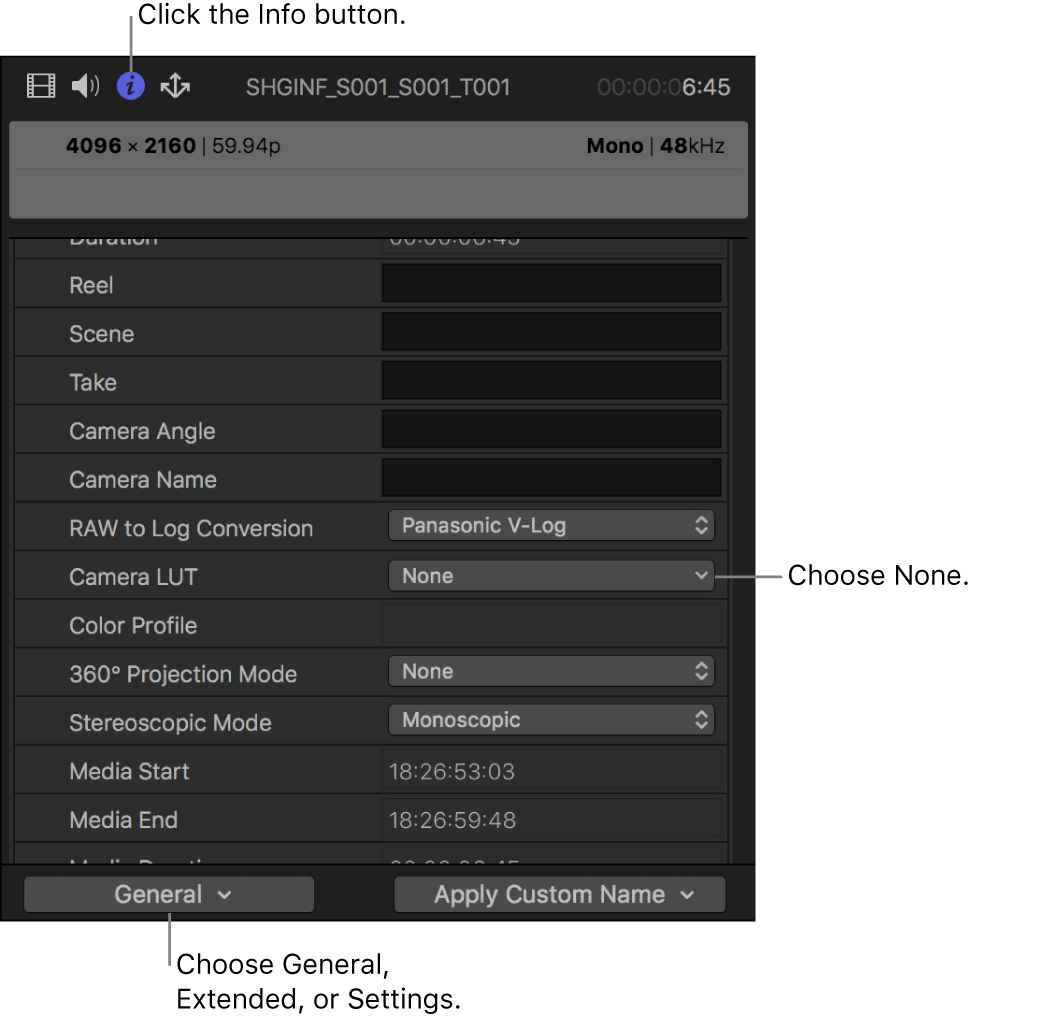
Click the Metadata View pop-up menu in the bottom-left corner, then choose either General, Extended, or Settings.
Click the Camera LUT pop-up menu and choose None.
When Camera LUT is set to None, the color correction tools (such as color wheels and color curves) and other effects operate on the log-encoded values. No tone mapping is applied to the source, and no dynamic range is lost.
Apply color correction and any other video effects.
To open the Effects browser, choose Window > Show in Workspace > Effects.
Select the Color category on the left, then double-click Custom LUT to apply the effect to the selected clip.
If the Video inspector isn’t already shown, choose Window > Show in Workspace > Inspector, then click the Video button at the top.
In the Custom LUT section of the Video inspector, click the LUT pop-up menu and choose “Choose Custom LUT.”
Note: If you previously imported a LUT effect, you can choose Recent and then choose from a list of recently used LUT effects.
In the window that appears, navigate to the LUT file you want to import, and select it.
Click Open.
The LUT effect you imported appears as the selected LUT at the top of the Custom LUT section.
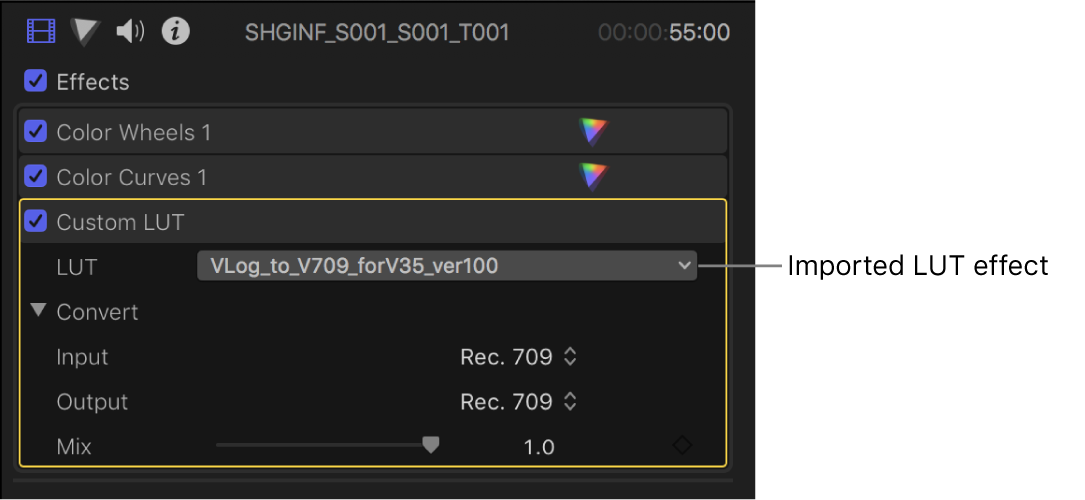
Click the Input pop-up menu and choose the color space the LUT effect converts from.
Click the Output pop-up menu and choose the color space the LUT effect converts to.
Note: Make sure the Custom LUT effect is the last effect in the effects list. If it isn’t, you can simply drag it to the bottom of the list.
Color correct directly without LUTs
You can color correct ProRes RAW video as HDR video, regardless of the library color-processing setting. To do this, you change the RAW to Log Conversion and Camera LUT settings to None.
In Final Cut Pro, select one or more video clips recorded with ProRes RAW.
If the Info inspector isn’t already shown, choose Window > Show in Workspace > Inspector, then click the Info button at the top.
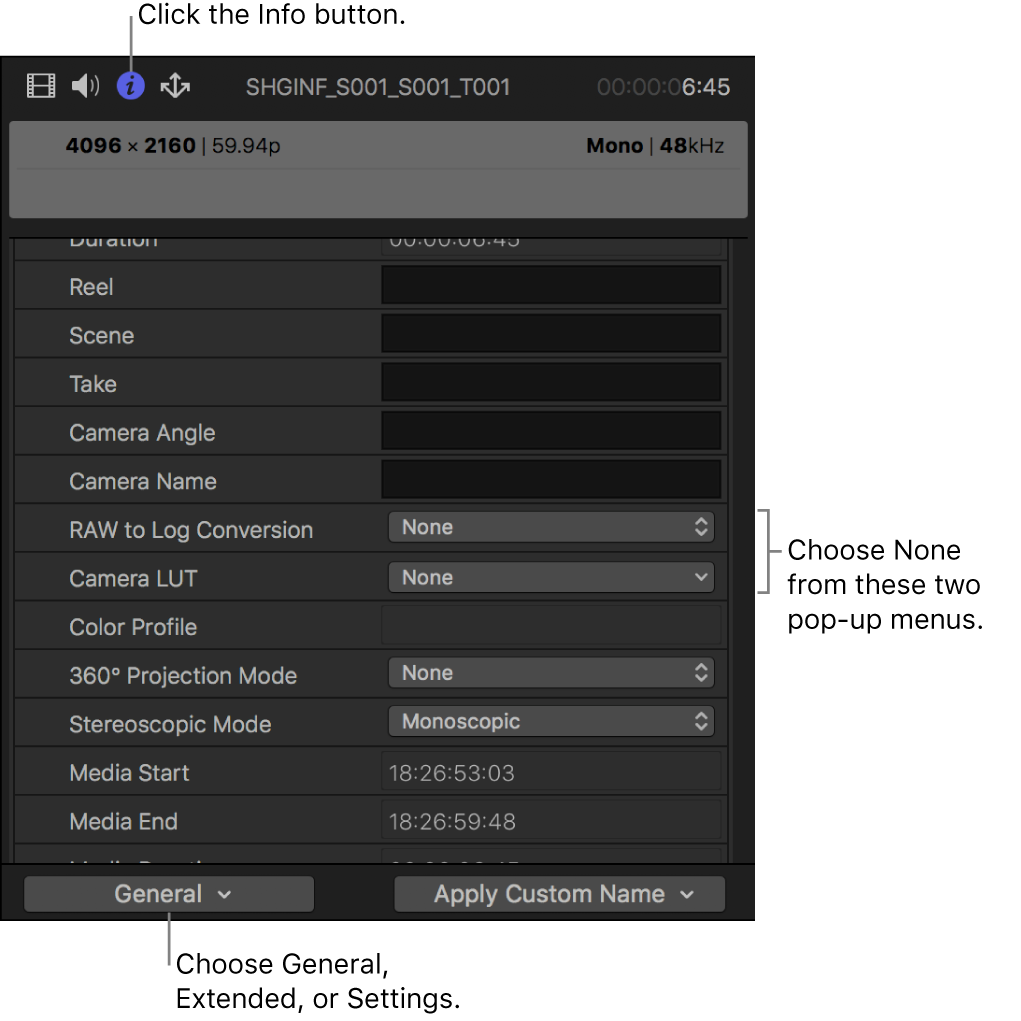
Click the Metadata View pop-up menu in the bottom-left corner, then choose either General, Extended, or Settings.
Click the RAW to Log Conversion pop-up menu and choose None, then click the Camera LUT pop-up menu and choose None.
No tone mapping is applied to the source, and the full dynamic range is available in the working space, even in libraries set to Standard color processing. Although highlights may initially appear blown out, you can correct this using color correction tools, such as color wheels and color curves.
Download this guide: Apple Books | PDF