Logic Pro User Guide for Mac
- Welcome
-
- What’s new in Logic Pro 12
- What’s new in Logic Pro 11.2
- What’s new in Logic Pro 11.1
- What’s new in Logic Pro 11
- What’s new in Logic Pro 10.8
- What’s new in Logic Pro 10.7.8
- What’s new in Logic Pro 10.7.5
- What’s new in Logic Pro 10.7.3
- What’s new in Logic Pro 10.7
- What’s new in Logic Pro 10.6
- What’s new in Logic Pro 10.5
- What’s new in Logic Pro 10.4
- What’s new in Logic Pro 10.3
- What’s new in Logic Pro 10.2
- What’s new in Logic Pro 10.0
-
- What is Logic Pro for Mac?
- Logic Pro project basics
- Undo and redo edits
- Download additional sound packs
- How to get help
-
- Tracks overview
-
- Create tracks
- Create tracks using drag and drop
- Create tracks using existing channel strips
- Assign tracks to different channel strips
- Choose the default region type for software instrument tracks
- Select tracks
- Duplicate tracks
- Rename tracks
- Change track icons
- Change track colors
- Reorder tracks
- Zoom tracks
- Replace or double drum sounds
- Control timing with the groove track
- Use selection-based processing
- Edit track parameters
-
- Overview
-
- Before recording software instruments
- Play software instruments
- Record software instruments
- Record additional software instrument takes
- Overdub software instrument recordings
- Spot erase software instrument recordings
- Use Note Repeat
- Replace software instrument recordings
- Record to multiple software instrument tracks
- Record multiple MIDI devices to multiple tracks
- Record software instruments and audio simultaneously
- Use step input recording techniques
- Record MIDI messages from another music app
- Route MIDI internally to software instrument tracks
- Use the metronome
-
- Arranging overview
-
- Regions overview
- Select regions
- Select parts of regions
- Cut, copy, and paste regions
- Move regions
- Add or remove gaps
- Delay region playback
- Loop regions
- Repeat regions
- Resize regions
- Mute and solo regions
- Time stretch regions
- Reverse audio regions
- Split regions
- Demix MIDI regions
- Join regions
- Create regions in the Tracks area
- Change the gain of audio regions in the Tracks area
- Normalize audio regions in the Tracks area
- Create aliases of MIDI regions
- Convert repeated MIDI regions to loops
- Change the color of regions
- Convert a MIDI region into a pattern region in Logic Pro for Mac
- Replace a MIDI region with a Session Player region in Logic Pro for Mac
- Convert audio regions to samples for a sampler instrument
- Rename regions
- Delete regions
-
- Chords overview
- Add and delete chords
- Select chords
- Cut, copy, and paste chords
- Move and resize chords
- Loop chords on the Chord track
- Transpose chords
- Edit chords
- Work with chord groups
- Use chord progressions
- Change the chord rhythm
- Choose which chords a Session Player region follows
- Analyze the key signature of a range of chords
- Analyze the chords in audio or MIDI regions in Logic Pro for Mac
- Extract vocal and instrumental stems with Stem Splitter
- Create groove templates
-
- Overview
-
- Add notes
- Select notes
- Snap items to the grid
- Move notes
- Copy notes
- Change the pitch of notes
- Resize notes
- Edit note velocity
- Quantize the timing of notes
- Quantize the pitch of notes
- Change note articulations
- Lock the position of events
- Mute notes
- Change note color
- View note labels
- Delete notes
- Time stretch notes
- View multiple MIDI regions
- Split chords
- Automation/MIDI area in the Piano Roll Editor
- Open other editors
-
- Session Players overview
- The Session Player Editor
- Choose a Session Player type and style
- Chords and Session Players
- Choose Session Player presets
- Regenerate a Session Player performance
- Follow rhythm of chords and other tracks
- Work with Drummer multi-channel kits
- Convert Session Player regions into MIDI or pattern regions
-
- Logic Pro for Mac advanced editors overview
-
- Audio File Editor overview
- Play audio files in the Audio File Editor
- Navigate audio files in the Audio File Editor
-
- Audio File Editor edit commands
- Edit audio files with transient markers
- Use the Audio File Editor Pencil tool
- Trim or silence audio files
- Remove DC offset
- Set audio file levels
- Normalize audio files
- Fade audio files
- Reverse audio and invert phase
- Audio File Editor Loop commands
- Undo Audio File Editor edits
- Backup audio files
- Use an external sample editor
-
- Mixing overview
- Set channel strip input format
- Set channel strip pan or balance positions
- Mute and solo channel strips
- Reorder channel strips in the Mixer
-
- Plug-ins overview
- Add, remove, move, and copy plug-ins
- Search for plug-ins in the Mixer
- Insert a plug-in on a track using drag and drop
- Activate plug-ins on inactive channel strips
- Use the Channel EQ
- Work in the plug-in window
- Work with plug-in settings
- Work with plug-in latencies
- Work with Audio Units in Logic Pro for Mac
- Use MPE with software instruments
- Use the Plug-in Manager
- Work with channel strip settings
- Surround panning
- Use the I/O Labels window
- Undo and redo Mixer and plug-in adjustments
-
- Smart Controls overview
- Show Smart Controls for master effects
- Choose a Smart Control layout
- Automatic MIDI controller assignment
- Map screen controls automatically
- Map screen controls
- Edit mapping parameters
- Use parameter mapping graphs
- Open the plug-in window for a screen control
- Rename a screen control
- Use articulation IDs to change articulations
- Assign hardware controls to screen controls
- Compare Smart Control edits with saved settings
- Use the Arpeggiator
- Automate screen control movements
-
- Live Loops overview
- Start and stop cells
- Work with Live Loops cells
- Change loop settings for cells
- How the Live Loops grid and Tracks area interact
- Edit cells
- Edit scenes
- Work in the Cell Editor
- Bounce cells
- Record a Live Loops performance
- Change Live Loops grid settings
- Control Live Loops with other devices
-
- Global changes overview
- Control transposition with the Pitch Source parameter
-
- Tempo overview
-
- Smart Tempo overview
- Use free tempo recording
- Choose the Project Tempo mode
- Choose the Flex & Follow setting
- Use Smart Tempo with multitrack audio
- Work in the Smart Tempo Editor
- Improve the tempo analysis using hints
- Correct tempo analysis results using beat markers
- Protect Smart Tempo edits by locking a range
- Match audio recordings to the project tempo
- Match the tempo to an audio region
- Use audio file tempo information
- Record tempo changes
- Use the Tempo Interpreter
- Use the tempo fader
- Control project volume
-
- Overview
- Add notes
-
- Part box overview
- View score symbols
- Select score symbols
- Add notes and rests
- Add notes and symbols to multiple regions
- Add key and time signature changes
- Change the clef sign
- Add dynamic marks, slurs, and crescendi
- Change note heads
- Add symbols to notes
- Add trills, ornaments, and tremolo symbols
- Add sustain pedal markings
- Add chord symbols
- Add chord grids and tablature symbols
- Add bar lines, repeats, and coda signs
- Add page and line break symbols
-
- Select notes
- Move and copy notes
- Change note pitch, duration, and velocity
- Change note articulations
- Quantize the timing of notes
- Restrict note input to a specific key and scale
- Control how ties are displayed
- Add and edit tuplets
- Override display quantization using tuplets
- Add grace notes and independent notes
- Delete notes
- Use automation in the Score Editor
-
- Staff styles overview
- Assign staff styles to tracks
- Staff Style window
- Create and duplicate staff styles
- Edit staff styles
- Edit staff, voice, and assign parameters
- Add and delete staffs or voices in the Staff Style window in Logic Pro for Mac
- Copy staffs or voices in the Staff Style window in Logic Pro for Mac
- Copy staff styles between projects
- Delete staff styles
- Assign notes to voices and staffs
- Display polyphonic parts on separate staffs
- Change the staff assignment of score symbols
- Beam notes across staffs
- Use mapped staff styles for drum notation
- Predefined staff styles
- Share a score
-
-
- Key commands overview
- Browse, import, and save key commands
- Assign key commands
- Copy and print key commands
-
- Global Commands
- Global Control Surfaces Commands
- Various Windows
- Windows Showing Audio Files
- Main Window Tracks and Various Editors
- Various Editors
- Views Showing Time Ruler
- Views Showing Automation
- Main Window Tracks
- Live Loops Grid
- Mixer
- MIDI Environment
- Piano Roll
- Score Editor
- Event Editor
- Step Editor
- Step Sequencer
- Project Audio
- Audio File Editor
- Smart Tempo Editor
- Library
- Sampler
- Drum Machine Designer
- Step Input Keyboard
- Smart Controls
- Tool Menu
- Control Surface Install Window
-
- Logic Pro projects
- Various windows
- Controller Assignments window
- Control bar
- Tracks area
- Global tracks
- Automation
- Live Loops grid
- Mixer
- MIDI Environment
- Piano Roll Editor
- Score Editor
- Event List
- Step Editor
- Step Sequencer
- Flex Time
- Audio File Editor
- Smart Tempo Editor
- Surround Panner
- Channel EQ
- Space Designer
- Sampler
- Touch Bar shortcuts
-
-
- Working with your control surface
- Connect control surfaces
- Add a control surface to Logic Pro for Mac
- Automatic assignment for USB MIDI controllers
- Grouping control surfaces
- Control Surfaces settings overview
- Modal dialog display
- Tips for using your control surface
- Supported control surfaces
- Software and firmware for Logic Pro for Mac
-
-
- Environment overview
- Common object parameters
- Customize the Environment
-
-
- Fader objects overview
- Use fader objects
- Play back fader movements
- Work with object groups
- Fader styles
- Fader functions: MIDI events
- Fader functions: range, value as
- Fader functions: filter
- Vector fader
- Special faders overview
- Cable switchers
- Meta event faders
- SysEx faders
- Work with SysEx messages
- Special functions
- Ornament objects
- MMC record buttons
- Keyboard objects
- Monitor objects
- Channel splitter object
- Physical input objects
- Physical input objects
- MIDI click objects
-
-
- Use MIDI plug-ins
-
- Arpeggiator overview
- Arpeggiator control parameters
- Note order parameters overview
- Note order variations
- Note order inversions
- Arpeggiator pattern parameters overview
- Use Live mode
- Use Grid mode
- Arpeggiator options parameters
- Arpeggiator keyboard parameters
- Use keyboard parameters
- Assign controllers
- Modifier controls
- Note Repeater controls
- Randomizer controls
-
- Use Scripter
- Use the Script Editor
- Scripter API overview
- MIDI processing functions overview
- HandleMIDI function
- ProcessMIDI function
- GetParameter function
- SetParameter function
- ParameterChanged function
- Reset function
- JavaScript objects overview
- Use the JavaScript Event object
- Use the JavaScript TimingInfo object
- Use the Trace object
- Use the MIDI event beatPos property
- Use the JavaScript MIDI object
- Create Scripter controls
- Transposer controls
- Record MIDI to Track
-
-
- Alchemy overview
- Alchemy interface overview
- Alchemy Name bar
- Alchemy file locations
-
- Alchemy source overview
- Source master controls
- Import browser
- Source subpage controls
- Source filter controls
- Source filter use tips
- Source elements overview
- Additive element controls
- Additive element effects
- Spectral element controls
- Spectral element effects
- Pitch correction controls
- Formant filter controls
- Granular element controls
- Sampler element controls
- VA element controls
- Wide unison mode
- Source modulations
- Morph controls
- Alchemy master voice section
- Alchemy Extended parameters
-
- ES2 overview
- ES2 interface overview
- ES2 integrated effects processor controls
- Use ES2 in Surround mode
- Extended parameters
-
-
- Sample Alchemy overview
- Interface overview
- Add source material
- Edit mode
- Play modes
- Source overview
- Synthesis modes
- Granular controls
- Additive effects
- Additive effect controls
- Spectral effect
- Spectral effect controls
- Filter module
- Lowpass, bandpass, and highpass filters
- Comb PM filter
- Downsampler filter
- FM filter
- Envelope generators
- Mod Matrix
- Modulation routing
- Motion mode
- Trim mode
- More menu
-
- Sculpture overview
- Sculpture interface
- Global parameters
- Amplitude envelope parameters
- Use the Waveshaper
- Filter parameters
- Output parameters
- Use surround range and diversity
- Define MIDI controllers
- Extended parameters
-
- Studio Piano
-
- Ultrabeat overview
- Ultrabeat interface
- Synthesizer section overview
- Filter section controls
- Distortion circuit controls
- Glossary
- Copyright and trademarks
Create Ultrabeat snare drums in Logic Pro for Mac
The sound of an acoustic snare drum consists primarily of two sound components: the sound of the drum itself and the buzzing of the snare springs. Try to approximate this combination in Ultrabeat with a single oscillator and the noise generator. Follow the tutorials sequentially to get the most from these examples.
Create a basic snare drum
In Logic Pro, load the Standard Tutorial setting.Turn off oscillator 1, and turn on oscillator 2 (in phase oscillator mode).
Choose LFO 1 from the mod pop-up menu of Osc 2 Pitch.
Set the pitch value for Osc 2 to around G#2 and set the Mod amount (the blue Mod control) to about 3 to 4 octaves higher.
You have modulated Osc 2 Pitch with a rapidly vibrating LFO with a medium Ramp Decay value. This eliminates the sine wave—which is not especially desirable for a snare sound, in contrast to the bass drum.
Set LFO 1 to a high Rate. Choose a value of 20 for Cycles and −20 for Ramp. Set the LFO Waveform parameter to a value of about 0.58, which is a square wave.
Use Env 1 to control the volume of oscillator 2 by setting Vol to the lowest possible value (−60 dB), choosing Env 1 from the mod pop-up menu, and adjusting the modulation intensity to a point just below its maximum value.
The figure shows the settings of oscillator 2 and Env 1.

Experiment with different Slope and Asym values to impart a more or less electronic character to the sound.
Turn on the noise generator and control its volume with the same quick envelope used in Osc 2 Volume.
Use the filter parameters of the noise generator to roughen up, refine, or add bright frequencies to the noise component of the snare drum sound. Select an LP filter type, and try a filter frequency between 0.60 and 0.90. Modulate it with LFO 1, which you’re already using to control the pitch of oscillator 2.
Note: The snare drum sound is listed as “snare 1” in the Tutorial Kit, at a pitch of E1.
Refine the snare drum sound using FM synthesis
In Logic Pro, turn on oscillator 1 in FM mode. Use Env 1 to control the volume of Osc 1 as well.
Choose a pitch for oscillator 1 that’s about an octave lower than oscillator 2. Consciously avoid even intervals between the oscillators and detune them slightly from each other. For example, try a pitch setting of F#2 in Osc 2 and E1 in Osc 1, then fine-tune Osc 1 a few cents higher by holding down Shift while adjusting the Osc 1 Pitch slider.
Experiment with FM Amount, and add more tone (low FM Amount) or noise (more FM Amount) as desired. Also try modulating the FM Amount with a fast LFO.
Higher FM Amount values lead to considerably more overtones and a very electronic sound character. If you want to make the sound more acoustic, feed oscillator 1 (and possibly oscillator 2 as well) into the main filter. Use these settings to start: LP 24 mode and a Cutoff value of about 0.60.
Note: An exemplary snare drum sound that uses FM can be found in the Tutorial Kit at a pitch of F1. It is listed as “snare 2.”
Recreate the 808 snare sound
The famous 808 snare is based on two resonating filters and a noise generator, fed through a highpass filter. The mix ratio of the two filters and the volume of the noise generator can be adjusted. This structure cannot be 100% replicated in Ultrabeat.
In Logic Pro, load the Standard Tutorial setting.
You are now ready to replicate the resonating filters of the 808 snare using two cleverly programmed phase oscillators.
Assign slightly different Slope values to two phase oscillators, and detune them by almost an octave.
Adjust the tonal relationship between the oscillators so that it is uneven—from E3 to F2, for example.
Control the volume of each oscillator with a different envelope. Adjust the decay times so that the envelope for the lower-tuned oscillator has a longer decay time than the very snappy envelope setting for the higher oscillator.
Feed the output of both oscillators into the main filter, and hollow out the sound with a highpass filter. Activate the filter bypass button in both oscillators. Choose the HP 12 setting in the filter, a Cutoff value around 0.40, and a Resonance value of about 0.70.
You have just cleverly emulated both of the TR-808 resonating filters. Shifting the pitch of both oscillators simulates the behavior of the TR-808 Tone control.
Complete the 808 emulation by adding some noise
In Logic Pro, switch the noise generator on, and activate the highpass mode in its filter (HP).
Set the Cutoff value to about 0.65, Resonance to 0.35, and add a little Dirt (around 0.06).
The noise generator provides the sustained snare sound. It should be shaped by its own envelope—independent of the decay phases of both oscillators—to get 808-like results. Changing the volume of the noise generator simulates the snap parameter of the 808.
Note: The 808 snare drum described is listed as “snare 3-808” in the Tutorial Kit, at a pitch of F#1. It also features an interesting EQ setting.
Use velocity modulation on your 808 snare
Use the 808 snare drum sounds in the Tutorial Kit to explore the possibilities Ultrabeat offers for implementing velocity.
In Logic Pro, select the “snare 3-808” sound.
Choose Vel from the via pop-up menu below the oscillator 1 Volume knob.
A slider appears on the ring around the knob.
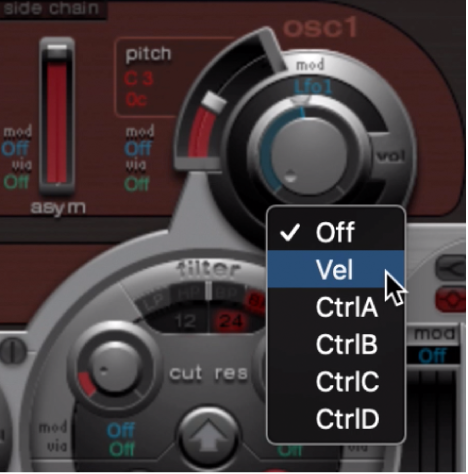
Drag the slider clockwise. When you drag the slider, a help tag displays the value. Set it to 0 dB.
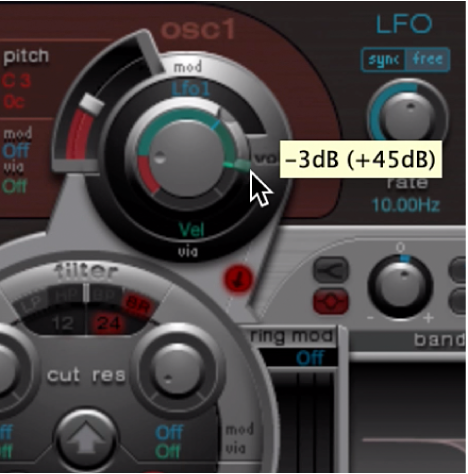
Repeat steps 2 and 3 in both oscillator 2 and the noise generator.
You can now dynamically play the sound using velocity.
Increase the performance dynamics of your 808 snare
In Logic Pro Ultrabeat, reduce the values of the individual volumes by turning down the Volume knobs in both oscillators and the noise generator. Note how the mod ring and its via sliders also move back. Change the via slider positions until all three Volume knobs look like this:
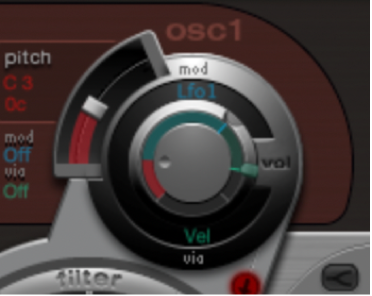
If you use differing intensities for each Volume knob when completing this step, you’ll have the potential of individual velocity reactions for each sound component.
Increase the dynamics of the sound as a whole by assigning the following setting to the Voice Volume knob:
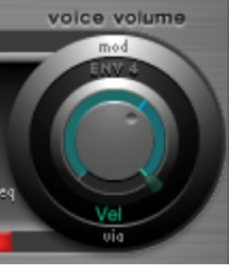
You now have an 808 snare that is exceptionally responsive to velocity. As you may know, this wasn’t possible with the original—not even an 808 sample could offer the dynamic volume control of individual sound components demonstrated here. A sample offers you only the whole sound, not its constituent parts.
In the next step, you use velocity to control the character of the sound—individually for each component—plus volume, of course.
Choose Max from the saturation mod pop-up menu of oscillator 2, and then choose Vel(ocity) from the corresponding via pop-up menu.
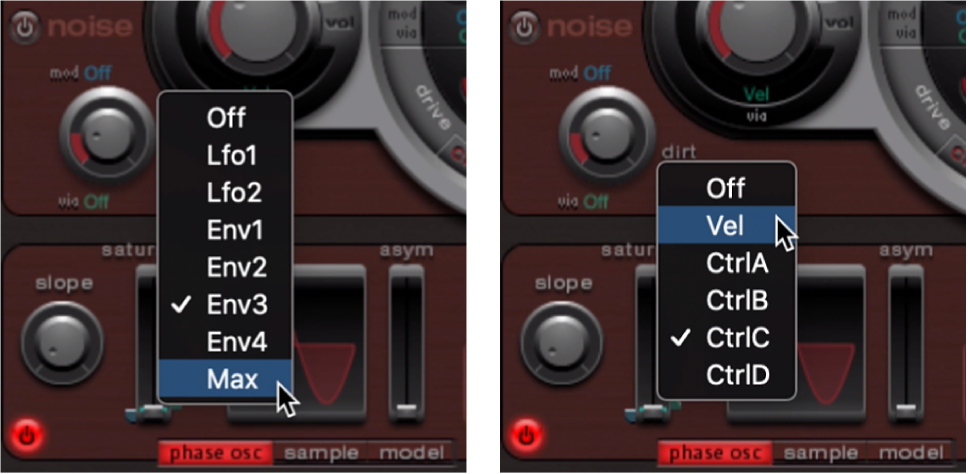
Set the additional control that appears as shown in the figure below, to control the character of the sound with velocity:
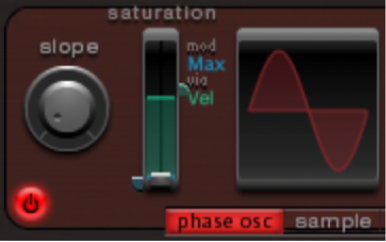
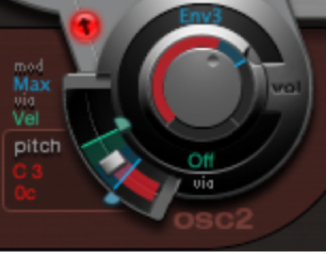
Repeat this with the other parameters of oscillator 2, as well as pitch:
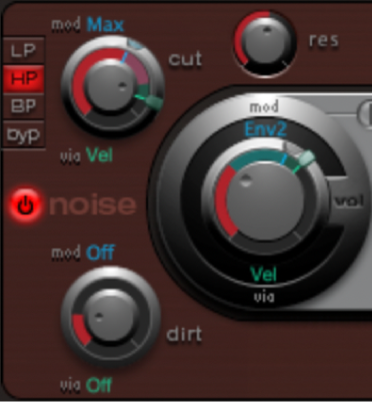
Modulate the noise generator as follows:
Cut parameter: Choose Max as modulation source, then set the modulation control as shown below.
Dirt parameter: Choose LFO 2 as modulation source, then set the modulation control as shown below.
The sound is now nothing like an 808 snare, which was your goal. Keep experimenting with velocity and figure out when it makes sense to use it as a direct or indirect modulation source, in either its positive or negative form.
Recreate the Kraftwerk snare sound
Another classic electronic snare drum sound is the highly resonant lowpass filter of an analog synthesizer that quickly closes with a snap. This sound was used extensively by Kraftwerk.
In Logic Pro, select the Snare 1 sound.
Direct the signals of both oscillators and the noise generator to the main filter.
Modulate Cutoff with Env 1 (which is already modulating the volume of the noise generator).
Modulate the filter resonance with Env 2.
Experiment with the parameters mentioned in steps 2 to 4 (especially the envelopes), introduce EQ into the sound, and discover how much “playing room” these basic settings allow you.
Note: An exemplary sound is listed as “snare 5-KW” in the Tutorial Kit, at a pitch of G#1. Analyze this sound, and compare it to your own creation.