Logic Pro User Guide for iPad
- Welcome
- What’s new in Logic Pro for iPad
-
- What is Logic Pro?
- Working areas
- Work with the menu bar
- Work with function buttons
- Work with numeric values
- Undo and redo edits in Logic Pro for iPad
-
- Intro to tracks
- Create tracks
- Create tracks using drag and drop
- Choose the default region type for a software instrument track
- Select tracks
- Duplicate tracks
- Reorder tracks
- Rename tracks
- Change track icons
- Change track colors
- Use the tuner on an audio track
- Show the output track in the Tracks area
- Delete tracks
- Edit track parameters
- How to get help
-
- Intro to recording
-
- Before recording software instruments
- Record software instruments
- Record additional software instrument takes
- Record to multiple software instrument tracks
- Record multiple MIDI devices to multiple tracks
- Record software instruments and audio simultaneously
- Merge software instrument recordings
- Spot erase software instrument recordings
- Replace software instrument recordings
- Route MIDI internally to software instrument tracks
- Record with Low Latency Monitoring mode
- Use the metronome
- Use the count-in
-
- Intro to arranging
-
- Intro to regions
- Select regions
- Cut, copy, and paste regions
- Move regions
- Remove gaps between regions
- Delay region playback
- Trim regions
- Loop regions
- Repeat regions
- Mute regions
- Split and join regions
- Stretch regions
- Separate a MIDI region by note pitch
- Bounce regions in place
- Change the gain of audio regions
- Normalize audio regions in the Tracks area in Logic Pro for iPad
- Create regions in the Tracks area
- Convert a MIDI region to a Session Player region or a pattern region
- Replace a MIDI region with a Session Player region in Logic Pro for iPad
- Rename regions
- Change the color of regions
- Delete regions
-
- Intro to chords
- Add and delete chords
- Select chords
- Cut, copy, and paste chords
- Move and resize chords
- Loop chords on the Chord track
- Color chords on the Chord track
- Edit chords
- Work with chord groups
- Use chord progressions
- Change the chord rhythm
- Choose which chords a Session Player region follows
- Analyze the key signature of a range of chords
- Analyze the chords in an audio or MIDI region with Chord ID
- Create fades on audio regions
- Extract vocal and instrumental stems with Stem Splitter
- Access mixing functions using the Fader
-
- Intro to editing regions and cells
-
-
- Piano Roll Editor overview
- Select notes
- Add notes
- Delete notes
- Mute notes
- Trim notes
- Move notes
- Copy notes
- Repeat notes
- Shorten overlaps
- Force legato
- Lock note position
- Transpose notes
- Change note velocity
- Change release velocity
- Change MIDI channel
- Set articulation IDs
- Quantize timing
- Quantize pitch
- Edit Live Loops in the Cell Editor
-
- Intro to Step Sequencer
- Use Step Sequencer with Drum Machine Designer
- Chords and pitch in Step Sequencer
- Record Step Sequencer patterns live
- Step record Step Sequencer patterns
- Load and save patterns
- Modify pattern playback
- Edit steps
- Edit rows
- Edit Step Sequencer pattern, row, and step settings in the inspector
- Customize Step Sequencer
-
- Intro to mixing
-
- Channel strip types
- Channel strip controls
- Peak level display and clipping
- Set channel strip volume
- Set channel strip input format
- Set the output for a channel strip
- Set channel strip pan position
- Mute and solo channel strips
- Reorder channel strips
- Replace a patch on a channel strip using drag and drop
- Work with plug-ins in the Mixer
- Search for plug-ins in the Mixer
-
-
- Effect plug-ins overview
-
- Instrument plug-ins overview
-
- ES2 overview
-
- Modulation overview
- Use the Mod Pad
-
- Vector Envelope overview
- Use Vector Envelope points
- Use Vector Envelope solo and sustain points
- Set Vector Envelope segment times
- Vector Envelope XY pad controls
- Vector Envelope Actions menu
- Vector Envelope loop controls
- Vector Envelope point transition shapes
- Vector Envelope release phase behavior
- Use Vector Envelope time scaling
- Modulation source reference
- Via modulation source reference
- Use macro controls
-
- Sample Alchemy overview
- Interface overview
- Add source material
- Save a preset
- Edit mode
- Play modes
- Source overview
- Synthesis modes
- Granular controls
- Additive effects
- Additive effect controls
- Spectral effect
- Spectral effect controls
- Filter module
- Low, bandpass, and highpass filters
- Comb PM filter
- Downsampler filter
- FM filter
- Envelope generators
- Mod Matrix
- Modulation routing
- Motion mode
- Trim mode
- More menu
- Sampler
- Studio Piano
- Copyright and trademarks
Distortion pedals in Logic Pro for iPad
Candy Fuzz
Candy Fuzz is a bright, “nasty” distortion effect.
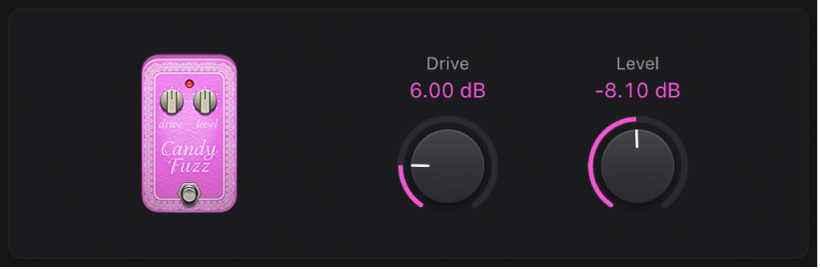
 Drive knob: Set the input gain.
- Level knob: Set the effect output volume.
Double Dragon
Double Dragon is a deluxe distortion effect.
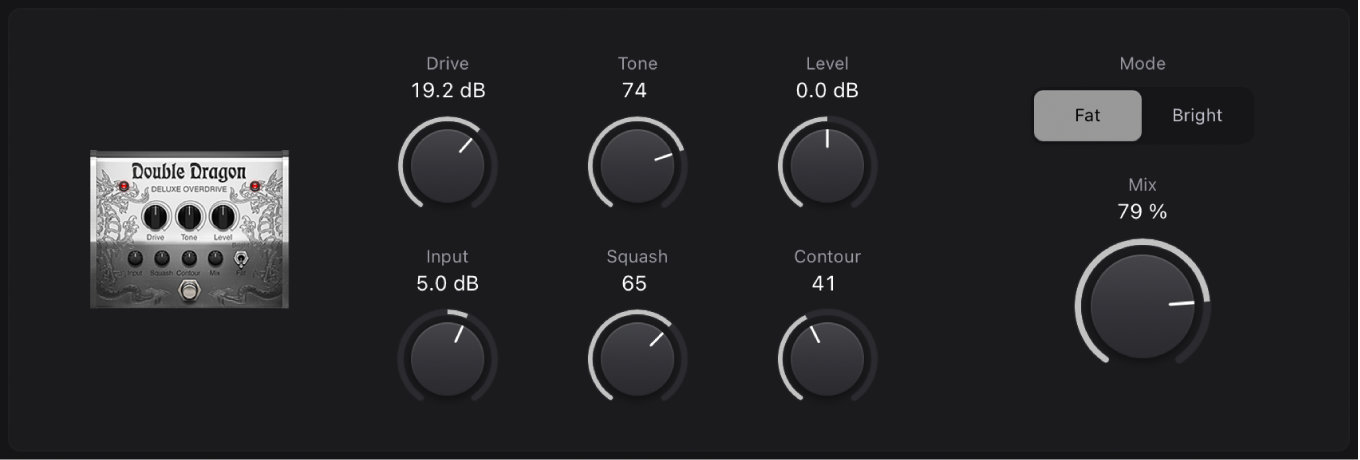
- Drive knob: Set the amount of saturation applied to the input signal.
- Tone knob: Set the cutoff frequency.
Level knob: Set the output level.
Input knob: Set the input level.
Squash knob: Set the threshold for the internal compression circuit.
Contour knob: Set the amount of nonlinear distortion applied to the signal.
Mode buttons: Choose between two fixed high shelving filter frequencies.
Mix knob: Set the ratio between the source and distorted signals.
Fuzz Machine
Fuzz Machine emulates an American “fuzz” distortion effect.
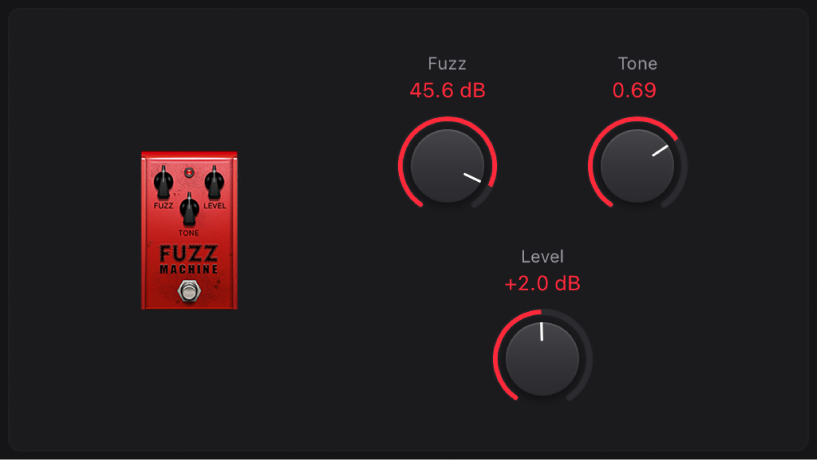
- Fuzz knob: Set the input gain.
- Tone knob: Increase treble, while simultaneously reducing low frequencies, as you move it to higher values.
Level knob: Set the output level.
Grinder
Grinder is a lo-fi dirty “metal” distortion.
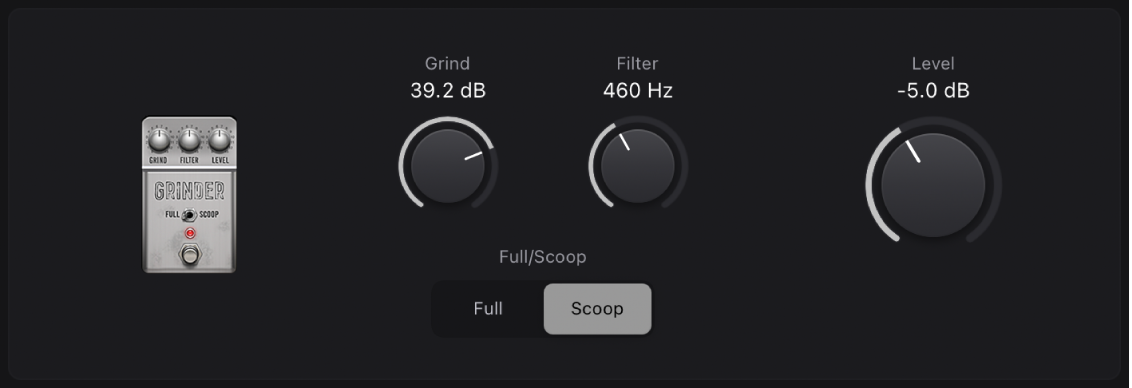
- Grind knob: Set the amount of drive applied to the input signal.
- Filter knob: Make the sound harsher and more crunchy at higher values.
Full/Scoop buttons: Choose between two fixed Gain/Q filter settings. At the Full position, filtering is less pronounced than at the Scoop position.
Level knob: Set the output level.
Grit
Grit is a hard and nasty filtered distortion effect that sounds great on keyboards and guitars.
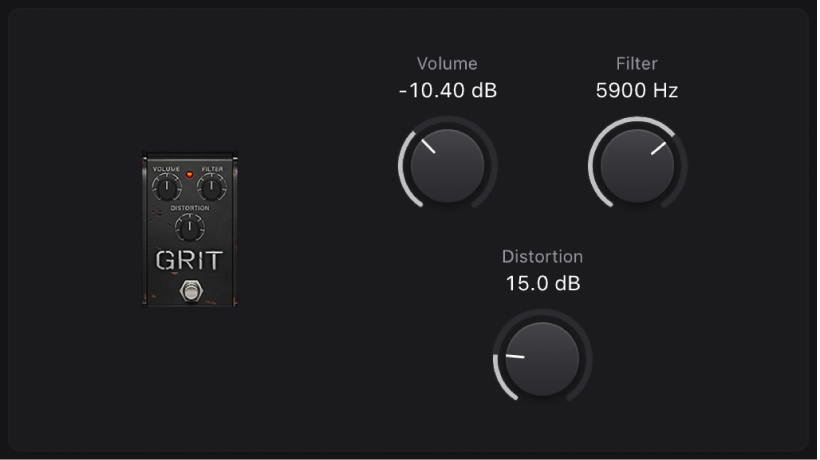
Volume knob: Set the amount of drive applied to the input signal.
- Filter knob: Make the sound harsher and more crunchy at higher values.
- Distortion knob: Set the amount of drive applied to the output signal.
Happy Face Fuzz
Happy Face Fuzz is a softer, full-sounding distortion effect.
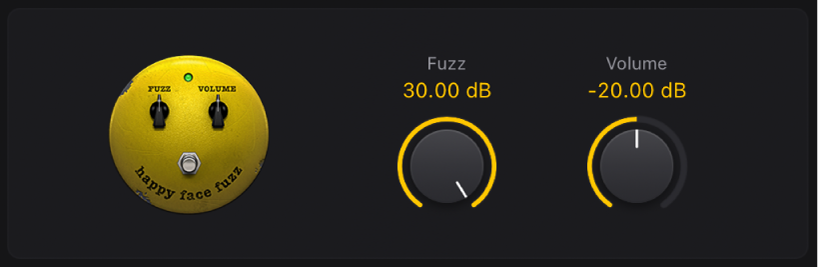
- Fuzz knob: Set the amount of saturation applied to the input signal.
Volume knob: Set the output level.
Hi-Drive
Hi-Drive is an overdrive effect that can emphasize high frequency content in the signal.
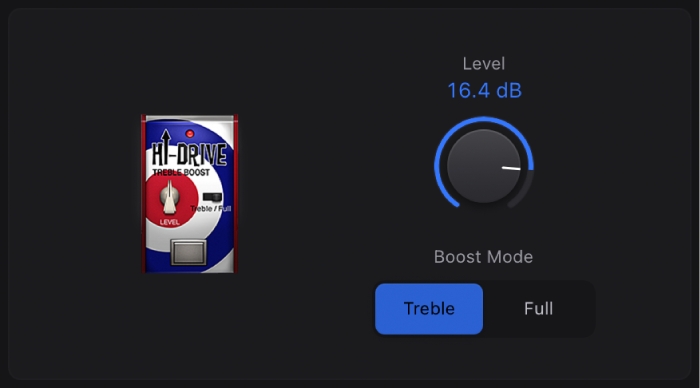
- Level knob: Set the output level.
- Boost Mode buttons: Set a fixed shelving frequency, allowing either the treble portion or the full range input signal to be processed.
Monster Fuzz
Monster Fuzz is a saturated, slightly harsh distortion.

- Roar knob: Set the amount of gain applied to the input signal.
- Growl knob: Set the amount of saturation.
Tone knob: Set the overall color of the distortion. Higher values increase treble with a corresponding decrease in overall volume.
Texture knob: Smooth or roughen the distortion.
Grain knob: Set the amount of nonlinear distortion applied to the signal.
Level knob: Set the output level.
Octafuzz
Octafuzz is a fat fuzz effect that can deliver a soft, saturated distortion.

- Fuzz knob: Set the amount of gain applied to the input signal.
Level knob: Set the output level.
Tone knob: Set the cutoff frequency of the integrated highpass filter.
Rawk! Distortion
Rawk! Distortion is a metal/hard rock distortion effect.
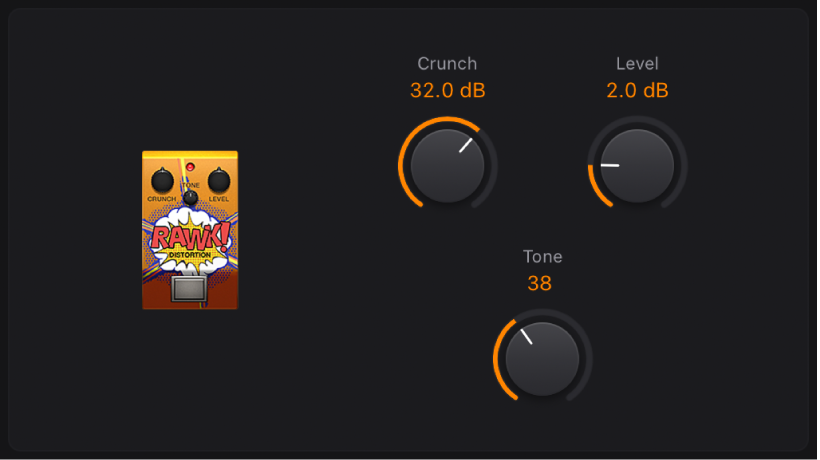
- Crunch knob: Set the amount of saturation applied to the input signal.
- Level knob: Set the output level.
Tone knob: Set the tonal color. High values are brighter.
Tube Burner
Tube Burner emulates a vacuum tube-based distortion that provides a wide palette of sounds, ranging from warm grain to crispy overdrive.
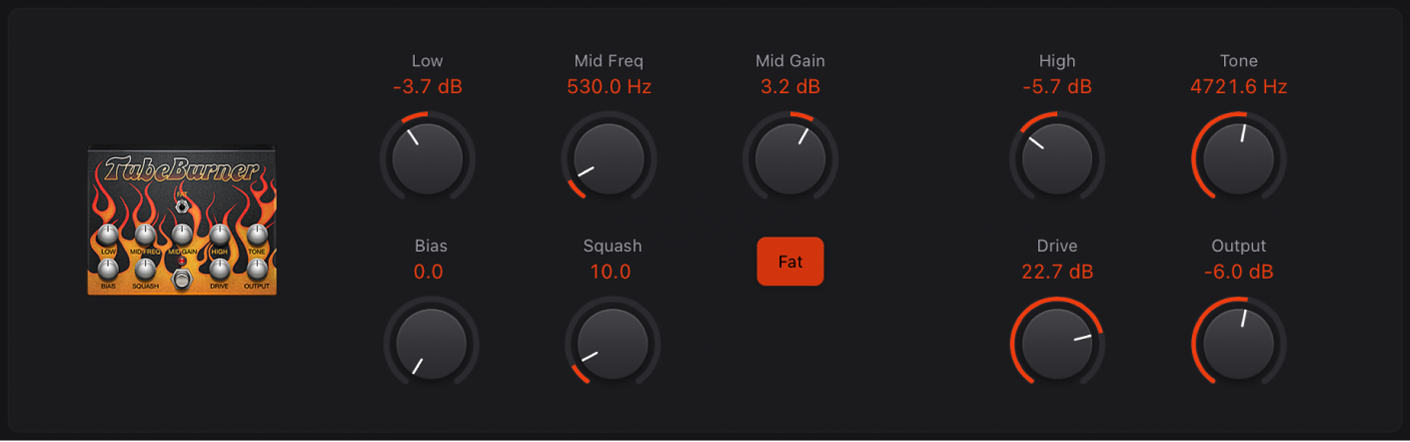
Low knob: Set the low frequency gain.
Mid Freq knob: Set the center frequency.
Mid Gain knob: Set the mid frequency level. This affects the range between the Low and High knob values.
- Bias knob: Adjust to add or avoid crossover distortion.
Squash knob: Set the threshold for the internal compression circuit.
Fat button: Set at the top position to enhance low frequency content in the signal.
High knob: Set the high frequency gain.
Tone knob: Set the tonal color. High values are harsher.
- Drive knob: Set the amount of saturation applied to the signal pre-output.
Output knob: Set the output level.
Vintage Drive
Vintage Drive is an overdrive effect that emulates the distortion produced by a field-effect transistor (FET), commonly used in solid-state amplifiers. When saturated, FETs generate a warmer-sounding distortion than bipolar transistors, such as those emulated by Grinder.

- Drive knob: Set the amount of saturation applied to the input signal.
Tone knob: Set the tonal color. High values are harsher.
- Level knob: Set the output level.
Fat button: Turn on to enhance low frequency content in the signal.
Download this guide: PDF