Logic Pro User Guide for iPad
- Welcome
- What’s new in Logic Pro for iPad
-
- What is Logic Pro?
- Working areas
- Work with the menu bar
- Work with function buttons
- Work with numeric values
- Undo and redo edits in Logic Pro for iPad
-
- Intro to tracks
- Create tracks
- Create tracks using drag and drop
- Choose the default region type for a software instrument track
- Select tracks
- Duplicate tracks
- Reorder tracks
- Rename tracks
- Change track icons
- Change track colors
- Use the tuner on an audio track
- Show the output track in the Tracks area
- Delete tracks
- Edit track parameters
- How to get help
-
- Intro to recording
-
- Before recording software instruments
- Record software instruments
- Record additional software instrument takes
- Record to multiple software instrument tracks
- Record multiple MIDI devices to multiple tracks
- Record software instruments and audio simultaneously
- Merge software instrument recordings
- Spot erase software instrument recordings
- Replace software instrument recordings
- Route MIDI internally to software instrument tracks
- Record with Low Latency Monitoring mode
- Use the metronome
- Use the count-in
-
- Intro to arranging
-
- Intro to regions
- Select regions
- Cut, copy, and paste regions
- Move regions
- Remove gaps between regions
- Delay region playback
- Trim regions
- Loop regions
- Repeat regions
- Mute regions
- Split and join regions
- Stretch regions
- Separate a MIDI region by note pitch
- Bounce regions in place
- Change the gain of audio regions
- Normalize audio regions in the Tracks area in Logic Pro for iPad
- Create regions in the Tracks area
- Convert a MIDI region to a Session Player region or a pattern region
- Replace a MIDI region with a Session Player region in Logic Pro for iPad
- Rename regions
- Change the color of regions
- Delete regions
-
- Intro to chords
- Add and delete chords
- Select chords
- Cut, copy, and paste chords
- Move and resize chords
- Loop chords on the Chord track
- Color chords on the Chord track
- Edit chords
- Work with chord groups
- Use chord progressions
- Change the chord rhythm
- Choose which chords a Session Player region follows
- Analyze the key signature of a range of chords
- Analyze the chords in an audio or MIDI region with Chord ID
- Create fades on audio regions
- Extract vocal and instrumental stems with Stem Splitter
- Access mixing functions using the Fader
-
- Intro to editing regions and cells
-
-
- Piano Roll Editor overview
- Select notes
- Add notes
- Delete notes
- Mute notes
- Trim notes
- Move notes
- Copy notes
- Repeat notes
- Shorten overlaps
- Force legato
- Lock note position
- Transpose notes
- Change note velocity
- Change release velocity
- Change MIDI channel
- Set articulation IDs
- Quantize timing
- Quantize pitch
- Edit Live Loops in the Cell Editor
-
- Intro to Step Sequencer
- Use Step Sequencer with Drum Machine Designer
- Chords and pitch in Step Sequencer
- Record Step Sequencer patterns live
- Step record Step Sequencer patterns
- Load and save patterns
- Modify pattern playback
- Edit steps
- Edit rows
- Edit Step Sequencer pattern, row, and step settings in the inspector
- Customize Step Sequencer
-
- Intro to mixing
-
- Channel strip types
- Channel strip controls
- Peak level display and clipping
- Set channel strip volume
- Set channel strip input format
- Set the output for a channel strip
- Set channel strip pan position
- Mute and solo channel strips
- Reorder channel strips
- Replace a patch on a channel strip using drag and drop
- Work with plug-ins in the Mixer
- Search for plug-ins in the Mixer
-
-
- Effect plug-ins overview
-
- Instrument plug-ins overview
-
- ES2 overview
-
- Modulation overview
- Use the Mod Pad
-
- Vector Envelope overview
- Use Vector Envelope points
- Use Vector Envelope solo and sustain points
- Set Vector Envelope segment times
- Vector Envelope XY pad controls
- Vector Envelope Actions menu
- Vector Envelope loop controls
- Vector Envelope point transition shapes
- Vector Envelope release phase behavior
- Use Vector Envelope time scaling
- Modulation source reference
- Via modulation source reference
- Use macro controls
-
- Sample Alchemy overview
- Interface overview
- Add source material
- Save a preset
- Edit mode
- Play modes
- Source overview
- Synthesis modes
- Granular controls
- Additive effects
- Additive effect controls
- Spectral effect
- Spectral effect controls
- Filter module
- Low, bandpass, and highpass filters
- Comb PM filter
- Downsampler filter
- FM filter
- Envelope generators
- Mod Matrix
- Modulation routing
- Motion mode
- Trim mode
- More menu
- Sampler
- Studio Piano
- Copyright and trademarks
Beat Breaker Main Editor in Logic Pro for iPad
The Main Editor is the working area of Beat Breaker and where you can interact with its effects. On the far left, incoming audio enters the input buffer. In the center, the output waveform is visible, and slices represent where you can add effects to the audio. These slices are flexible; you can add, delete, and move them in relation to the Snap value using slice markers in the Slice Editor strip situated above the output waveform.
Beat Breaker has six edit modes: Time is orange, Repeat is magenta, Cutoff is cyan, Resonance is purple, Volume is yellow, and Pan is green. Use the Edit Mode buttons to switch between modes.
When you select an Edit mode and tap a slice, the parameters for the selected slice appear at the top of the Main Editor. You can adjust a parameter’s value using a gesture or by dragging the sliders directly.
In Time mode, a mapping line shows which part of the input buffer plays back for the selected slice, letting you reposition audio and change its speed. Repeat mode adds up to eight repetitions of a slice to create stutter effects. Cutoff and Resonance modes let you shape the filter applied to a slice. Volume mode lets you change the volume over the duration of a slice to create swells and dynamic changes. Pan mode lets you set the stereo position of a slice. Each slice stores its settings independently, so you can apply different mode configurations to different slices within the same pattern. For example, one slice could use Time mode to reverse playback while another uses Repeat mode to create a stutter effect.
Finally, you can use the Pattern Slot menu to save and organize your patterns. See Work with pattern slots in Logic Pro for iPad.
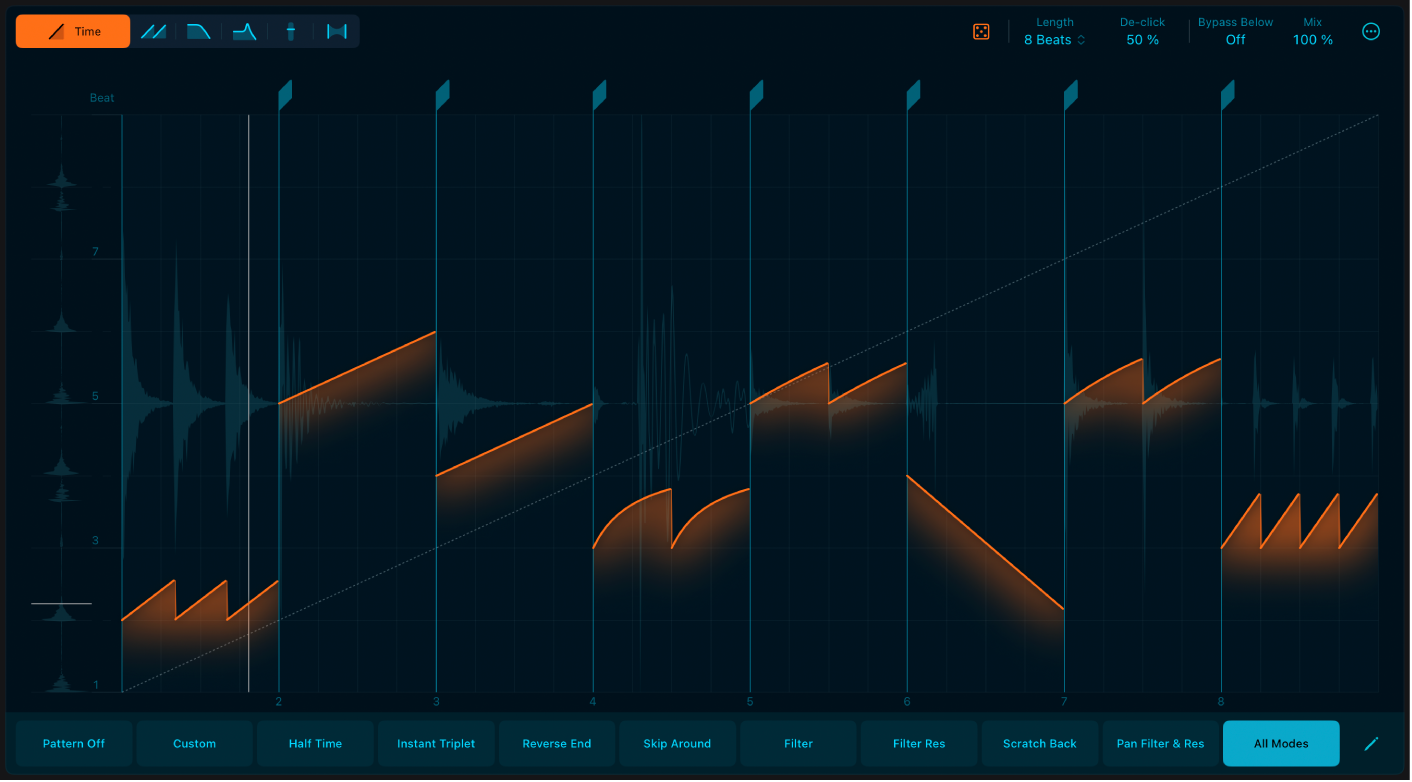
Main Editor parameters
Edit Mode buttons: Choose an edit mode to customize slice playback. See Edit modes.
Time button: Select Time mode to adjust the position and speed of a slice. See Time mode.
Repeat button: Select Repeat mode to adjust the number of repetitions for a slice. See Repeat mode.
Cutoff button: Select Cutoff mode to adjust the cutoff frequency of a slice. See Cutoff mode.
Resonance button: Select Resonance mode to adjust the filter resonance of a slice. See Resonance mode.
Volume button: Select Volume mode to adjust the volume of a slice. See Volume mode.
Pan button: Select Pan mode to adjust the stereo position of a slice. See Pan mode.
Input buffer: During playback, the input buffer on the left side displays the incoming audio, and its playhead shows which part of the input buffer is currently playing.
Slice Editor strip: This area contains slice markers. Here you can add, move, and delete slice markers for the selected pattern. See Work with Beat Breaker slices.
Output Beat: Set the position of the selected slice marker. This defines the beat at which the input beat is played back. See Move a slice.
Randomize button: Generate random effect values for the current mode or all modes. A single die randomizes the current mode; two dice randomize all modes. Touch and hold to change modes and randomization settings. See Use the Randomize button.
Global controls: Use the global controls, such as Length, De-click, and Mix, to fine-tune your pattern.
Length pop-up menu: Set the length of the current pattern in beats.
De-click value: Reduce clicks at locations where the playhead jumps by having a fast fade-out and fade-in. Decrease the value to hear more hard-hitting transients. Increase the value to remove audio clicks. Clicks occur when slices jump between noncontiguous parts of the audio, creating a sudden discontinuity in the waveform.
Bypass Below field: Set the frequency threshold below which the effect is bypassed. Frequencies below this threshold remain unaffected, while the effect is applied to frequencies above it. This is useful when applying Beat Breaker to a full mix, letting you keep low frequencies such as kick and bass unaffected while the effect processes the rest of the signal.
 Mix value: Control the balance between the original and processed audio signals. Set to 100% to hear only the processed signal.
More button: Tap the More button
 to choose how quantized values are used when setting parameters on the Slice Editor strip.
Snap Output Beat: Set the snap value for the Output Beat parameter, allowing precise adjustment of parameters to quantized values when editing slices on the Main Editor.
Snap Input Beat: Set the snap value for the Input Beat parameter, allowing precise adjustment of parameters to quantized values when editing slices on the Main Editor.
Snap Speed: Set quantized values for the Speed parameter in the Main Editor, with Time for musical divisions, Pitch for semitone increments, and Off for no snapping.
Snap Cutoff: Set the snap resolution for the Cutoff parameter. Choose Off for free adjustment, or Fine, Medium, or Coarse for progressively larger snap increments.
Snap Resonance: Set the snap resolution for the Resonance parameter. Choose Off for free adjustment, or Fine, Medium, or Coarse for progressively larger snap increments.
Snap Volume: Set the snap resolution for the Volume parameter. Choose Off for free adjustment, or Fine, Medium, or Coarse for progressively larger snap increments.
Snap Pan: Set the snap resolution for the Pan parameter. Choose Off for free adjustment, or Fine, Medium, or Coarse for progressively larger snap increments.
- Pattern buttons: Select a new preset pattern, or use Pattern Off to turn off all pattern effects. Each Pattern button contains settings for Time, Repeat, Cutoff, Resonance, Volume, and Pan modes, and Length. Use Pattern buttons to quickly switch Beat Breaker settings while performing or recording.
Pattern Off button: Turn off all pattern effects. Use this button to hear audio from Beat Breaker without any processing.
Pattern Slot Edit button: Tap the Pattern Slot Edit button
 to turn on Pattern Slot Edit mode. In this mode, you can use the Pattern pop-up menu to load, save, and rename patterns in each pattern slot. See Work with Beat Breaker patterns.
Download this guide: PDF