Final Cut Pro User Guide
- Welcome
-
- What’s new in Final Cut Pro 10.6
- What’s new in Final Cut Pro 10.5.3
- What’s new in Final Cut Pro 10.5
- What’s new in Final Cut Pro 10.4.9
- What’s new in Final Cut Pro 10.4.7
- What’s new in Final Cut Pro 10.4.6
- What’s new in Final Cut Pro 10.4.4
- What’s new in Final Cut Pro 10.4.1
- What’s new in Final Cut Pro 10.4
- What’s new in Final Cut Pro 10.3
- What’s new in Final Cut Pro 10.2
- What’s new in Final Cut Pro 10.1.2
- What’s new in Final Cut Pro 10.1
- What’s new in Final Cut Pro 10.0.6
- What’s new in Final Cut Pro 10.0.3
- What’s new in Final Cut Pro 10.0.1
-
- Intro to effects
-
- Intro to transitions
- How transitions are created
- Add transitions
- Set the default transition
- Delete transitions
- Adjust transitions in the timeline
- Adjust transitions in the inspector and viewer
- Merge jump cuts with the Flow transition
- Adjust transitions with multiple images
- Modify transitions in Motion
-
- Add storylines
- Use the precision editor
- Conform frame sizes and rates
- Use XML to transfer projects
-
- Glossary
- Copyright

Adjust transitions with multiple images in Final Cut Pro
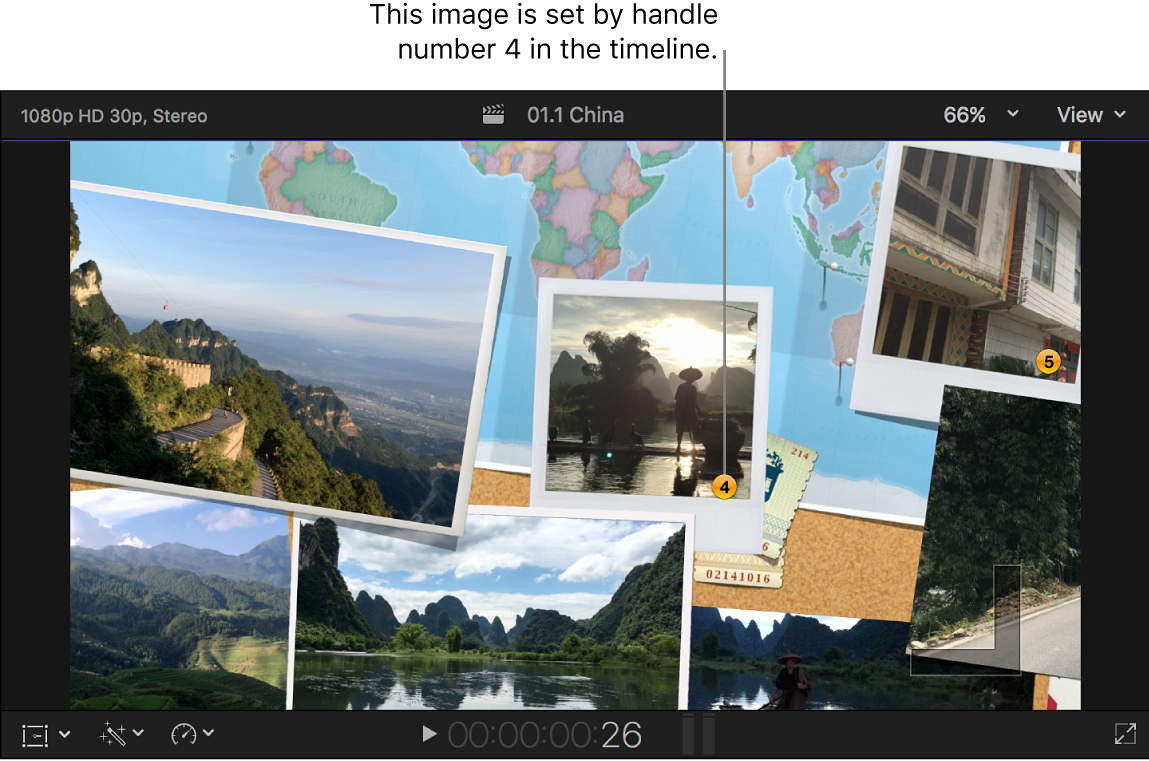
Several transitions include areas that are filled with still images from the clips on either side of the transition. The example below shows the Pan Far Right transition (one of the Bulletin Board transitions).

The areas are numbered and correlate to numbered points (handles) in the timeline.

Select a transition with numbered points in the Final Cut Pro timeline.
Position the playhead at the center of the transition so that numbered handles appear in the timeline and the corresponding numbers appear in the viewer, as shown above.
Note: You may need to adjust the zoom level in the timeline. To fit all the clips in the visible part of the timeline, choose View > Zoom to Fit (or press Shift–Z).
Drag any of the numbered handles in the timeline to select the frame to fill the corresponding area in the viewer.
As you drag the handle in the timeline, the corresponding area in the viewer updates to show the new image.
Continue until you’ve selected images for all of the areas.
Download this guide: Apple Books | PDF