Logic Pro User Guide for Mac
- Welcome
-
- What’s new in Logic Pro for Mac 10.8
- What’s new in Logic Pro for Mac 10.7.8
- What’s new in Logic Pro for Mac 10.7.5
- What’s new in Logic Pro 10.7.3
- What’s new in Logic Pro 10.7
- What’s new in Logic Pro 10.6
- What’s new in Logic Pro 10.5
- What’s new in Logic Pro 10.4
- What’s new in Logic Pro 10.3
- What’s new in Logic Pro 10.2
- What’s new in Logic Pro 10.0
-
- What is Logic Pro for Mac?
- Logic Pro project basics
- Use menu commands and key commands
- Use the complete set of Logic Pro features
- Undo and redo edits
- Manage Logic Pro content
- How to get help
-
- Projects overview
- Create projects
- Open projects
- Save projects
- Delete projects
-
- Play a project
- Set the playhead position
- Control playback with the transport buttons
- Use transport shortcut menus
- Use transport key commands
- Customize the control bar
- Change the LCD display mode in Logic Pro for Mac
- Monitor and reset MIDI events
- Use the cycle area
- Use the Chase Events function
- Use Apple Remote to control Logic Pro
- Use Logic Remote to control Logic Pro projects
- Preview projects in the Finder
- Close projects
- View project information
-
- Tracks overview
-
- Create tracks
- Create tracks using drag and drop
- Create tracks using existing channel strips
- Assign tracks to different channel strips
- Choose the default region type for software instrument tracks
- Select tracks
- Duplicate tracks
- Rename tracks
- Change track icons
- Change track colors
- Reorder tracks
- Zoom tracks
- Replace or double drum sounds
- Control timing with the groove track
- Use selection-based processing
- Edit track parameters
-
- Overview
-
- Before recording software instruments
- Play software instruments
- Record software instruments
- Record additional software instrument takes
- Overdub software instrument recordings
- Spot erase software instrument recordings
- Use Note Repeat
- Replace software instrument recordings
- Record to multiple software instrument tracks
- Record multiple MIDI devices to multiple tracks
- Record software instruments and audio simultaneously
- Use step input recording techniques
- Record MIDI messages from another music app
- Use the metronome
-
- Arranging overview
-
- Regions overview
- Select regions
- Select parts of regions
- Cut, copy, and paste regions
- Move regions
- Add or remove gaps
- Delay region playback
- Loop regions
- Repeat regions
- Resize regions
- Mute and solo regions
- Time stretch regions
- Reverse audio regions
- Split regions
- Demix MIDI regions
- Join regions
- Create regions in the Tracks area
- Change the gain of audio regions in the Tracks area in Logic Pro for Mac
- Normalize audio regions in the Tracks area
- Create aliases of MIDI regions
- Convert repeated MIDI regions to loops
- Change the color of regions
- Convert audio regions to samples for a sampler instrument
- Rename regions
- Delete regions
- Create groove templates
-
- Overview
-
- Add notes
- Select notes
- Snap items to the grid
- Move notes
- Copy notes
- Change the pitch of notes
- Resize notes
- Edit note velocity
- Quantize the timing of notes
- Quantize the pitch of notes
- Change note articulations
- Lock the position of events
- Mute notes
- Change note color
- View note labels
- Delete notes
- Time stretch notes
- View multiple MIDI regions
- Split chords
- Automation/MIDI area in the Piano Roll Editor
- Open other editors
-
- Logic Pro for Mac advanced editors overview
-
- Audio File Editor overview
- Play audio files in the Audio File Editor
- Navigate audio files in the Audio File Editor
-
- Audio File Editor edit commands
- Edit audio files with transient markers
- Use the Audio File Editor Pencil tool
- Trim or silence audio files
- Remove DC offset
- Set audio file levels
- Normalize audio files
- Fade audio files
- Reverse audio and invert phase
- Audio File Editor Loop commands
- Undo Audio File Editor edits
- Backup audio files
- Use an external sample editor
-
- Mixing overview
- Set channel strip input formats
- Set channel strip pan or balance positions
- Mute and solo channel strips
-
- Plug-ins overview
- Add, remove, move, and copy plug-ins
- Insert a plug-in on a track using drag and drop
- Activate plug-ins on inactive channels
- Use the Channel EQ
- Work in the plug-in window
- Work with plug-in settings
- Work with plug-in latencies
- Work with Audio Units in Logic Pro for Mac
- Support for ARA 2 compatible plug-ins
- Use MPE with software instruments
- Use the Plug-in Manager
- Work with channel strip settings
- Surround panning
- Use the I/O Labels window
- Undo and redo Mixer and plug-in adjustments
-
- Smart Controls overview
- Show Smart Controls for master effects
- Choose a Smart Control layout
- Automatic MIDI controller assignment
- Map screen controls automatically
- Map screen controls
- Edit mapping parameters
- Use parameter mapping graphs
- Open the plug-in window for a screen control
- Rename a screen control
- Use articulation IDs to change articulations
- Assign hardware controls to screen controls
- Compare Smart Control edits with saved settings
- Use the Arpeggiator
- Automate screen control movements
-
- Live Loops overview
- Start and stop cells
- Work with Live Loops cells
- Change loop settings for cells
- How the Live Loops grid and Tracks area interact
- Edit cells
- Edit scenes
- Work in the Cell Editor
- Bounce cells
- Record a Live Loops performance
- Change Live Loops grid settings
- Control Live Loops with other devices
-
- Global changes overview
-
- Tempo overview
-
- Smart Tempo overview
- Use free tempo recording
- Choose the Project Tempo mode
- Choose the Flex & Follow setting
- Use Smart Tempo with multitrack audio
- Work in the Smart Tempo Editor
- Improve the tempo analysis using hints
- Correct tempo analysis results using beat markers
- Protect Smart Tempo edits by locking a range
- Match audio recordings to the project tempo
- Match the tempo to an audio region
- Use audio file tempo information
- Record tempo changes
- Use the Tempo Interpreter
- Use the tempo fader
- Control project volume
-
- Overview
- Add notes
-
- Part box overview
- View score symbols
- Select score symbols
- Add notes and rests
- Add notes and symbols to multiple regions
- Add key and time signature changes
- Change the clef sign
- Add dynamic marks, slurs, and crescendi
- Change note heads
- Add symbols to notes
- Add trills, ornaments, and tremolo symbols
- Add sustain pedal markings
- Add chord symbols
- Add chord grids and tablature symbols
- Add bar lines, repeats, and coda signs
- Add page and line break symbols
-
- Select notes
- Move and copy notes
- Change note pitch, duration, and velocity
- Change note articulations
- Quantize the timing of notes
- Restrict note input to the current key
- Control how ties are displayed
- Add and edit tuplets
- Override display quantization using tuplets
- Add grace notes and independent notes
- Delete notes
- Use automation in the Score Editor
-
- Staff styles overview
- Assign staff styles to tracks
- Staff Style window
- Create and duplicate staff styles
- Edit staff styles
- Edit staff, voice, and assign parameters
- Add and delete staffs or voices in the Staff Style window in Logic Pro for Mac
- Copy staffs or voices in the Staff Style window in Logic Pro for Mac
- Copy staff styles between projects
- Delete staff styles
- Assign notes to voices and staffs
- Display polyphonic parts on separate staffs
- Change the staff assignment of score symbols
- Beam notes across staffs
- Use mapped staff styles for drum notation
- Predefined staff styles
- Share a score
-
-
- Key commands overview
- Browse, import, and save key commands
- Assign key commands
- Copy and print key commands
-
- Global Commands
- Global Control Surfaces Commands
- Various Windows
- Windows Showing Audio Files
- Main Window Tracks and Various Editors
- Various Editors
- Views Showing Time Ruler
- Views Showing Automation
- Main Window Tracks
- Live Loops Grid
- Mixer
- MIDI Environment
- Piano Roll
- Score Editor
- Event Editor
- Step Editor
- Step Sequencer
- Project Audio
- Audio File Editor
- Smart Tempo Editor
- Library
- Sampler
- Drum Machine Designer
- Step Input Keyboard
- Smart Controls
- Tool Menu
- Control Surface Install Window
- Touch Bar shortcuts
-
-
- Working with your control surface
- Connect control surfaces
- Add a control surface to Logic Pro for Mac
- Automatic assignment for USB MIDI controllers
- Grouping control surfaces
- Control Surfaces settings overview
- Modal dialog display
- Tips for using your control surface
- Supported control surfaces
- Software and firmware for Logic Pro for Mac
-
-
- Environment overview
- Common object parameters
- Customize the Environment
-
-
- Fader objects overview
- Use fader objects
- Play back fader movements
- Work with object groups
- Fader styles
- Fader functions: MIDI events
- Fader functions: range, value as
- Fader functions: filter
- Vector fader
- Special faders overview
- Cable switchers
- Meta event faders
- SysEx faders
- Work with SysEx messages
- Special functions
- Ornament objects
- MMC record buttons
- Keyboard objects
- Monitor objects
- Channel splitter object
- Physical input objects
- Physical input objects
- MIDI click objects
-
-
- Use MIDI plug-ins
-
- Arpeggiator overview
- Arpeggiator control parameters
- Note order parameters overview
- Note order variations
- Note order inversions
- Arpeggiator pattern parameters overview
- Use Live mode
- Use Grid mode
- Arpeggiator options parameters
- Arpeggiator keyboard parameters
- Use keyboard parameters
- Assign controllers
- Modifier controls
- Note Repeater controls
- Randomizer controls
-
- Use Scripter
- Use the Script Editor
- Scripter API overview
- MIDI processing functions overview
- HandleMIDI function
- ProcessMIDI function
- GetParameter function
- SetParameter function
- ParameterChanged function
- Reset function
- JavaScript objects overview
- Use the JavaScript Event object
- Use the JavaScript TimingInfo object
- Use the Trace object
- Use the MIDI event beatPos property
- Use the JavaScript MIDI object
- Create Scripter controls
- Transposer controls
- Record MIDI to Track
-
-
- Alchemy overview
- Alchemy interface overview
- Alchemy Name bar
- Alchemy file locations
-
- Alchemy source overview
- Source master controls
- Import browser
- Source subpage controls
- Source filter controls
- Source filter use tips
- Source elements overview
- Additive element controls
- Additive element effects
- Spectral element controls
- Spectral element effects
- Pitch correction controls
- Formant filter controls
- Granular element controls
- Sampler element controls
- VA element controls
- Source modulations
- Morph controls
- Alchemy master voice section
- Alchemy Extended parameters
-
- ES2 overview
- ES2 interface overview
- ES2 integrated effects processor controls
- Use ES2 in Surround mode
- Extended parameters
-
-
- Sample Alchemy overview
- Interface overview
- Add source material
- Edit mode
- Play modes
- Source overview
- Synthesis modes
- Granular controls
- Additive effects
- Additive effect controls
- Spectral effect
- Spectral effect controls
- Filter module
- Low and highpass filter
- Comb PM filter
- Downsampler filter
- FM filter
- Envelope generators
- Mod Matrix
- Modulation routing
- Motion mode
- Trim mode
- More menu
-
- Sculpture overview
- Sculpture interface
- Global parameters
- Amplitude envelope parameters
- Use the Waveshaper
- Filter parameters
- Output parameters
- Use surround range and diversity
- Define MIDI controllers
- Extended parameters
-
-
- Ultrabeat overview
- Ultrabeat interface
- Synthesizer section overview
- Filter section controls
- Distortion circuit controls
- Glossary
- Copyright

Share a project to Logic Pro for iPad
You can open and edit projects in Logic Pro for iPad that were created in Logic Pro for Mac, and you can use AirDrop or MailDrop to quickly send projects to anyone. When you share projects from Logic Pro for Mac to Logic Pro for iPad, there are best practices that you can follow.
Best practices for sharing projects to Logic Pro for iPad
You can consolidate your project in Logic Pro for Mac, which combines the assets used and copies them into the project. This helps you avoid attempting to load projects with missing files.
Tip: When you want to continue working on a project in Logic Pro for iPad, it’s helpful to include all the assets and files used in a project so that the project opens correctly. So before sharing to an iPad, be sure to save all assets into your project in Logic Pro for Mac. To do this, you can choose which files to copy into your project package when saving.
If your project in Logic Pro for Mac uses Audio Units plug-ins or Audio Unit Extensions that are not installed as Audio Unit Extensions on your iPad, you can bounce or freeze any tracks that use these before you share the project and open it in Logic Pro for iPad. This is also true for tracks using Drummer Producer Kits.
Tip: For Audio Units instruments, you can also use Auto Sampler in Logic Pro for Mac to create a sampler instrument that you can play in Logic Pro for iPad.
Some instruments and effects available in Logic Pro for Mac provide only playback compatibility in Logic Pro for iPad. You can still load projects in Logic Pro for iPad that use these plug-ins, but you can’t edit their parameters.
Logic Pro for iPad doesn’t support projects in surround, so you need to convert any surround settings in your project to stereo before sharing and opening on an iPad. For information on how to convert surround projects, see Convert spatial audio and surround projects.
Projects created in Logic Pro for Mac with any of the following features can’t be opened in Logic Pro for iPad (in such cases, a dialog appears while the project is loading that tells you which features are present):
Surround and spatial audio
Binaural panning
Projects saved in folders (not as packages)
Sample rates greater than 96 kHz
Projects in which the primary ruler is set to time instead of bars and beats
Projects starting at a position other than 1 1 1 1
Drummer Producer Kits
Arrange folders (with multiple tracks)
External MIDI tracks (without External Instrument plug-ins)
No output tracks
Working with projects from Logic Pro for iPad
If your project in Logic Pro for iPad uses Audio Unit Extensions that are not installed as Audio Units plug-ins or Audio Unit Extensions on your Mac, you can bounce or freeze any tracks that use these before you share the project and open it in Logic Pro for Mac.
Prepare projects for Logic Pro for iPad
The following tasks can help you prepare your projects before you share them and resolve any issues when trying to open them in Logic Pro for iPad.
Create a consolidated copy of project assets
In Logic Pro, choose File > Project Management > Consolidate (or use the Consolidate Project key command).
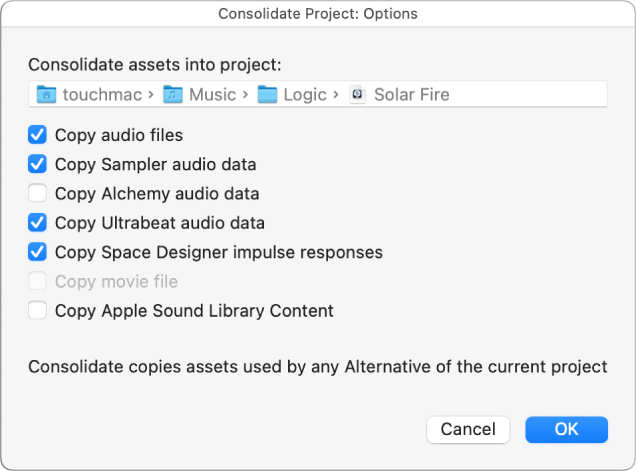
Select the checkboxes for the file types you want to copy into the consolidated project, then click OK.
Copy files into an existing project package
In Logic Pro, choose File > Project Settings > Assets, then select the checkboxes for all the assets you want to save in your package.
Save a project as a package
In Logic Pro, choose File > Save As.
In the Save As dialog, enter a new name for the project.
Next to “Organize my project as a,” select “Package.”
Select the type of assets to copy to the project, then click Save.
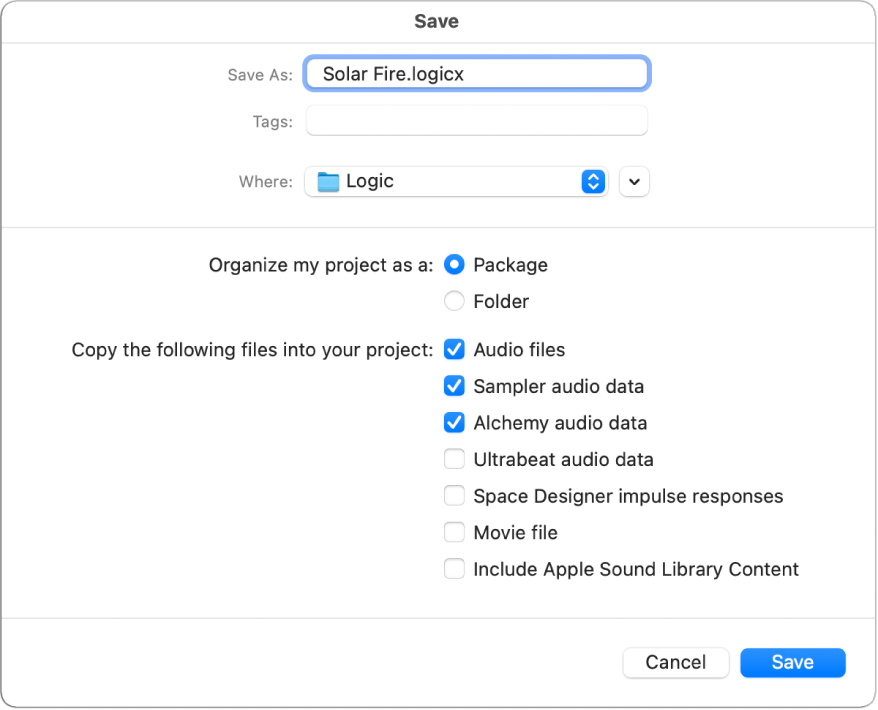
For more information about managing project assets, see Manage project assets.
Freeze a track
You can freeze any tracks that use Audio Units plug-ins not installed as Audio Unit Extensions on your iPad. This allows you to play back the tracks in your project in Logic Pro for iPad and hear any plug-ins used on those tracks.
In Logic Pro, click the Freeze button
 in the track header.
If the Freeze button is not visible, you can show it or configure track header components.
In the Track inspector, choose Pre Fader from the Freeze Mode pop-up menu. This freezes the track signal with all effect plug-ins. When selected, the Freeze button appears blue.
To unlock the track, click the Freeze button again.
Bounce one or more tracks in place
You can bounce any tracks that use Audio Units plug-ins not installed as Audio Unit Extensions on your iPad. This allows you to play back the tracks in your project in Logic Pro for iPad and hear any plug-ins used on those tracks. Make sure the Bypass Effect Plug-ins checkbox is unselected.
In Logic Pro, select the track.
Choose File > Bounce > Track in Place (or use the Bounce Track in Place key command).
In the Bounce Track In Place dialog, set the following parameters:
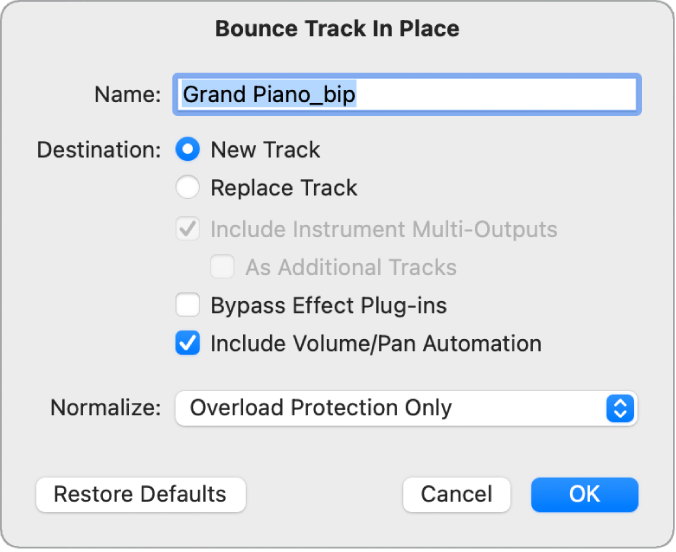
Name field: Enter a name for the bounce file in the field. The name defaults to the region name of the first selected region, with the extension _bip added at the end.
Destination buttons: Define the track on which the bounce file is placed. You have two options:
New Track: Creates a new audio track below the selected track, and places the bounce file on that track.
Replace Track: Replaces the existing track, and places the bounce file on it.
Include Instrument Multi-Outputs checkbox: Select to include aux channel strips with multi-output signals of the instrument in the bounce process. Otherwise, only the channel strips of tracks with selected regions are bounced.
As Additional Tracks checkbox: Select to create additional bounce files for every aux with any multi-output of the selected multi-output software instrument as input source.
Bypass Effect Plug-ins checkbox: Make sure this checkbox is unselected to include all plug-ins on the source track during the bounce process.
Include Volume/Pan Automation checkbox: Select to have volume and pan automation performed during the bounce process, with their result influencing the bounce file. Otherwise, the volume and pan automation is simply copied, not performed.
Normalize pop-up menu: Choose between three states of normalization:
Off: Turns off normalization.
Overload Protection Only: Allows downward normalization in case of overloads—levels above 0 dB, which would lead to clipping—but no normalization in case of lower levels.
On: Allows full bidirectional normalization.
Restore Defaults button: Click to set all parameters in the dialog to their default settings.
Click OK to trigger an in-place bounce of the selected track or tracks.
Following the bounce in place, the original track content (all regions, and all automation data except for volume, pan, and sends) is lost, and the original instrument or track channel strip is reset. You can use the Undo command if you want to return to the pre-bounce state. For more information about bouncing, see Bounce in place overview.
Set the channel strip panning mode (for projects using binaural panning)
In Logic Pro, do one of the following:
Click the Output slot of the channel strip, then choose Balance or Pan.
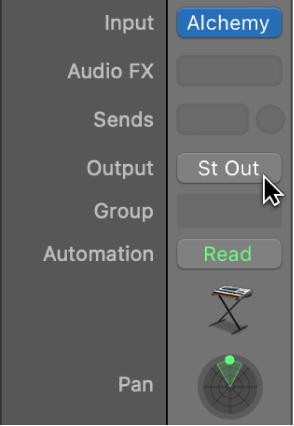
Control-click the Pan knob, then choose Balance or Pan from the shortcut menu.
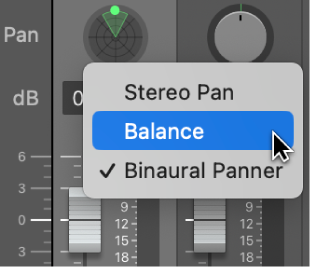
For more information, see Overview of binaural panning and Set channel strip pan or balance positions.
Set the ruler to use bars and beats
In Logic Pro, choose File > Project Settings > General, then select the “Use musical grid” checkbox.
Unpack and delete an arrange folder
In the Logic Pro Tracks area, Control-click the folder header area, then choose Folder > Unpack Take Folder to Independent Tracks (mute inactive) or Unpack Folder/Take Cell to New Tracks from the shortcut menu.
Control-click the folder track header, then choose Delete Track from the shortcut menu.
Note: Projects created and last saved in Logic Pro for Mac version 9 or earlier (with the filename extension .logic) don’t appear in the New Project Chooser in Logic Pro for iPad and can’t be opened.