Logic Pro User Guide for iPad
- What’s new in Logic Pro 1.1
-
- What is Logic Pro?
- Working areas
- Work with function buttons
- Work with numeric values
-
- Intro to tracks
- Create tracks
- Create tracks using drag and drop
- Choose the default region type for a software instrument track
- Select tracks
- Duplicate tracks
- Reorder tracks
- Rename tracks
- Change track icons
- Change track colors
- Use the tuner on an audio track
- Show the output track in the Tracks area
- Delete tracks
- Edit track parameters
- Start a Logic Pro subscription
- How to get help
-
- Intro to recording
-
- Before recording software instruments
- Record software instruments
- Record additional software instrument takes
- Record to multiple software instrument tracks
- Record multiple MIDI devices to multiple tracks
- Record software instruments and audio simultaneously
- Merge software instrument recordings
- Spot erase software instrument recordings
- Replace software instrument recordings
- Capture your most recent MIDI performance
- Use the metronome
- Use the count-in
-
- Intro to arranging
-
- Intro to regions
- Select regions
- Cut, copy, and paste regions
- Move regions
- Remove gaps between regions
- Delay region playback
- Trim regions
- Loop regions
- Repeat regions
- Mute regions
- Split and join regions
- Stretch regions
- Separate a MIDI region by note pitch
- Bounce regions in place
- Change the gain of audio regions
- Create regions in the Tracks area
- Convert a MIDI region to a Drummer region or a pattern region
- Rename regions
- Change the color of regions
- Delete regions
- Create fades on audio regions
- Access mixing functions using the Fader
-
- Intro to Step Sequencer
- Use Step Sequencer with Drum Machine Designer
- Record Step Sequencer patterns live
- Step record Step Sequencer patterns
- Load and save patterns
- Modify pattern playback
- Edit steps
- Edit rows
- Edit Step Sequencer pattern, row, and step settings in the inspector
- Customize Step Sequencer
-
- Effect plug-ins overview
-
- Instrument plug-ins overview
-
- ES2 overview
- Interface overview
-
- Modulation overview
-
- Vector Envelope overview
- Use Vector Envelope points
- Use Vector Envelope solo and sustain points
- Set Vector Envelope segment times
- Vector Envelope XY pad controls
- Vector Envelope Actions menu
- Vector Envelope loop controls
- Vector Envelope release phase behavior
- Vector Envelope point transition shapes
- Use Vector Envelope time scaling
- Use the Mod Pad
- Modulation source reference
- Via modulation source reference
-
- Sample Alchemy overview
- Interface overview
- Add source material
- Save a preset
- Edit mode
- Play modes
- Source overview
- Synthesis modes
- Granular controls
- Additive effects
- Additive effect controls
- Spectral effect
- Spectral effect controls
- Filter module
- Low and highpass filter
- Comb PM filter
- Downsampler filter
- FM filter
- Envelope generators
- Mod Matrix
- Modulation routing
- Motion mode
- Trim mode
- More menu
- Sampler
- Copyright
ES1 global parameters in Logic Pro for iPad
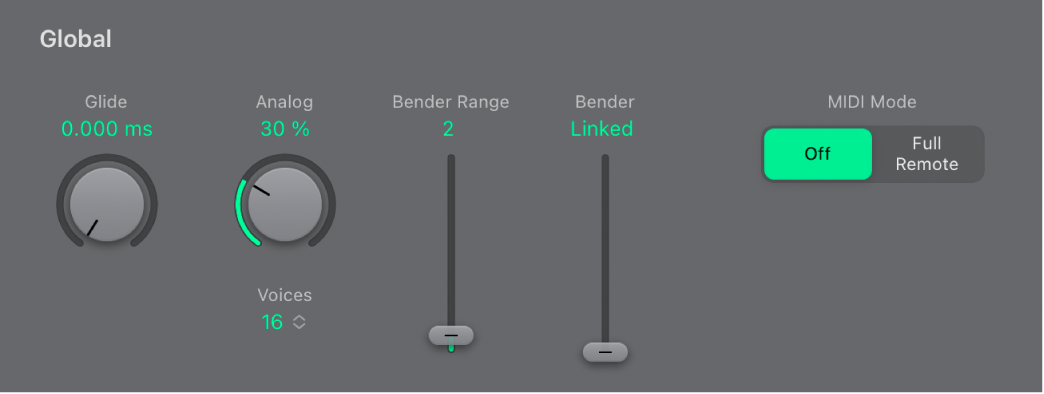
The global parameters affect the overall sound, or behavior, of ES1.

Global parameters
Glide knob and field: Set the amount of time it takes to slide between the pitches of each triggered note. The Glide trigger behavior depends on the value set in the Voices field (see below).
Analog knob and field: Change the pitch of each note and the cutoff frequency slightly and randomly. This emulates the oscillator detuning and filter fluctuations of polyphonic analog synthesizers, due to heat and age.
If you set the Analog parameter to 0%, the oscillator cycle start points of all triggered voices are synchronized. This can be useful for percussive sounds, when you want to achieve a sharper attack characteristic.
If you set the Analog parameter higher than 0%, the oscillators of all triggered voices can cycle freely. Use higher values if you want a warm, analog type of sound—where subtle sonic variations occur for each triggered voice.
Voices field: Set the maximum number of notes that can be played simultaneously.
When Voices is set to Legato, the ES1 behaves like a monophonic synthesizer—with single trigger and fingered portamento engaged. This means that if you play legato, a portamento—glide from one note to the next—will happen. If you release each key before pressing a new one, the envelope is not triggered by the new note, and there is no portamento. Use this feature to create pitch bend effects, without touching your keyboard pitch bender, by choosing a high Glide parameter value when using the Legato setting.
When set to full (polyphony), each played note has its own synth voice and an automatic release cutoff comes into effect. If you have set a long release time and play a non-legato chord progression, the chords won’t smear into each other, which is useful for classic string synthesizer emulations.
PB Range Up slider and field: Set the sensitivity of the pitch bender, in semitone steps.
PB Down slider and field: Set the pitch bend range independently for upward and downward bends.
Linked: The negative pitch band uses the value set in the global Bender Range field. Positive and negative bend ranges are the same.
0: No negative bend range at all, but the global value for positive bends is retained.
1-24: Independent amount of negative bend range to allow for different ranges. For example, +2 and -12.
MIDI Mode buttons: Determine how ES1 responds to MIDI controllers. Choose either Off or Full Remote. See ES1 MIDI controller assignments.
Download this guide: PDF