Final Cut Pro User Guide for Mac
- Welcome
- What’s new
-
- Intro to importing media
- If it’s your first import
- Organize files during import
-
- Import from Image Playground
- Import from iMovie for macOS
- Import from iMovie for iOS or iPadOS
- Import from Final Cut Pro for iPad
- Import from Final Cut Camera
- Import from Photos
- Import from Music
- Import from Apple TV
- Import from Motion
- Import from GarageBand and Logic Pro
- Import using workflow extensions
- Record into Final Cut Pro
- Memory cards and cables
- Supported media formats
-
- Intro to effects
-
- Intro to transitions
- How transitions are created
- Add transitions and fades
- Quickly add a transition with a keyboard shortcut
- Set the default duration for transitions
- Delete transitions
- Adjust transitions in the timeline
- Adjust transitions in the inspector and viewer
- Merge jump cuts with the Flow transition
- Adjust transitions with multiple images
- Modify transitions in Motion
- Add adjustment clips
-
- Add storylines
- Use the precision editor
- Conform frame sizes and rates
- Use XML to transfer projects
-
- Intro to sharing projects
- Share to Apple devices
- Share on the web
- Send a video frame to Pixelmator Pro
- Share in email
- Share stereo or spatial video
- Batch sharing
- Share using Compressor
- Create share destinations
- Change metadata for shared items
- View the status of shared items
- Speed up exports with simultaneous processing
- Glossary
- Copyright and trademarks
Edit closed caption text in Final Cut Pro for Mac
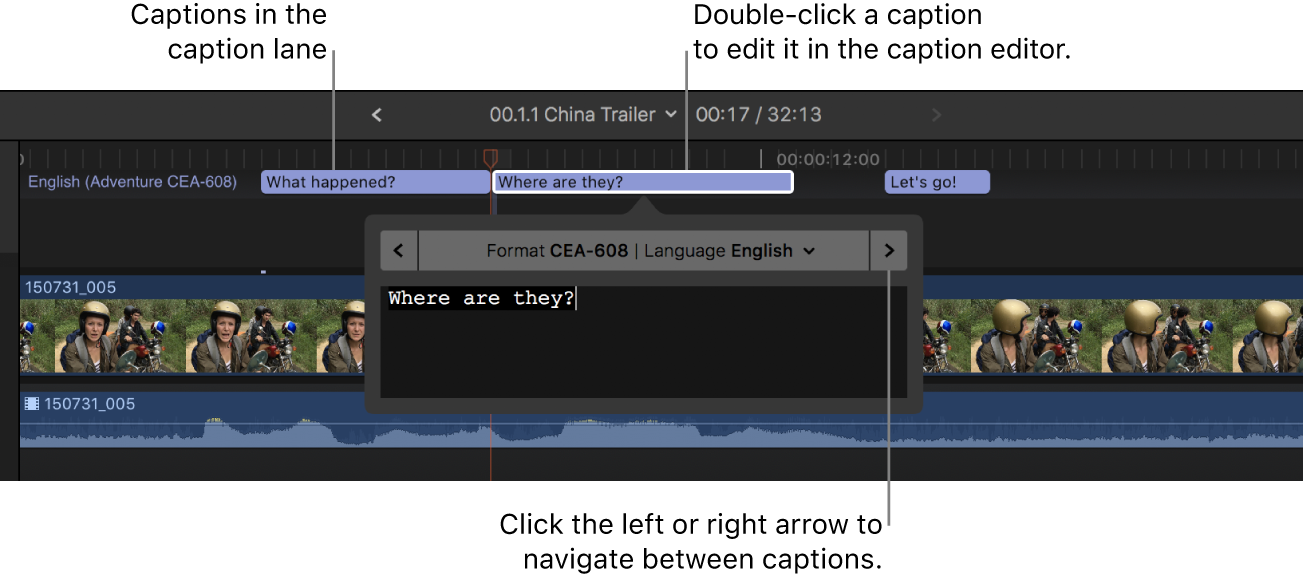
You can edit the text of your closed captions directly in the timeline using the closed caption editor, or you can enter changes in the inspector.
In Final Cut Pro, do one of the following:
Double-click a closed caption in the timeline or the timeline index (or select it and press Control-Shift-C).
The closed caption editor opens, showing the closed caption text.
Select a closed caption in the timeline and open the inspector.
The text of the closed caption appears in the Caption Text field at the top of the inspector.
Make any text changes, including typing additional text, deleting text, and copying and pasting text.
To add a new line, press Return.
In a CEA-608 closed caption, you can enter up to four lines of text, with up to 32 characters per line. The four-line maximum also applies to closed captions with multiple fields. See Add multiple text fields to CEA-608 closed captions.
In an iTT closed caption, you can enter up to two lines of text. The character limit is determined by several factors, including the aspect ratio and the title-safe area of the display.
In an SRT closed caption, the character limit is the same as in iTT closed captions. The number of lines of text is limited only by the player or playback device. See the documentation for your intended player or device.
If your closed caption doesn’t conform to the specifications of the closed caption format you chose (for example, if the closed caption is too long), the closed caption turns red in the timeline and in the Captions pane of the timeline index, and a warning message appears in the inspector. See the Apple Support article Learn about Final Cut Pro caption validation.
To navigate between closed captions, click the arrows on either side of the closed caption editor (or press Command-Right Arrow or Command-Left Arrow).
Note: When the closed caption editor is open, many single-key keyboard shortcuts (such as J, K, L, I, O, and Space bar) are interpreted as text characters rather than as shortcuts. To use these shortcuts in the closed caption editor, add the Control key. For example, to play in reverse when the closed caption editor is open, press Control-J.

Download this guide: PDF