Change camera settings in Final Cut Camera
When you record video with Final Cut Camera, you can control focus, zoom, white balance, exposure, stabilization, and more.
Change the zoom level
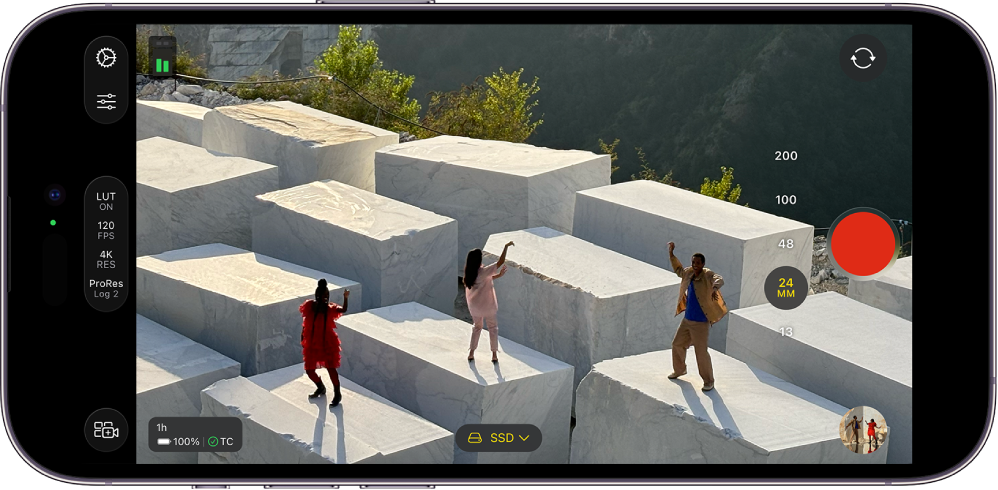
In Final Cut Camera, the current zoom level is indicated by the lens focal length buttons. Each button represents a different lens on your particular device model (for example, 13 mm, 24 mm, 48 mm, 100 mm, or 200 mm).
Go to the Final Cut Camera app
 on your iPhone or iPad.
In the camera screen, do one of the following:
Switch between lenses: Tap a lens button to switch between lenses (24 mm to 13 mm, for example). You can’t switch between lenses during recording.
Drag the Continuous Zoom slider: In the camera screen, tap
 , tap
, tap  , then drag the slider to change the zoom level. You can control the rate of zoom by the distance you drag.
Unlike the zoom controls in Camera on iPhone or iPad, the Continuous Zoom slider in Final Cut Camera is constrained to one lens at a time for smooth zooming.
Use the pinch gesture: In the viewfinder, pinch open to zoom in, or pinch closed to zoom out.
Note: The Continuous Zoom slider and the pinch gesture use digital zoom. To eliminate the reduced resolution sometimes associated with digital zoom, you can turn it off. In the camera screen, tap
 , tap Preferences, then turn off Allow Digital Zoom. When digital zoom is turned off, the only way to change the focal length is by tapping a lens button to switch between lenses.
The camera maintains the zoom level until you change it or close the camera.
Adjust the exposure
By default, Final Cut Camera sets the exposure automatically, but you can manually adjust the exposure of your image. For example, if you’re shooting indoors (with less light) and want to show the detail of a subject through a window (which has more light), you can adjust the exposure to reveal the subject outside the window.
Deliberately underexposing or overexposing the image can also create a certain mood or feeling in the shot.
Go to the Final Cut Camera app
on your iPhone or iPad.In the camera screen, do one of the following:
Set the exposure for a subject: Tap the subject.
Note: This method also sets the focus on the subject.
Adjust the automatic exposure setting: Tap
, tap  , then drag the dial. This method doesn’t completely turn off autoexposure. Rather, it adjusts the automatic exposure setting lighter or darker.
Set exposure manually: Tap
, tap , tap  , then do any of the following:
Tap Shutter, then drag the dial to adjust the exposure duration.
Tap ISO, then drag the dial to set the ISO rating.
To reset the exposure, double-tap the dial.
Tap
to close the exposure controls.
The camera maintains your exposure setting until you change it or close the camera.
Tip: If you’re recording at 24 fps, you can set the shutter to 1/48 of a second for a natural motion blur.
Change the focus
When recording with the rear camera on your device, you can manually focus on particular subjects.
You can’t change the focus for the front-facing camera.
Tip: Turn on focus peaking for maximum precision in your focus adjustments. See Turn on the focus peaking overlay.
Go to the Final Cut Camera app
on your iPhone or iPad.By default, the camera is set to autofocus and focuses on the nearest subject. The camera recognizes people, animals, and many common objects.
Do one of the following:
Focus using a subject: Tap a subject in the camera’s viewfinder. The camera focuses (and sets exposure) based on that subject’s current location. If the camera loses focus, it reverts to the default autofocus (and autoexposure) in the center of the viewfinder.
Lock focus and exposure: Touch and hold a subject in the camera’s viewfinder to lock focus and exposure. A yellow AE/AF Lock indicator appears at the top of the screen. To unlock, tap anywhere on the screen.
Focus manually: Tap
, tap  , tap , then drag the dial to set a focal length. To reset the focus, double-tap the dial. To switch back to autofocus, tap
  .
.
When you focus manually, the camera maintains your manual focus setting until you switch to autofocus or close the camera. If you touch and hold a different subject while a manual focus setting is active, the camera locks the exposure to the new subject, and a yellow AE Lock indicator appears at the top of the screen.
Set the white balance
White-balancing an image removes color casts and ensures that white objects in the image appear white.
You can also adjust the white balance manually to set the mood for a shot. For example, setting the white balance cooler (lower) can give the scene a colder or harsher feel. Setting the white balance warmer (higher) can make the scene feel more inviting.
Note: White balance adjustments are not available while recording Apple ProRes RAW. You can adjust the white balance in Apple ProRes RAW files using Final Cut Pro and other post-production software.
Go to the Final Cut Camera app
on your iPhone or iPad.In the camera screen, tap
, then tap  .
.By default, the white balance is set automatically to create a neutral white balance for the scene.
Do one of the following:
Set the white balance using a subject: Tap a subject in the camera’s viewfinder to create a neutral white balance for that subject.
Lock the white balance to the current level: Tap the button at the end of the White Balance dial, then tap Fixed. By default, the button at the end of the dial is set to Automatic
.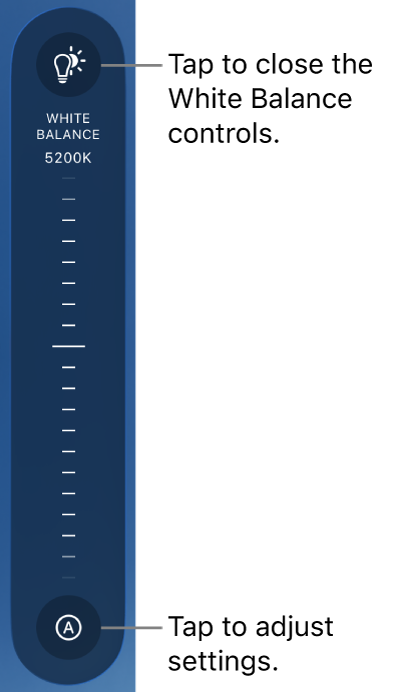
Set the white balance to a custom level: Drag the dial. To reset the white balance, double-tap the dial.
Set the white balance automatically: Tap the button at the end of the White Balance dial, then tap Automatic.
Use a white balance preset: Tap the button at the end of the White Balance dial, then tap a preset.
White balance presets include the following:
Daylight (5600K)
Shadow (7000K)
Cloudy (6000K)
Tungsten (3200K)
Fluorescent (4000K)
Flash (5500K)
To close the White Balance controls, tap
again.
The camera maintains your white balance setting until you set the white balance to Automatic.
Lock or unlock the screen orientation
You can lock the Final Cut Camera screen orientation so that it doesn’t change when you rotate your device.
Go to the Final Cut Camera app
on your iPhone or iPad.In the camera screen, tap
.Tap
 , then tap an option.
Turn on camera stabilization
Final Cut Camera can stabilize any shakes and bumps while you record video.
Go to the Final Cut Camera app
on your iPhone or iPad.In the camera screen, tap
, tap Preferences, then turn on Stabilization.Tap
 .
.
Set the timecode
In Final Cut Camera, you can set the type or source of timecode to record in your videos.
Go to the Final Cut Camera app
on your iPhone or iPad.In the camera screen, tap
, tap Preferences, then tap Timecode.Tap an option:
Record Run: Counts up from the starting point (00:00:00:00) while the camera is actively recording and pauses when not recording. This timecode option shows the total recorded duration.
Time of Day: Runs continuously like a clock, whether recording or not. This timecode option shows the actual real-world time at which each frame was captured, making it easier to sync timecode across devices.
External Source: Receives timecode from an external generator or central device, allowing multiple devices to lock to the same reference signal. This option is available when you connect an external timecode generator to your iPhone with a USB-C cable. Tap
 next to Source, then tap the name of the device.
The color of the icon next to the device name shows its current status: Connected, Synchronized, or Signal Loss.
Tap
.
Set a genlock source
With Final Cut Camera and iPhone 17 Pro or later, you can set the source of an external genlock signal to ensure perfect sync between multiple cameras.
Go to the Final Cut Camera app
on your iPhone.In the camera screen, tap
, then tap Preferences.Connect a compatible sync generator device to your iPhone.
The name of the genlock device appears below Genlock.
To check the status of the connection, tap Genlock.
The color of the icon next to the device name shows its current status: Connected, Synchronized, or Signal Loss.
Tap
.
With Final Cut Camera and iPhone 17 Pro or later, you can also set how video appears on a connected external display. See Use an external display.