Logic Pro User Guide for iPad
- Welcome
-
- What is Logic Pro?
- Working areas
- Work with the menu bar
- Work with function buttons
- Work with numeric values
- Undo and redo edits in Logic Pro for iPad
-
- Intro to tracks
- Create tracks
- Create tracks using drag and drop
- Choose the default region type for a software instrument track
- Select tracks
- Duplicate tracks
- Reorder tracks
- Rename tracks
- Change track icons
- Change track colors
- Use the tuner on an audio track
- Show the output track in the Tracks area
- Delete tracks
- Edit track parameters
- How to get help
-
- Intro to recording
-
- Before recording software instruments
- Record software instruments
- Record additional software instrument takes
- Record to multiple software instrument tracks
- Record multiple MIDI devices to multiple tracks
- Record software instruments and audio simultaneously
- Merge software instrument recordings
- Spot erase software instrument recordings
- Replace software instrument recordings
- Route MIDI internally to software instrument tracks
- Record with Low Latency Monitoring mode
- Use the metronome
- Use the count-in
-
- Intro to arranging
-
- Intro to regions
- Select regions
- Cut, copy, and paste regions
- Move regions
- Remove gaps between regions
- Delay region playback
- Trim regions
- Loop regions
- Repeat regions
- Mute regions
- Split and join regions
- Stretch regions
- Separate a MIDI region by note pitch
- Bounce regions in place
- Change the gain of audio regions
- Normalize audio regions in the Tracks area in Logic Pro for iPad
- Create regions in the Tracks area
- Convert a MIDI region to a Session Player region or a pattern region
- Replace a MIDI region with a Session Player region in Logic Pro for iPad
- Rename regions
- Change the color of regions
- Delete regions
-
- Intro to chords
- Add and delete chords
- Select chords
- Cut, copy, and paste chords
- Move and resize chords
- Loop chords on the Chord track
- Color chords on the Chord track
- Edit chords
- Work with chord groups
- Use chord progressions
- Change the chord rhythm
- Choose which chords a Session Player region follows
- Analyze the key signature of a range of chords
- Use Chord ID to analyze the chords in an audio or MIDI region
- Create fades on audio regions
- Extract vocal and instrumental stems with Stem Splitter
- Access mixing functions using the Fader
-
- Intro to Step Sequencer
- Use Step Sequencer with Drum Machine Designer
- Chords and pitch in Step Sequencer
- Record Step Sequencer patterns live
- Step record Step Sequencer patterns
- Load and save patterns
- Modify pattern playback
- Edit steps
- Edit rows
- Edit Step Sequencer pattern, row, and step settings in the inspector
- Customize Step Sequencer
-
- Intro to mixing
-
- Channel strip types
- Channel strip controls
- Peak level display and clipping
- Set channel strip volume
- Set channel strip input format
- Set the output for a channel strip
- Set channel strip pan position
- Mute and solo channel strips
- Reorder channel strips
- Replace a patch on a channel strip using drag and drop
- Work with plug-ins in the Mixer
- Search for plug-ins in the Mixer
-
-
- Effect plug-ins overview
-
- Instrument plug-ins overview
-
- ES2 overview
-
- Modulation overview
- Use the Mod Pad
-
- Vector Envelope overview
- Use Vector Envelope points
- Use Vector Envelope solo and sustain points
- Set Vector Envelope segment times
- Vector Envelope XY pad controls
- Vector Envelope Actions menu
- Vector Envelope loop controls
- Vector Envelope point transition shapes
- Vector Envelope release phase behavior
- Use Vector Envelope time scaling
- Modulation source reference
- Via modulation source reference
- Use macro controls
-
- Sample Alchemy overview
- Interface overview
- Add source material
- Save a preset
- Edit mode
- Play modes
- Source overview
- Synthesis modes
- Granular controls
- Additive effects
- Additive effect controls
- Spectral effect
- Spectral effect controls
- Filter module
- Low, bandpass, and highpass filters
- Comb PM filter
- Downsampler filter
- FM filter
- Envelope generators
- Mod Matrix
- Modulation routing
- Motion mode
- Trim mode
- More menu
- Sampler
- Studio Piano
- Copyright and trademarks
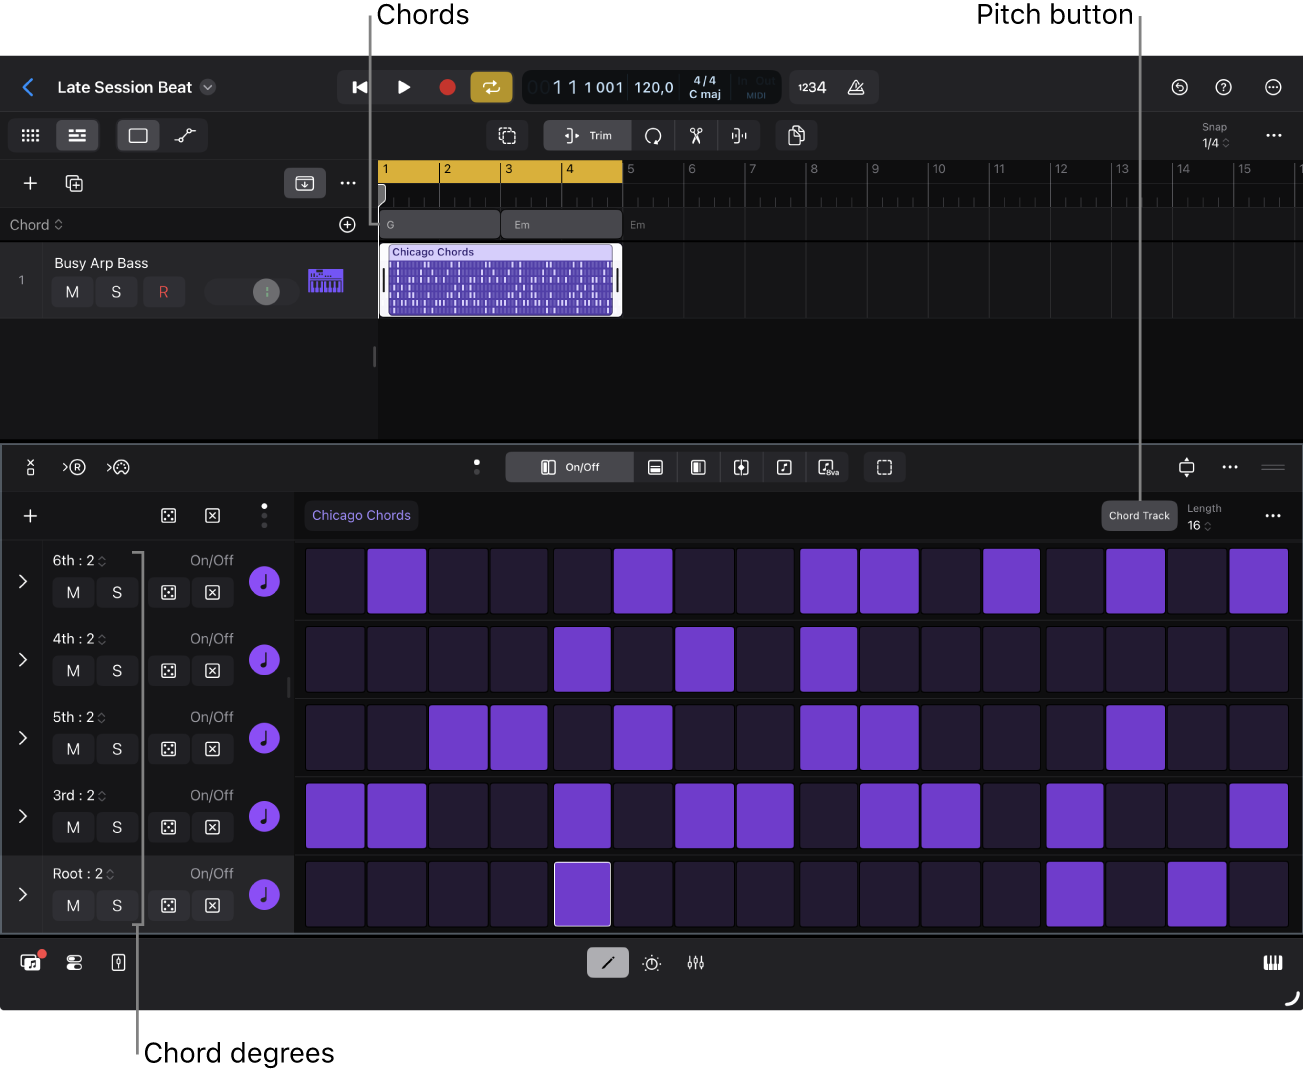
Chords and pitch in Step Sequencer in Logic Pro for iPad
Step Sequencer in Logic Pro for iPad can follow different pitch sources. You can set the key and scale for a pattern or use the project key signature. Step Sequencer can also follow either the Chord track or region chords. By following the Chord track, multiple tracks—such as tracks using Step Sequencer, Session Player tracks, and other software instrument tracks—can play in sync harmonically. For information about working with chords, see Intro to chords.
Step Sequencer and chords
When Step Sequencer is set to follow the Chord track or region chords, the names of the note rows in the pattern show chord degrees instead of fixed notes. This allows Step Sequencer to play the different chord notes and to play chord extensions using the same rows.
The chord degrees correspond to the chords and chosen scale in the Chord track or region. As the playhead passes over different chords, the notes that Step Sequencer plays for each row change to match the chord. For example, imagine you have three rows with the chord degrees root, third, and fifth; and the Chord track has a G major and an E minor chord. Over the G major, the three rows correspond to a G major triad (G, B, and D). Over the E minor, the same three rows correspond to an E minor triad (E, G, and B).
Step Sequencer and pattern loops
When you load drum-based pattern loops, such as loops using Drum Kit Designer or Drum Machine Designer, no pitch source is selected. When you load melodic- or harmonic-based pattern loops, the project key signature is selected as the pitch source, and the loop is transposed to the project key. For more information about pattern loops, see Load and save patterns.
Many pattern loops also contain region chords. When you add a loop containing chords to the Tracks area, you can choose to have Step Sequencer follow these chords. For more information about adding pattern loops, see Add Apple Loops to your Logic Pro for iPad project.
Note: The Pitch button in the Step Sequencer menu bar isn’t available when using a Drum Machine Designer kit in Step Sequencer. When you use a Drum Machine Designer kit in Step Sequencer, the Pitch button in the Step Sequencer menu bar isn’t available. Instead, you canchange the key and scale in the inspector.
Set the key and scale for a pattern
In Logic Pro, tap the Pitch button in the Step Sequencer menu bar.
Tap the Pitch Source pop-up menu, then choose Off.
Choose a key from the Key pop-up menu.
Choose a scale from the Scale pop-up menu.
You can also set the key and scale in the Step Sequencer inspector.
Have Step Sequencer follow the project key signature
In Logic Pro, tap the Pitch button in the Step Sequencer menu bar.
Tap the Pitch Source pop-up menu, then choose Key Signature.
Have Step Sequencer follow the region chords or Chord track
In Logic Pro, tap the Pitch button in the Step Sequencer menu bar.
Tap the Pitch Source pop-up menu, then choose one of the following:
To have Step Sequencer follow the region chords in the pattern region: Choose Region Chords.
To have Step Sequencer follow the Chord track: Choose Chord Track.
The row names change to chord degrees, and the Chord Degrees submenu is available in the Add Row pop-up menu. You can then change the chord degree that’s assigned to a row. See Change the row assignment.
Download this guide: PDF