Final Cut Pro X User Guide
- Welcome
-
- What’s new in Final Cut Pro 10.4.9
- What’s new in Final Cut Pro 10.4.7
- What’s new in Final Cut Pro 10.4.6
- What’s new in Final Cut Pro 10.4.4
- What’s new in Final Cut Pro 10.4.1
- What’s new in Final Cut Pro 10.4
- What’s new in Final Cut Pro 10.3
- What’s new in Final Cut Pro 10.2
- What’s new in Final Cut Pro 10.1.2
- What’s new in Final Cut Pro 10.1
- What’s new in Final Cut Pro 10.0.6
- What’s new in Final Cut Pro 10.0.3
- What’s new in Final Cut Pro 10.0.1
-
- Intro to effects
-
- Intro to transitions
- How transitions are created
- Add transitions
- Set the default transition
- Delete transitions
- Adjust transitions in the timeline
- Adjust transitions in the inspector and viewer
- Merge jump cuts with the Flow transition
- Adjust transitions with multiple images
- Modify transitions in Motion
-
- Add storylines
- Use the precision editor
- Conform frame sizes and rates
- Use XML to transfer projects
-
-
- Intro to media management
-
- View a clip’s information
- Override a clip’s metadata
- Locate source media files
- Relink clips to media files
- Consolidate projects and libraries
- Back up projects and libraries
- Create optimized and proxy files
- Create a proxy-only project
- Manage render files
- View background tasks
- Convert incompatible media
- Create camera archives
- Glossary
- Copyright

Adjust timeline clip appearance in Final Cut Pro
In Final Cut Pro, you can change how clips are displayed in the timeline. For example, you can show clips with or without video filmstrips or audio waveforms. You can also change the vertical height of clips, and adjust the relative size of video filmstrips and audio waveforms in clip thumbnails. You can also show only the clip labels.
In Final Cut Pro, click the Clip Appearance button in the top-right corner of the timeline.

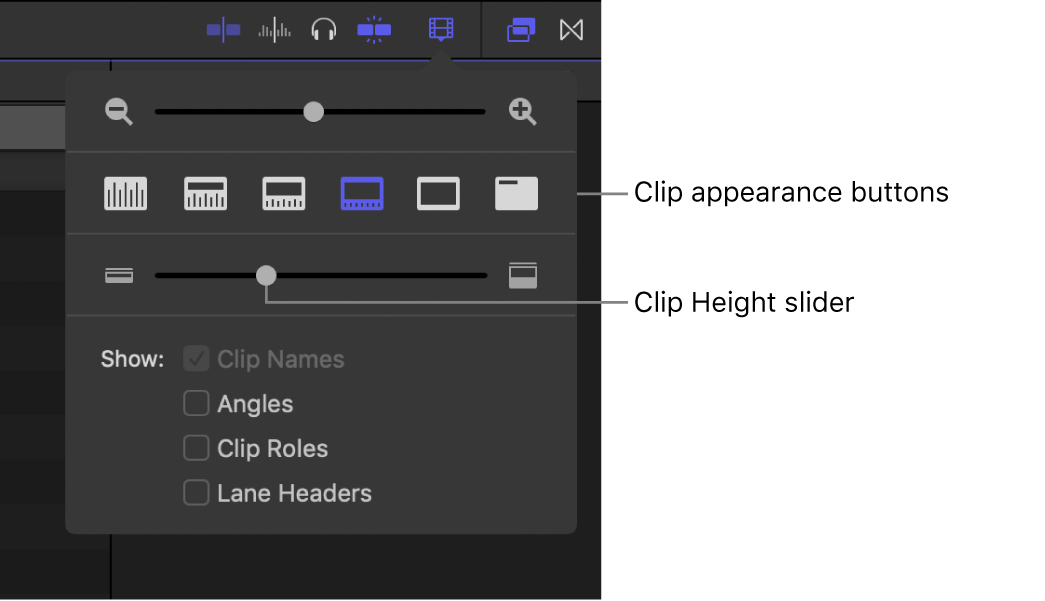
The clip appearance controls appear.

To adjust the display of filmstrips and waveforms in timeline clips, click a clip appearance button.

Display clips with large audio waveforms only: Click the leftmost button (or press Control-Option-1).

Display clips with large audio waveforms and small filmstrips: Click the second button from the left (or press Control-Option-2).

Display clips with audio waveforms and video filmstrips of equal size: Click the third button from the left (or press Control-Option-3).

Display clips with small audio waveforms and large filmstrips: Click the third button from the right (or press Control-Option-4).

Display clips with large filmstrips only: Click the second button from the right (or press Control-Option-5).

Display clip labels only: Click the rightmost button (or press Control-Option-6).
Tip: To increase the size of audio waveforms for timeline clips, press Control-Option-Up Arrow. To decrease the size of audio waveforms for timeline clips, press Control-Option-Down Arrow.
To adjust the vertical height of clips in the timeline, drag the Clip Height slider to the left to decrease the clip height, or to the right to increase the clip height.
To adjust the display of clip labels, do any of the following:
View clips by name: Select the Clip Names checkbox.
View multicam clips by the name of the active video angle and the active audio angle: Select the Angles checkbox.
View clips by role: Select the Clip Roles checkbox.
Always show lane names (so the names aren’t obscured by clips): Select the Lane Headers checkbox.