Final Cut Pro User Guide for Mac
- Welcome
- What’s new
-
- Intro to effects
-
- Intro to transitions
- How transitions are created
- Add transitions and fades
- Quickly add a transition with a keyboard shortcut
- Set the default duration for transitions
- Delete transitions
- Adjust transitions in the timeline
- Adjust transitions in the inspector and viewer
- Merge jump cuts with the Flow transition
- Adjust transitions with multiple images
- Modify transitions in Motion
-
- Add storylines
- Use the precision editor
- Conform frame sizes and rates
- Use XML to transfer projects
- Glossary
- Copyright

Add a Magnetic Mask to a video effect in Final Cut Pro for Mac
You can easily define the area of a video effect using a Magnetic Mask. The Magnetic Mask recognizes people, objects, and shapes, which makes it particularly useful for color correction. Final Cut Pro can then track the item’s movement in the clip using machine learning and apply the mask to each frame automatically.
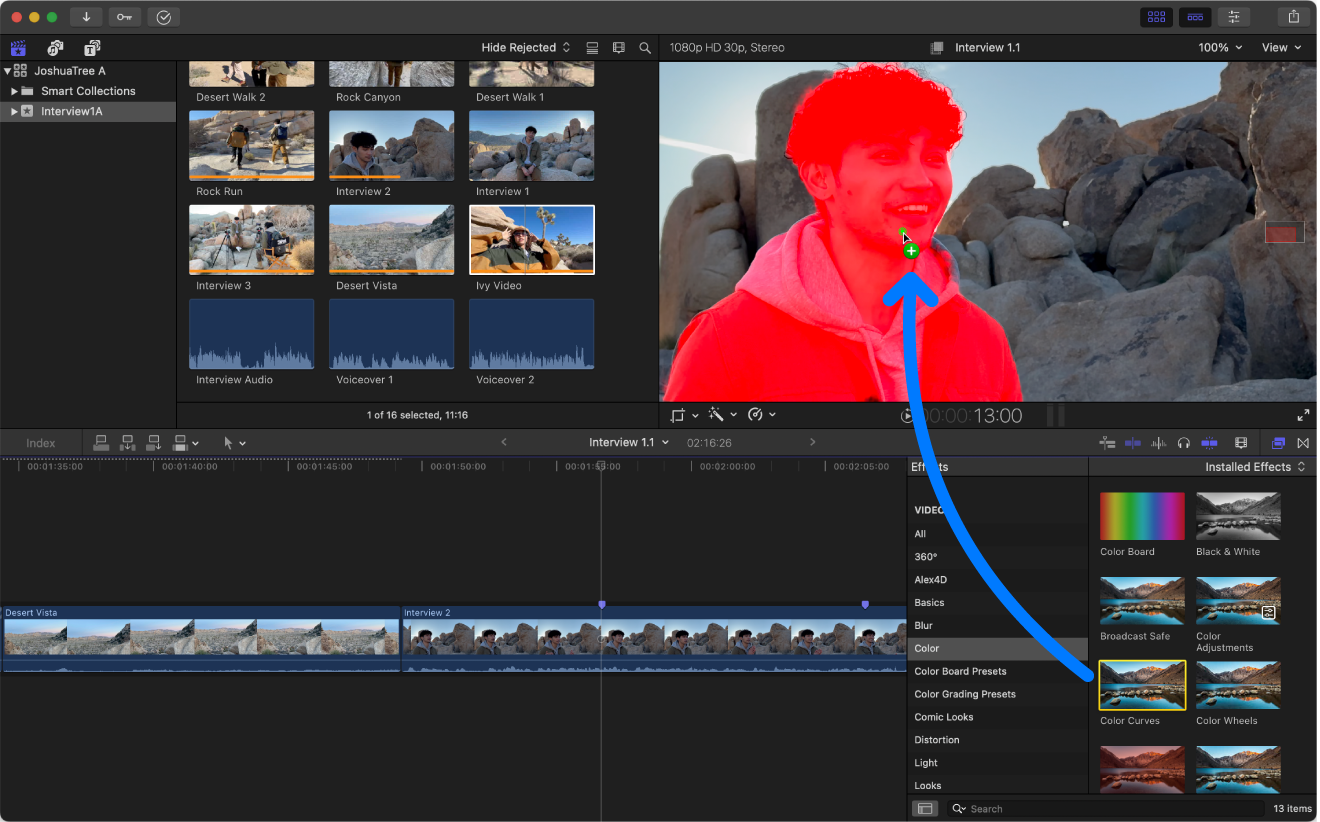
For example, if you drag a color correction effect to a person’s face in the viewer, the face is highlighted to show the area where the color correction will be applied. The example below uses a Magnetic Mask to control which parts of the image are affected by the Color Curves effect.
In Final Cut Pro, add a video clip to the timeline.
Select the clip in the timeline, then position the playhead at a point within the clip that shows the area you want to adjust.
Open the Effects browser, then select the effect that you want to apply to the clip.
Note: Effects you can add include the color correction effects, which you can apply from the Color category of the Effects browser or from the Color inspector. See Add color correction effects in Final Cut Pro for Mac.
Do one of the following:
Drag the effect to the viewer, directly onto the object or shape that you want to mask.
As you drag the effect over the viewer, objects and shapes in the image are highlighted in a bright color.

Note: If you don’t see colorful highlighting as you drag in the viewer, choose Final Cut Pro > Settings > General, then click the Drop Effect in Player pop-up menu and choose Add Magnetic Mask (instead of Add Tracker). Or, to temporarily switch between the two drag-to-viewer options, press and hold the Command key while dragging. See Drop Effect in Player.
Add a video effect to the timeline clip. At the top of the Video inspector, move the pointer over the effect name, then click the Apply Effect Masks button
 and choose Add Magnetic Mask.
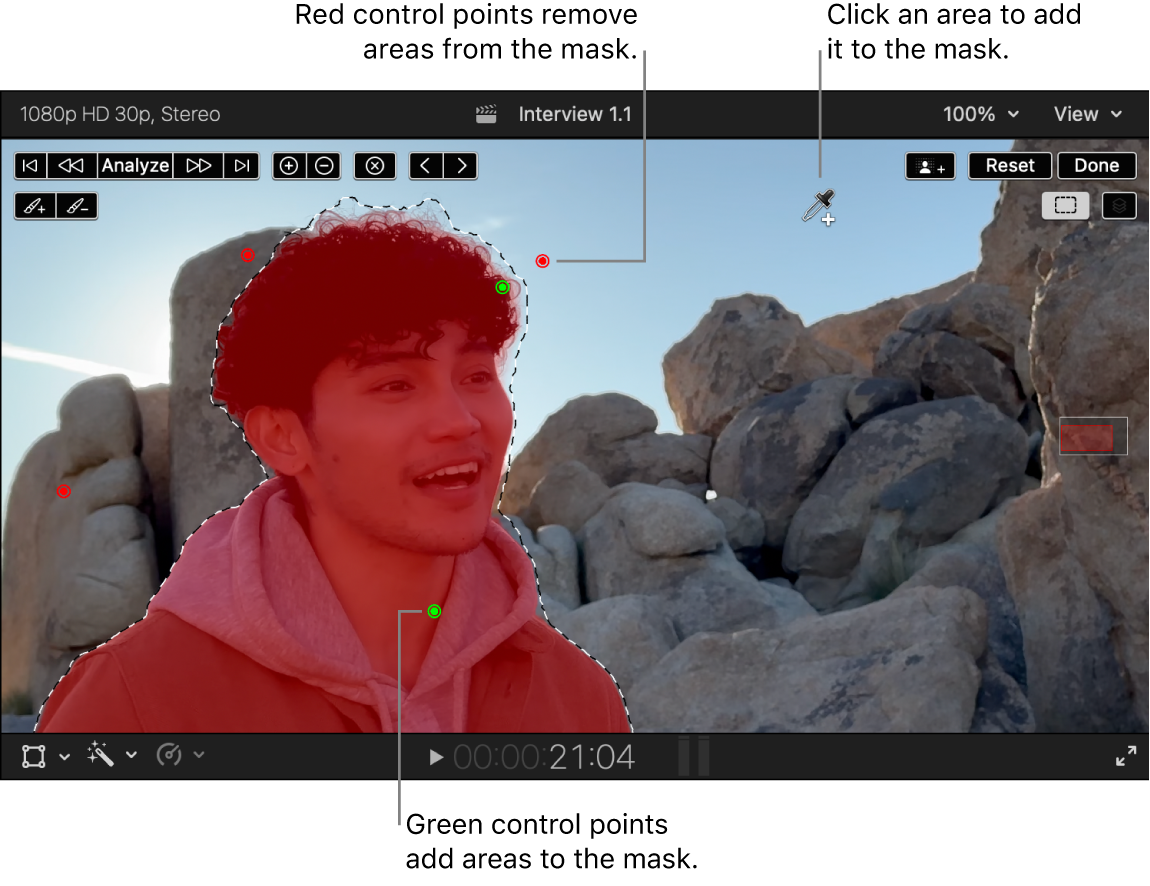
The Magnetic Mask controls appear at the top of the viewer. By default, the pointer changes to the Add eyedropper (for adding parts of the image to the mask).
In the viewer, position the eyedropper on an object or shape in the image that you want to mask, then click to select it. (This step may not be necessary if you dragged the effect directly onto the object or shape.)
To adjust the mask area, do any of the following:
Add to the selection: Click an area in the viewer with the Add eyedropper
 . Each click with the Add eyedropper places a green control point, adding an area to the mask.
Subtract from the selection: Click the Remove button
 at the top of the viewer, then click an area in the viewer with the Remove eyedropper
  . Each click with the Remove eyedropper places a red control point, removing an area from the mask.
To switch back to the Add eyedropper, click the Add button
 .
.
Tip: To switch between eyedroppers temporarily, press and hold the Option key. When you release the Option key, the tool reverts to the previously active eyedropper.
In most cases, you need only a handful of control points to select the object or shape you want to mask. There’s no measurable effect after about 20 control points.

Use the analysis buttons at the top of the viewer to extend the Magnetic Mask to additional frames of the clip.

Do one of the following:
Apply the mask to the previous or next frame: Click the Previous Frame button
 or the Next Frame button
  .
.Apply the mask to the portion of the clip before or after the current frame: Click the Analyze Backward button
 or the Analyze Forward button
  .
.Apply the mask to the entire clip: Click Analyze.
Note: To cancel the analysis, press the Esc (Escape) key, or press Command-Period (.).
In the timeline, move the playhead to the beginning of the analyzed section and play it back.
Make any needed adjustments to the Magnetic Mask.
See Edit a Magnetic Mask selection with control points or the brush tool.
When you’re satisfied with the mask selection, click Done in the upper-right corner of the viewer.
The video effect is applied to the masked object.
Make any adjustments to the video effect you applied.
See Adjust effects in Final Cut Pro for Mac. If you applied a color correction effect, see Intro to color correction effects in Final Cut Pro for Mac.
For more information, see Add a Magnetic Mask in Final Cut Pro for Mac and Edit Magnetic Masks in Final Cut Pro for Mac.
Download this guide: PDF