Modifying this control will update this page automatically
Logic Pro User Guide for Mac
- Welcome
- What’s new in Logic Pro
-
- What is Logic Pro for Mac?
- Logic Pro project basics
- Undo and redo edits
- Download additional sound packs
- How to get help
-
- Tracks overview
-
- Create tracks
- Create tracks using drag and drop
- Create tracks using existing channel strips
- Assign tracks to different channel strips
- Choose the default region type for software instrument tracks
- Select tracks
- Duplicate tracks
- Rename tracks
- Change track icons
- Change track colors
- Reorder tracks
- Zoom tracks
- Replace or double drum sounds
- Control timing with the groove track
- Use selection-based processing
- Edit track parameters
-
- Overview
-
- Before recording software instruments
- Play software instruments
- Record software instruments
- Record additional software instrument takes
- Overdub software instrument recordings
- Spot erase software instrument recordings
- Use Note Repeat
- Replace software instrument recordings
- Record to multiple software instrument tracks
- Record multiple MIDI devices to multiple tracks
- Record software instruments and audio simultaneously
- Use step input recording techniques
- Record MIDI messages from another music app
- Route MIDI internally to software instrument tracks
- Use the metronome
-
- Arranging overview
-
- Regions overview
- Select regions
- Select parts of regions
- Cut, copy, and paste regions
- Move regions
- Add or remove gaps
- Delay region playback
- Loop regions
- Repeat regions
- Resize regions
- Mute and solo regions
- Time stretch regions
- Reverse audio regions
- Split regions
- Demix MIDI regions
- Join regions
- Create regions in the Tracks area
- Change the gain of audio regions in the Tracks area
- Normalize audio regions in the Tracks area
- Create aliases of MIDI regions
- Convert repeated MIDI regions to loops
- Change the color of regions
- Convert a MIDI region into a pattern region in Logic Pro for Mac
- Replace a MIDI region with a Session Player region in Logic Pro for Mac
- Convert audio regions to samples for a sampler instrument
- Rename regions
- Delete regions
-
- Chords overview
- Add and delete chords
- Select chords
- Cut, copy, and paste chords
- Move and resize chords
- Loop chords on the Chord track
- Transpose chords
- Edit chords
- Work with chord groups
- Use chord progressions
- Change the chord rhythm
- Choose which chords a Session Player region follows
- Analyze the key signature of a range of chords
- Analyze the chords in audio or MIDI regions in Logic Pro for Mac
- Extract vocal and instrumental stems with Stem Splitter
- Create groove templates
-
- Overview
-
- Add notes
- Select notes
- Snap items to the grid
- Move notes
- Copy notes
- Change the pitch of notes
- Resize notes
- Edit note velocity
- Quantize the timing of notes
- Quantize the pitch of notes
- Change note articulations
- Lock the position of events
- Mute notes
- Change note color
- View note labels
- Delete notes
- Time stretch notes
- View multiple MIDI regions
- Split chords
- Automation/MIDI area in the Piano Roll Editor
- Open other editors
-
- Session Players overview
- The Session Player Editor
- Choose a Session Player type and style
- Chords and Session Players
- Choose Session Player presets
- Regenerate a Session Player performance
- Follow rhythm of chords and other tracks
- Work with Drummer multi-channel kits
- Convert Session Player regions into MIDI or pattern regions
-
- Logic Pro for Mac advanced editors overview
-
- Audio File Editor overview
- Play audio files in the Audio File Editor
- Navigate audio files in the Audio File Editor
-
- Audio File Editor edit commands
- Edit audio files with transient markers
- Use the Audio File Editor Pencil tool
- Trim or silence audio files
- Remove DC offset
- Set audio file levels
- Normalize audio files
- Fade audio files
- Reverse audio and invert phase
- Audio File Editor Loop commands
- Undo Audio File Editor edits
- Backup audio files
- Use an external sample editor
-
- Mixing overview
- Set channel strip input format
- Set channel strip pan or balance positions
- Mute and solo channel strips
- Reorder channel strips in the Mixer
-
- Plug-ins overview
- Add, remove, move, and copy plug-ins
- Search for plug-ins in the Mixer
- Insert a plug-in on a track using drag and drop
- Activate plug-ins on inactive channel strips
- Use the Channel EQ
- Work in the plug-in window
- Work with plug-in settings
- Work with plug-in latencies
- Work with Audio Units in Logic Pro for Mac
- Use MPE with software instruments
- Use the Plug-in Manager
- Work with channel strip settings
- Surround panning
- Use the I/O Labels window
- Undo and redo Mixer and plug-in adjustments
-
- Smart Controls overview
- Show Smart Controls for master effects
- Choose a Smart Control layout
- Automatic MIDI controller assignment
- Map screen controls automatically
- Map screen controls
- Edit mapping parameters
- Use parameter mapping graphs
- Open the plug-in window for a screen control
- Rename a screen control
- Use articulation IDs to change articulations
- Assign hardware controls to screen controls
- Compare Smart Control edits with saved settings
- Use the Arpeggiator
- Automate screen control movements
-
- Live Loops overview
- Start and stop cells
- Work with Live Loops cells
- Change loop settings for cells
- How the Live Loops grid and Tracks area interact
- Edit cells
- Edit scenes
- Work in the Cell Editor
- Bounce cells
- Record a Live Loops performance
- Change Live Loops grid settings
- Control Live Loops with other devices
-
- Global changes overview
- Control transposition with the Pitch Source parameter
-
- Tempo overview
-
- Smart Tempo overview
- Use free tempo recording
- Choose the Project Tempo mode
- Choose the Smart Tempo setting
- Use Smart Tempo with multitrack audio
- Work in the Smart Tempo Editor
- Improve the tempo analysis using hints
- Correct tempo analysis results using beat markers
- Protect Smart Tempo edits by locking a range
- Match audio recordings to the project tempo
- Match the project tempo to an audio region
- Use audio file tempo information
- Sync audio to a video hit point
- Record tempo changes
- Use the Tempo Interpreter
- Use the tempo fader
- Control project volume
-
- Overview
- Add notes to a score
-
- Part box overview
- View score symbols
- Select score symbols
- Add notes and rests
- Add notes and symbols to multiple regions
- Add key and time signature changes
- Change the clef sign
- Add dynamic marks, slurs, and crescendi
- Change note heads
- Add symbols to notes
- Add trills, ornaments, and tremolo symbols
- Add sustain pedal markings
- Add chord symbols
- Add chord grids and tablature symbols
- Add bar lines, repeats, and coda signs
- Add page and line break symbols
-
- Select notes
- Move and copy notes
- Change note pitch, duration, and velocity
- Change note articulations
- Quantize the timing of notes
- Restrict note input to the current key
- Control how ties are displayed
- Add and edit tuplets
- Override display quantization using tuplets
- Add grace notes and independent notes
- Delete notes
- Use automation in the Score Editor
-
- Staff styles overview
- Assign staff styles to tracks
- Staff Style window
- Create and duplicate staff styles
- Edit staff styles
- Edit staff, voice, and assign parameters
- Add and delete staffs or voices in the Staff Style window in Logic Pro for Mac
- Copy staffs or voices in the Staff Style window in Logic Pro for Mac
- Copy staff styles between projects
- Delete staff styles
- Assign notes to voices and staffs
- Display polyphonic parts on separate staffs
- Change the staff assignment of score symbols
- Beam notes across staffs
- Use mapped staff styles for drum notation
- Predefined staff styles
- Share a score
-
-
- Key commands overview
- Browse, import, and save key commands
- Assign key commands
- Copy and print key commands
-
- Global Commands
- Global Control Surfaces Commands
- Various Windows
- Windows Showing Audio Files
- Main Window Tracks and Various Editors
- Various Editors
- Views Showing Time Ruler
- Views Showing Automation
- Main Window Tracks
- Live Loops Grid
- Mixer
- MIDI Environment
- Piano Roll
- Score Editor
- Event Editor
- Step Editor
- Step Sequencer
- Project Audio
- Audio File Editor
- Smart Tempo Editor
- Library
- Sampler
- Drum Machine Designer
- Step Input Keyboard
- Smart Controls
- Tool Menu
- Control Surface Install Window
-
- Logic Pro projects
- Various windows
- Controller Assignments window
- Control bar
- Tracks area
- Global tracks
- Automation
- Live Loops grid
- Mixer
- MIDI Environment
- Piano Roll Editor
- Score Editor
- Event List
- Step Editor
- Step Sequencer
- Flex Time
- Audio File Editor
- Smart Tempo Editor
- Surround Panner
- Channel EQ
- Space Designer
- Sampler
- Touch Bar shortcuts
-
-
- Working with your control surface
- Connect control surfaces
- Add a control surface to Logic Pro for Mac
- Automatic assignment for USB MIDI controllers
- Grouping control surfaces
- Control Surfaces settings overview
- Modal dialog display
- Tips for using your control surface
- Supported control surfaces
- Software and firmware for Logic Pro for Mac
-
-
- Environment overview
- Common object parameters
- Customize the Environment
-
-
- Fader objects overview
- Use fader objects
- Play back fader movements
- Work with object groups
- Fader styles
- Fader functions: MIDI events
- Fader functions: range, value as
- Fader functions: filter
- Vector fader
- Special faders overview
- Cable switchers
- Meta event faders
- SysEx faders
- Work with SysEx messages
- Special functions
- Ornament objects
- MMC record buttons
- Keyboard objects
- Monitor objects
- Channel splitter object
- Physical input objects
- Physical input objects
- MIDI click objects
-
-
- Use MIDI plug-ins
-
- Arpeggiator overview
- Arpeggiator control parameters
- Note order parameters overview
- Note order variations
- Note order inversions
- Arpeggiator pattern parameters overview
- Use Live mode
- Use Grid mode
- Arpeggiator options parameters
- Arpeggiator keyboard parameters
- Use keyboard parameters
- Assign controllers
- Modifier controls
- Note Repeater controls
- Randomizer controls
-
- Use Scripter
- Use the Script Editor
- Scripter API overview
- MIDI processing functions overview
- HandleMIDI function
- ProcessMIDI function
- GetParameter function
- SetParameter function
- ParameterChanged function
- Reset function
- JavaScript objects overview
- Use the JavaScript Event object
- Use the JavaScript TimingInfo object
- Use the Trace object
- Use the MIDI event beatPos property
- Use the JavaScript MIDI object
- Create Scripter controls
- Transposer controls
- Record MIDI to Track
-
-
- Alchemy overview
- Alchemy interface overview
- Alchemy Name bar
- Alchemy file locations
-
- Alchemy source overview
- Source master controls
- Import browser
- Source subpage controls
- Source filter controls
- Source filter use tips
- Source elements overview
- Additive element controls
- Additive element effects
- Spectral element controls
- Spectral element effects
- Pitch correction controls
- Formant filter controls
- Granular element controls
- Sampler element controls
- VA element controls
- Wide unison mode
- Source modulations
- Morph controls
- Alchemy master voice section
- Alchemy Extended parameters
-
- ES2 overview
- ES2 interface overview
- ES2 integrated effects processor controls
- Use ES2 in Surround mode
- Extended parameters
-
-
- Sample Alchemy overview
- Interface overview
- Add source material
- Edit mode
- Play modes
- Source overview
- Synthesis modes
- Granular controls
- Additive effects
- Additive effect controls
- Spectral effect
- Spectral effect controls
- Filter module
- Lowpass, bandpass, and highpass filters
- Comb PM filter
- Downsampler filter
- FM filter
- Envelope generators
- Mod Matrix
- Modulation routing
- Motion mode
- Trim mode
- More menu
-
- Sculpture overview
- Sculpture interface
- Global parameters
- Amplitude envelope parameters
- Use the Waveshaper
- Filter parameters
- Output parameters
- Use surround range and diversity
- Define MIDI controllers
- Extended parameters
-
- Studio Piano
-
- Ultrabeat overview
- Ultrabeat interface
- Synthesizer section overview
- Filter section controls
- Distortion circuit controls
- Glossary
- Copyright and trademarks
Bass Amp Designer compressor in Logic Pro for Mac
The internal compression circuit is custom-built for use with Bass Amp Designer. It features an AutoGain function that compensates for volume reductions caused by compression.
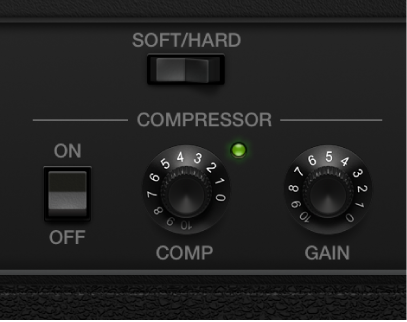
Compressor parameters
Compressor on/off switch: Turn the Compressor on or off.
Hard/Soft switch: Switch between two compression algorithms.
Hard: Stronger compression, with good control over levels, which makes it easier to fit the bass into an arrangement.
Soft: Compression with a slow attack and longer sustain phase.
Comp(ression) knob: Set the amount of compression intensity applied to the input signal.
Gain knob: Add gain to, or subtract gain from, the gain staging of the internal AutoGain feature.
Note: AutoGain is always active.
Thanks for your feedback.