
Use hue and saturation curves in Final Cut Pro
The six hue and saturation curves provide the maximum control and precision for color correcting your projects. You can adjust the hue, saturation, and brightness of any color in your project. Additionally, you can adjust the saturation for a range of brightness or a range of saturation in a clip. You can also adjust the saturation of a specific color at any point in its range of brightness.
First you add the Hue/Saturation Curves color correction effect to the clip, and then you adjust its settings in the Color inspector.
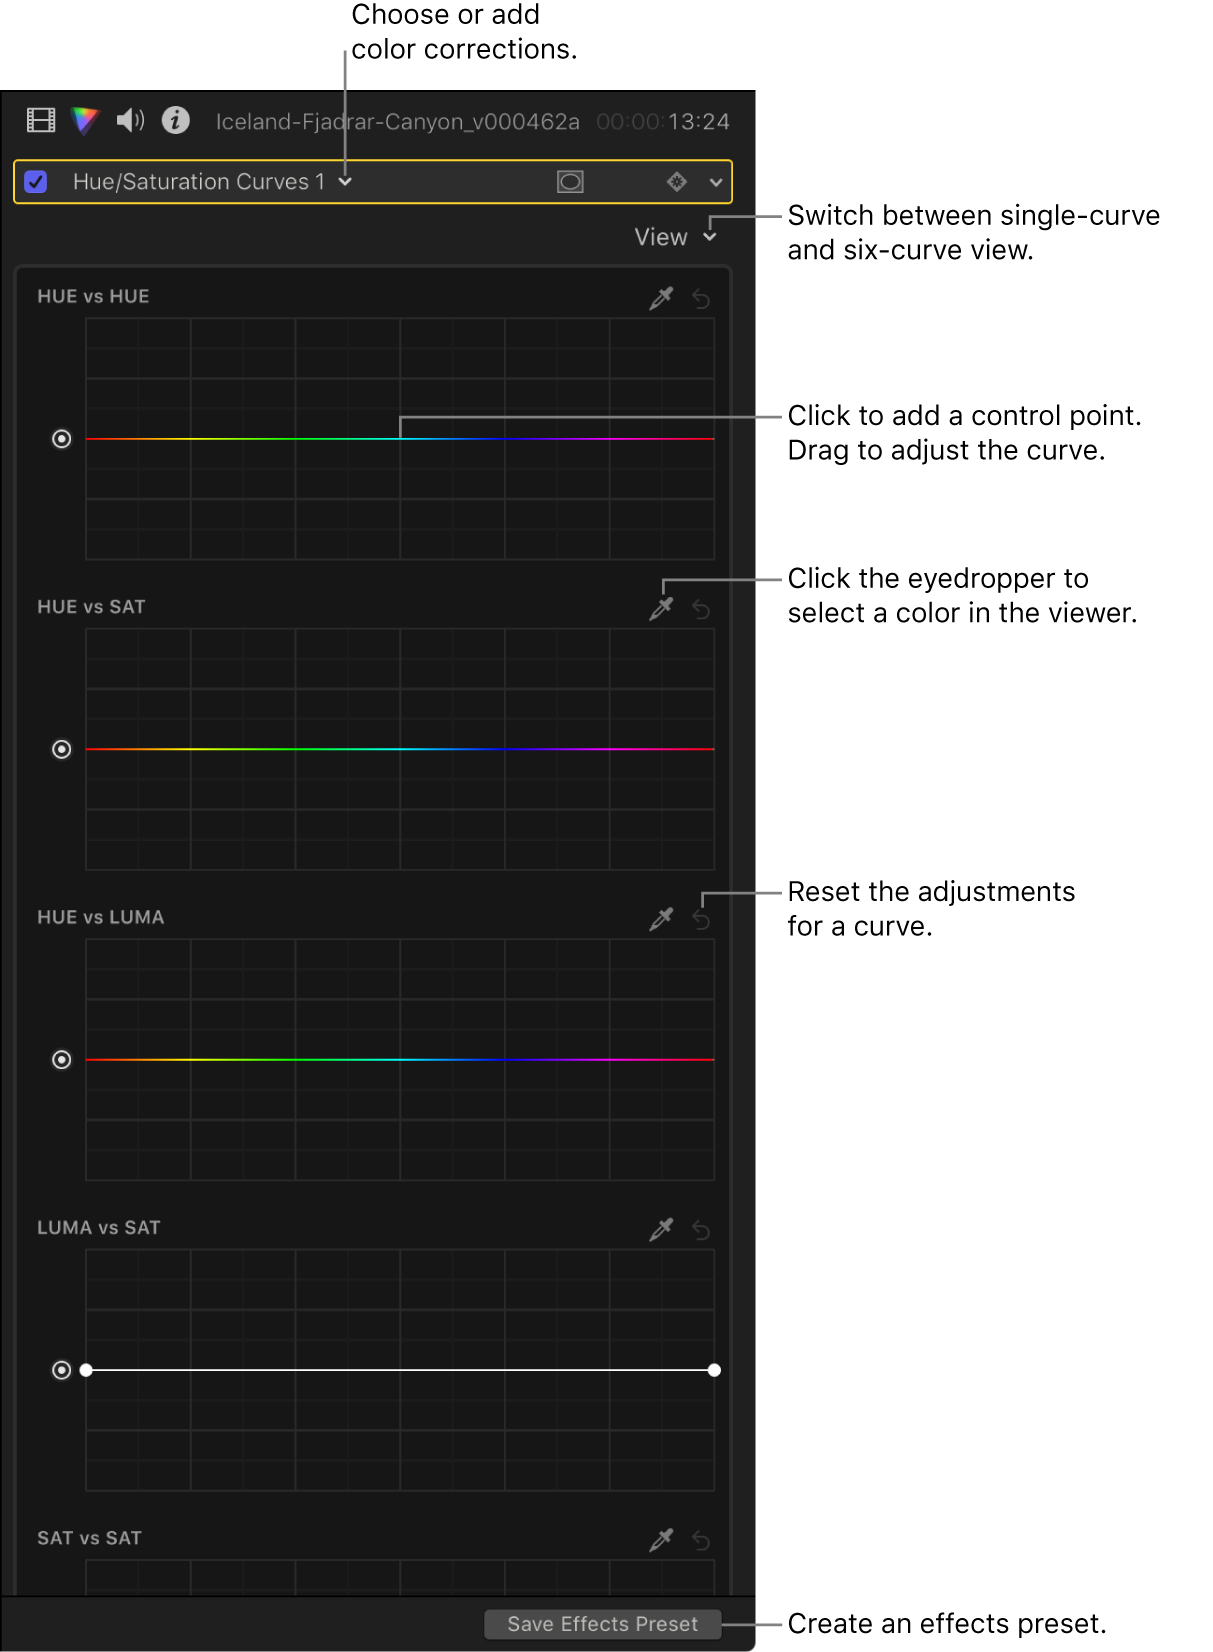
To provide objective, precise information as you color correct a clip, use the video scopes and other video measurement tools (see Intro to measuring video in Final Cut Pro).
You can create a custom workspace layout for color correction or switch to the predefined Color & Effects layout (see Change the workspace layout in Final Cut Pro).
Note: Because you can apply multiple color correction effects to a clip, you’re not required to follow all of the steps below, nor the order of those steps. For example, you might adjust the overall contrast with the Color Curves effect and adjust a color tint with the Color Wheels effect. Or you could achieve the same results with multiple instances of the same effect. For a summary of the color correction effects, see Intro to color correction effects in Final Cut Pro.
Add and set up a Hue/Saturation Curves color correction
In the Final Cut Pro timeline, select the clip you want to correct, then position the playhead in the clip so that the clip appears in the viewer.
Open the Color inspector.
Tip: If you frequently add a particular color correction effect, you can speed up your workflow by setting it as the default color correction. Then just select a timeline clip and press Command-6 to start adjusting the effect in the Color inspector.
Click the pop-up menu at the top of the Color inspector, then do one of the following:
Add a new instance of the Hue/Saturation Curves effect: Choose Hue/Saturation Curves from the Add Correction section at the bottom of the menu.
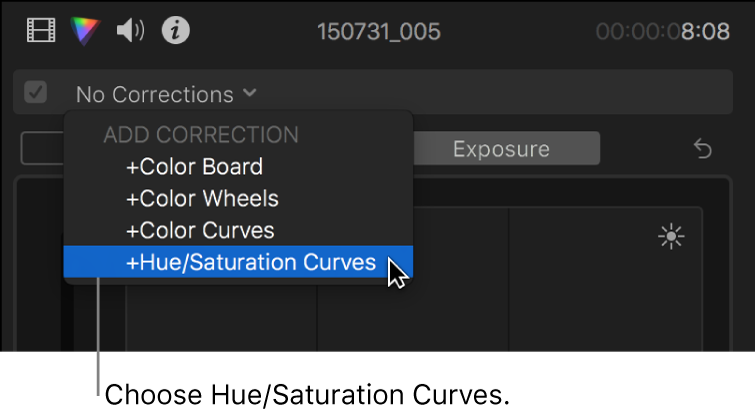
For more details and methods, see Add color corrections in Final Cut Pro.
Correct a Hue/Saturation Curves effect already applied to the clip: Choose the Hue/Saturation Curves effect you want to correct from the Corrections section at the top of the menu.
Hue/Saturation Curves controls appear in the Color inspector. The effect also appears in the Effects section of the Video inspector.

Tip: To switch the inspector between full-height view and half-height view, double-click the top bar of the inspector.
Click the View pop-up menu at the top of the Color inspector and choose a display option:
6 Curves: Displays all six curves at once.
Single Curves: Displays one large curve at a time. In Single Curves view, click a button at the top of the Color inspector to display a specific curve.
To color correct the clip, follow the instructions below for the adjustment you want to make.
Adjust the hue, saturation, or brightness of a color
Follow the instructions in Add and set up a Hue/Saturation Curves color correction, above.
In the Color inspector, click the eyedropper for the curve that you want to use.
Hue vs Hue: Change a color (hue) in the image.
Hue vs Sat: Change the saturation of a color in the image.
Hue vs Luma: Adjust the brightness of a color in the image.
In the viewer, click or drag over the color in your clip that you want to adjust.
Three control points appear on the curve in the Color inspector. The middle control point represents the color you selected with the eyedropper. The two outer control points constrain the selection to a narrow range of hues.
The examples below show the Hue/Saturation Curves effect in Single Curves view. In this view, click a button at the top of the Color inspector to display a specific curve. For example, click HvH to display the Hue vs Hue curve.
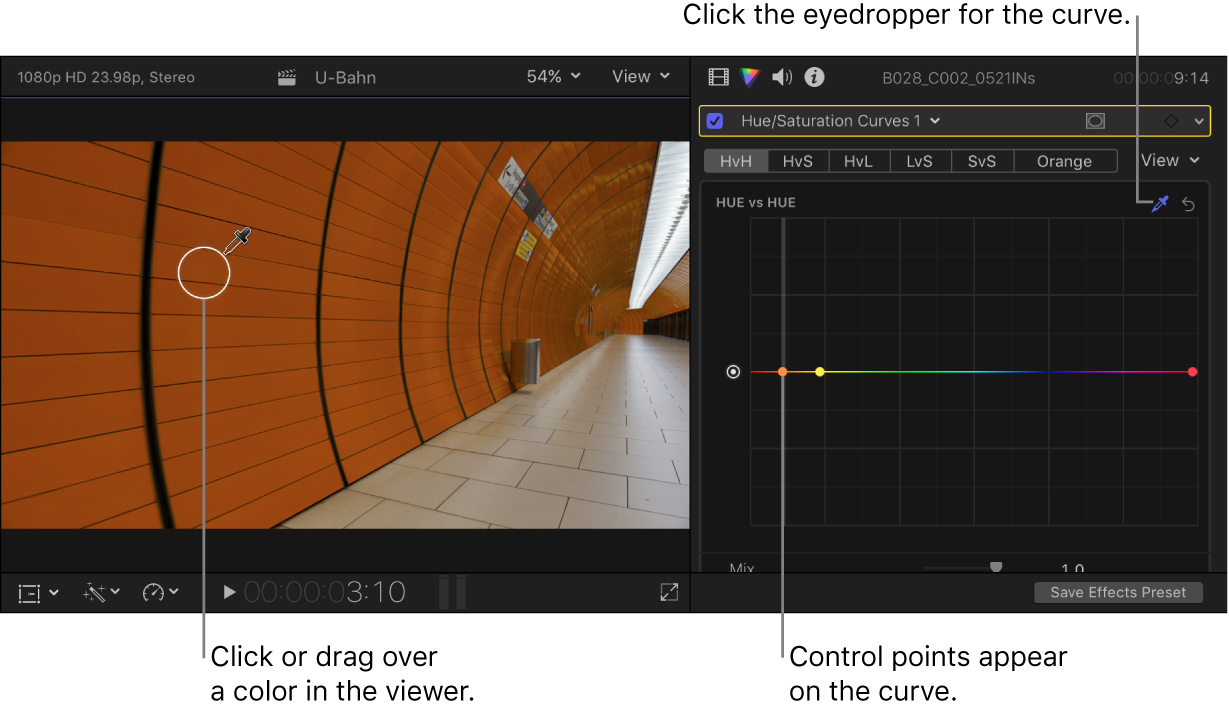
Note: You can also create control points by clicking the curve, but the eyedropper method is generally more precise.
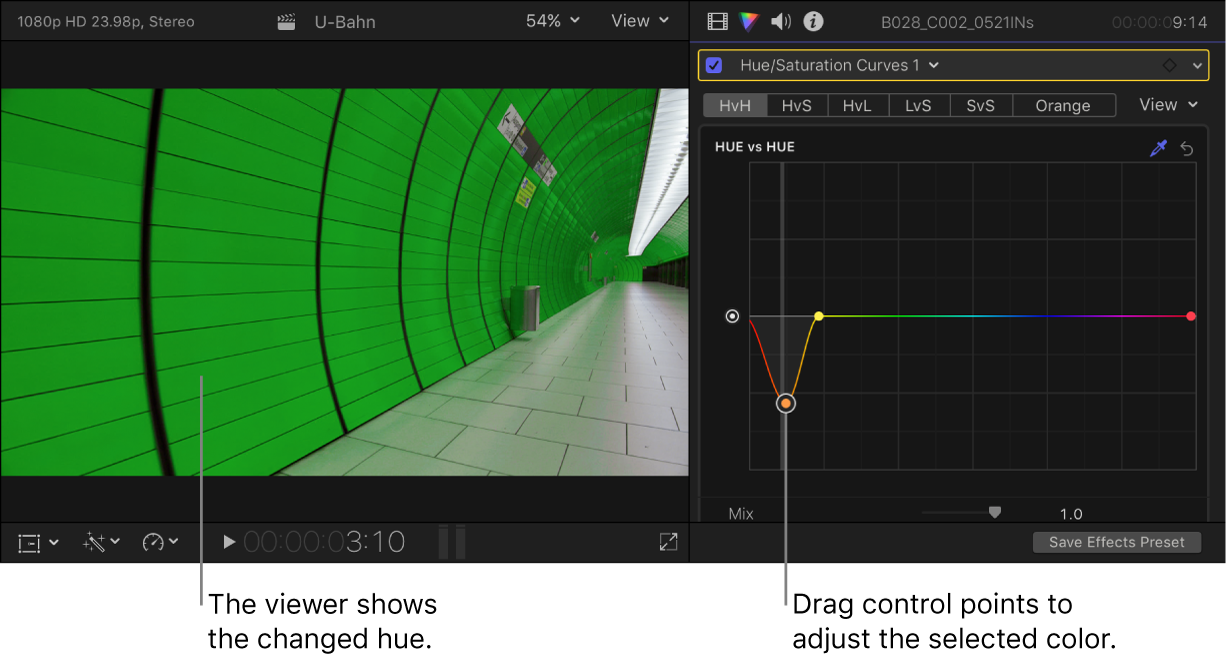
Drag the middle control point to adjust any of the following (depending on which curve you’re using in the Color inspector):
Hue vs Hue: Change the hue in the selection. Drag the control point up or down to rotate through the various hues around the perimeter of the color wheel.
Note: If you use the Hue vs Hue curve to change the hue and then use the eyedropper in any other curve in the same instance of the Hue/Saturation Curves color correction effect, the eyedropper selects the original hue—not the altered hue. To select the original hue, adjust the control points without using the eyedropper, or add a second instance of the Hue/Saturation Curves color correction effect.
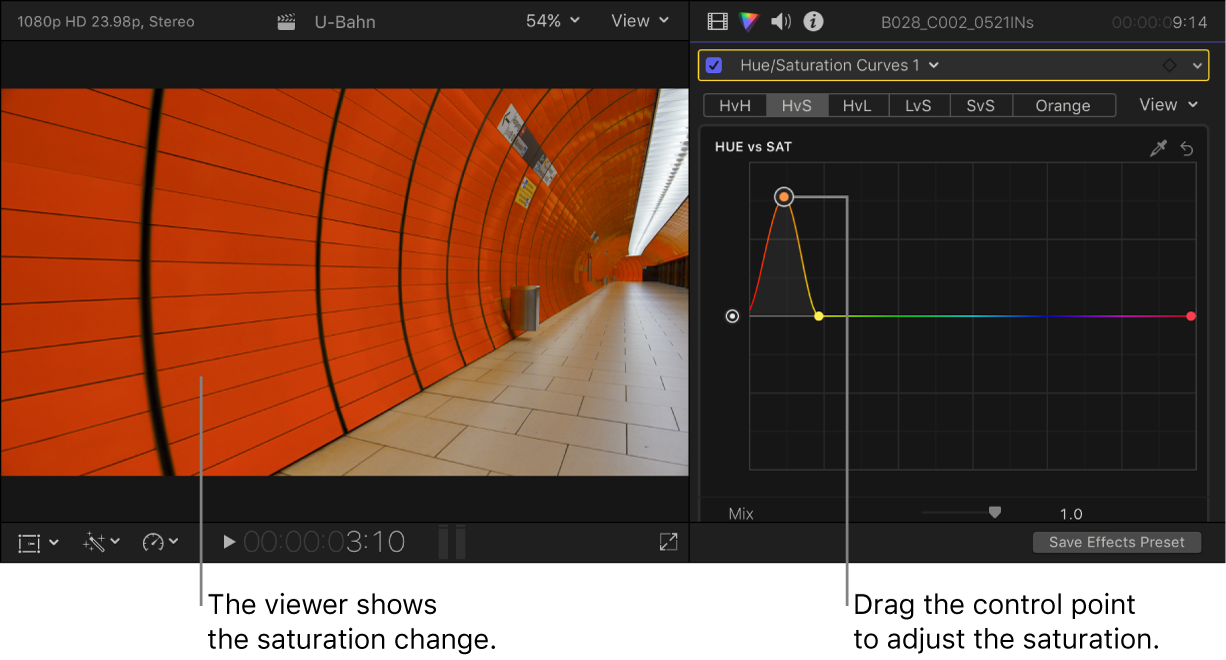
Hue vs Sat: Adjust the saturation of the selected color. Drag the middle control point up to increase the saturation, or down to decrease the saturation. Add or adjust control points as needed.
In the example below, the HvS button was clicked in the Single Curves view, and the eyedropper was used to select the hue of the wall in the image.
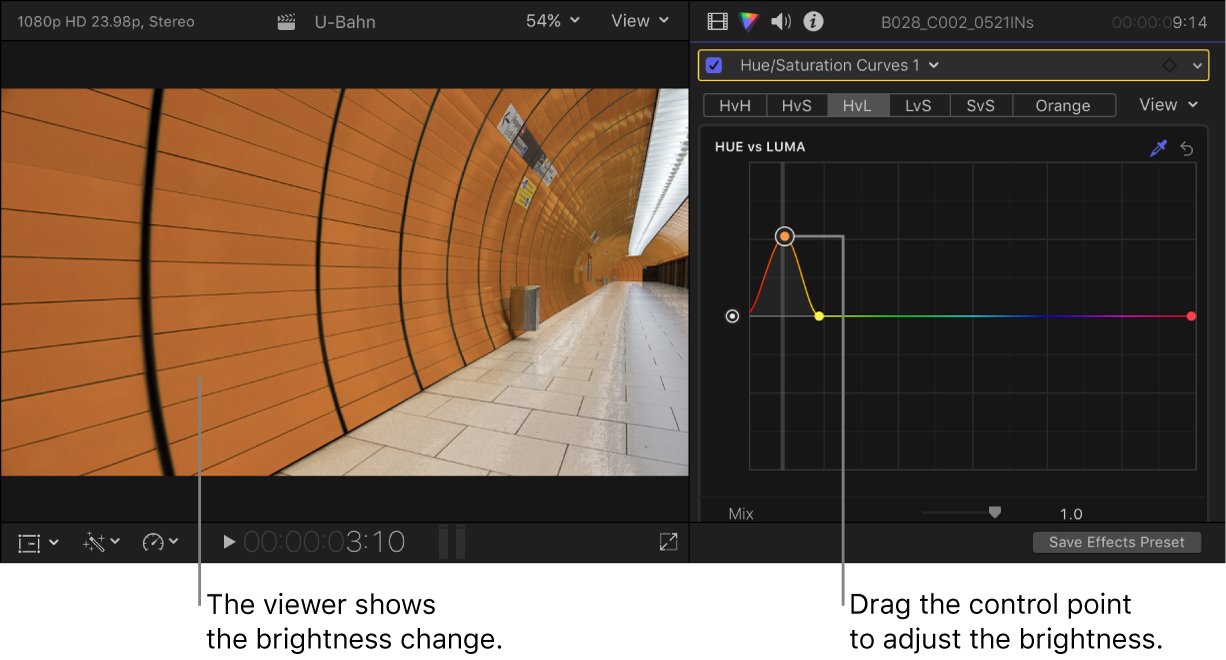
Hue vs Luma: Adjust the brightness of the selected color. Drag the middle control point up to increase the brightness, or down to decrease the brightness. Add or adjust control points as needed.
To make fine adjustments, hold down the Option key as you drag a control. Hold down the Shift key as you drag to constrain the control point to vertical or horizontal movement only.
In the example below, the HvL button was clicked in the Single Curves view, and the eyedropper was used to select the hue of the wall in the image.
To adjust the selected range, drag the two outer control points to the left or the right, or just delete them.
Adjust the saturation for a range of brightness
You can use the Luma vs Sat curve to create special looks and to make a clip broadcast-safe by reducing oversaturation.
Follow the instructions in Add and set up a Hue/Saturation Curves color correction, above.
In the Color inspector, click the eyedropper for the Luma vs Sat curve.
If all six curves are shown in the inspector, you may need to scroll to see the Luma vs Sat curve. In Single Curves view, click the LvS button at the top to display the curve.
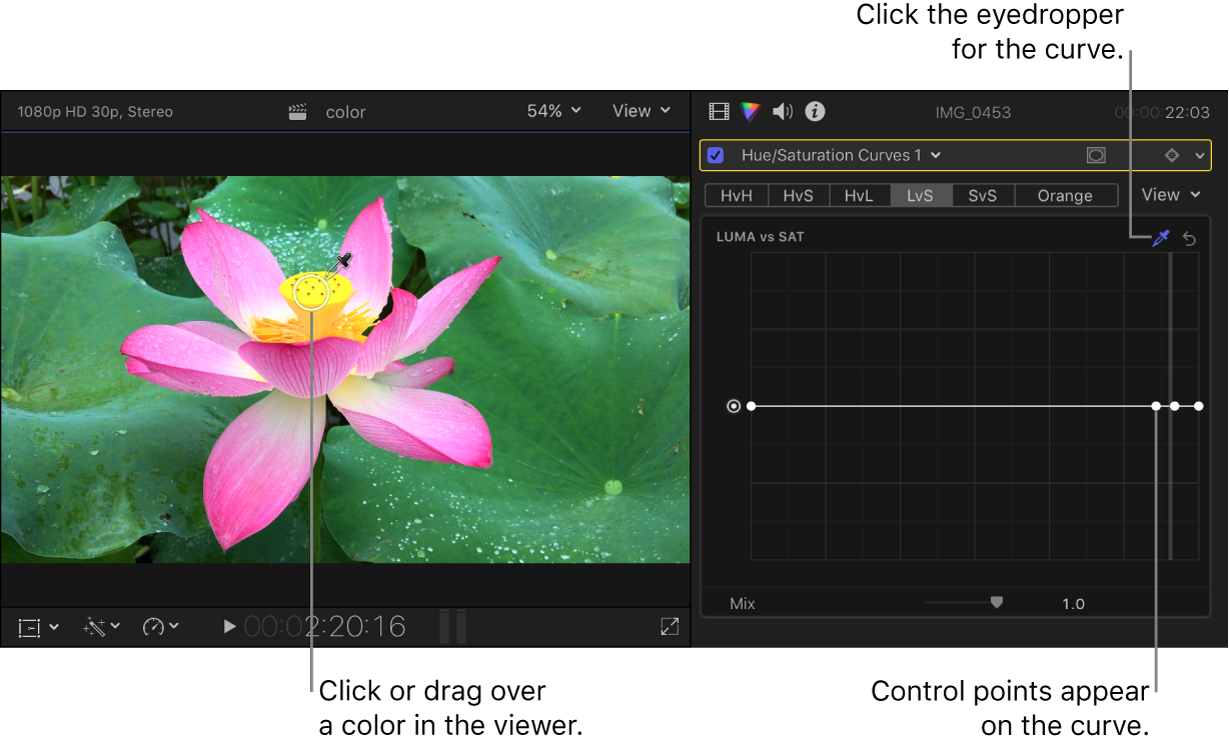
In the viewer, click or drag over the color in your clip whose saturation you want to adjust.
Three control points appear on the curve in the Color inspector. The middle control point represents the level of luma (brightness) you selected with the eyedropper. The two outer control points constrain the selection to a narrow range of brightness.
Note: You can also create control points by clicking the curve, but the eyedropper method is generally more precise.
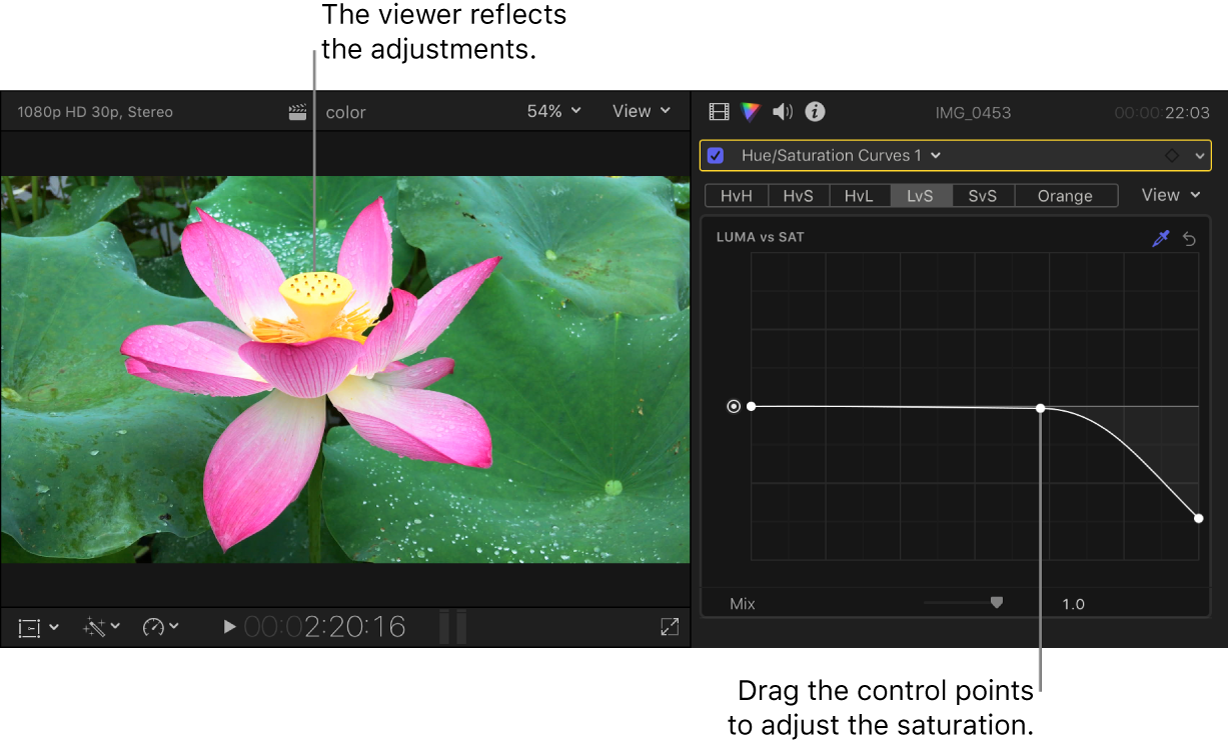
Drag the middle control point up to increase the saturation, or down to decrease the saturation.
To make fine adjustments, hold down the Option key as you drag a control. Hold down the Shift key as you drag to constrain the control point to vertical or horizontal movement only.
To adjust the range of luma selected, drag the two outer control points to the left or the right, or just delete them.
To adjust the saturation for a different range of brightness, click the curve to add control points, and adjust them as needed.
Use the left end of the curve to adjust shadows, the middle section to adjust midtones, and the right end of the curve to adjust highlights. Drag up to increase saturation, or down to decrease saturation.
Adjust the saturation within a range of saturation
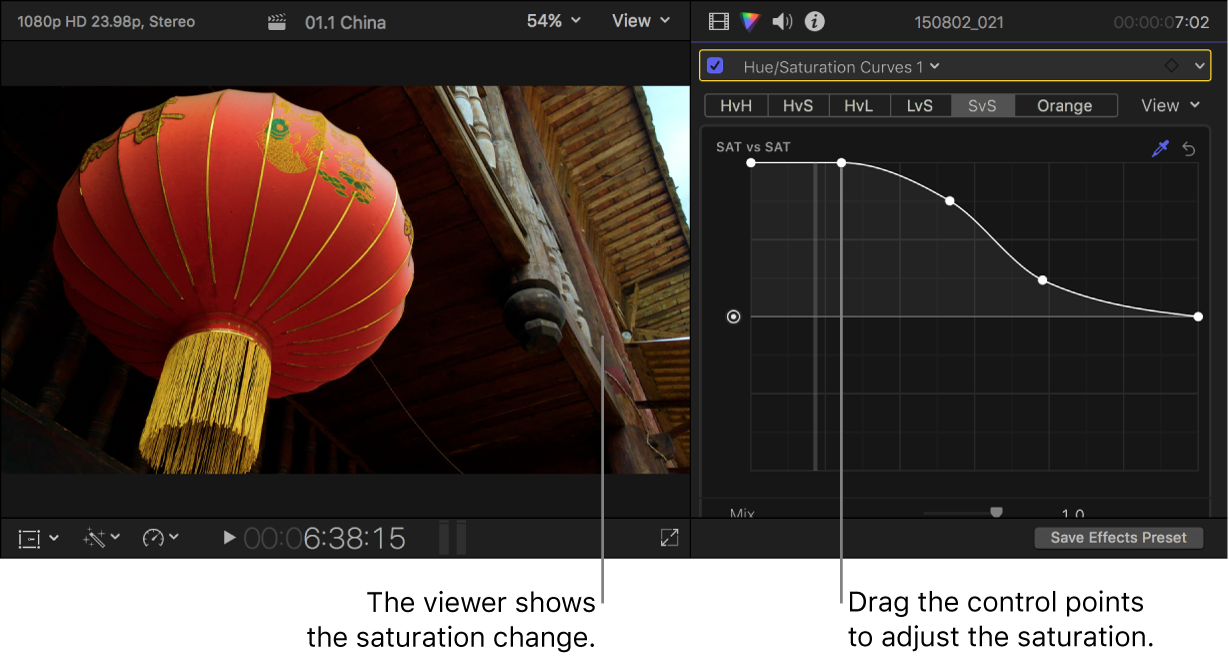
The Sat vs Sat curve allows you to create special looks by selecting and adjusting a range of saturation within the video clip’s original saturation. You can increase the saturation of areas with low saturation, or you can desaturate oversaturated areas to make them safe for broadcast. In the example below, the saturation is increased in a region of low saturation in the original image.
Follow the instructions in Add and set up a Hue/Saturation Curves color correction, above.
In the Color inspector, click the eyedropper for the Sat vs Sat curve.
If all six curves are shown in the inspector, you may need to scroll to see the Sat vs Sat curve. In Single Curves view, click the SvS button at the top to display the curve.
In the viewer, click or drag over the color in your clip whose saturation you want to adjust.
Three control points appear on the curve in the Color inspector. The middle control point represents the level of saturation you selected with the eyedropper. The two outer control points constrain the selection to a narrow range of saturation.
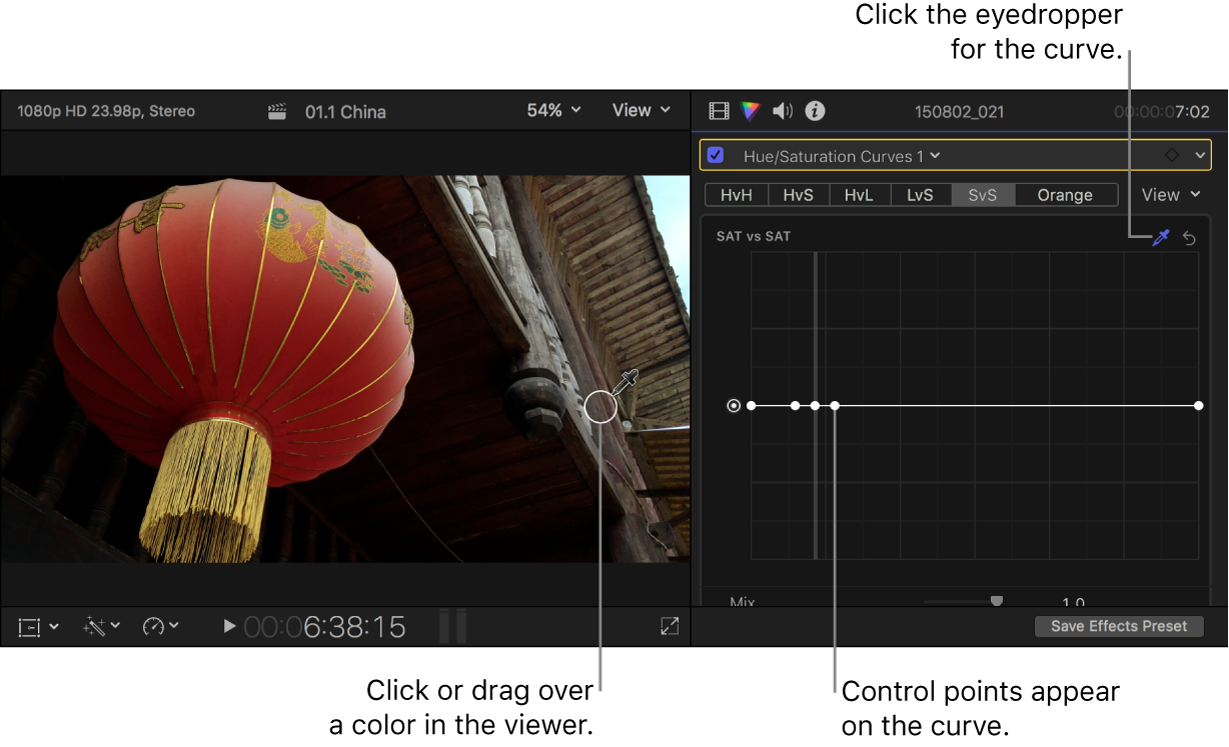
Note: You can also create control points by clicking the curve, but the eyedropper method is generally more precise.
Drag the middle control point up to increase the saturation, or down to decrease the saturation.
To make fine adjustments, hold down the Option key as you drag a control. Hold down the Shift key as you drag to constrain the control point to vertical or horizontal movement only.
To change the range of saturation selected, drag the two outer control points to the left or the right, or just delete them.
To adjust the saturation for a different range of saturation, click the curve to add control points, and adjust them as needed.
Use the left end of the curve to adjust regions of low saturation, the middle section to adjust regions of medium saturation, and the right end of the curve to adjust highly saturated regions. Drag a control point up or down to increase or decrease saturation for that region of saturation.
Adjust the saturation of a specific color at any point along its range of brightness
You can use the Orange vs Sat curve to adjust a specific color’s saturation at any point along its range of tonality from darkest to brightest.
Note: The default color for the curve is orange (because it aligns with skin tone), but you can select any color and adjust its saturation. For more information about skin tone, see Vectorscope display options in Final Cut Pro.
Follow the instructions in Add and set up a Hue/Saturation Curves color correction, above.
In the Color inspector, click the eyedropper for the Orange vs Sat curve.
If all six curves are shown in the inspector, you may need to scroll to see the Orange vs Sat curve. In Single Curves view, click the Orange button at the top to display the curve.
In the viewer, click or drag over the color in your clip whose saturation you want to adjust.
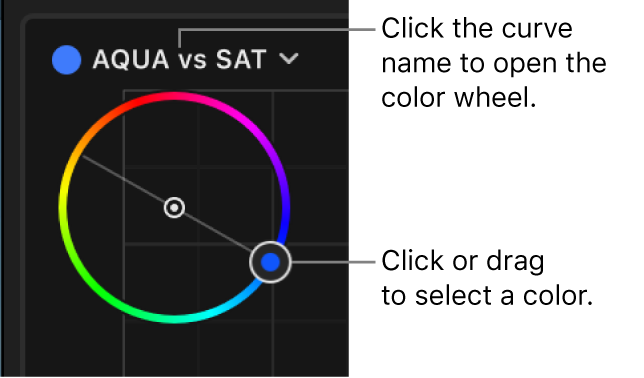
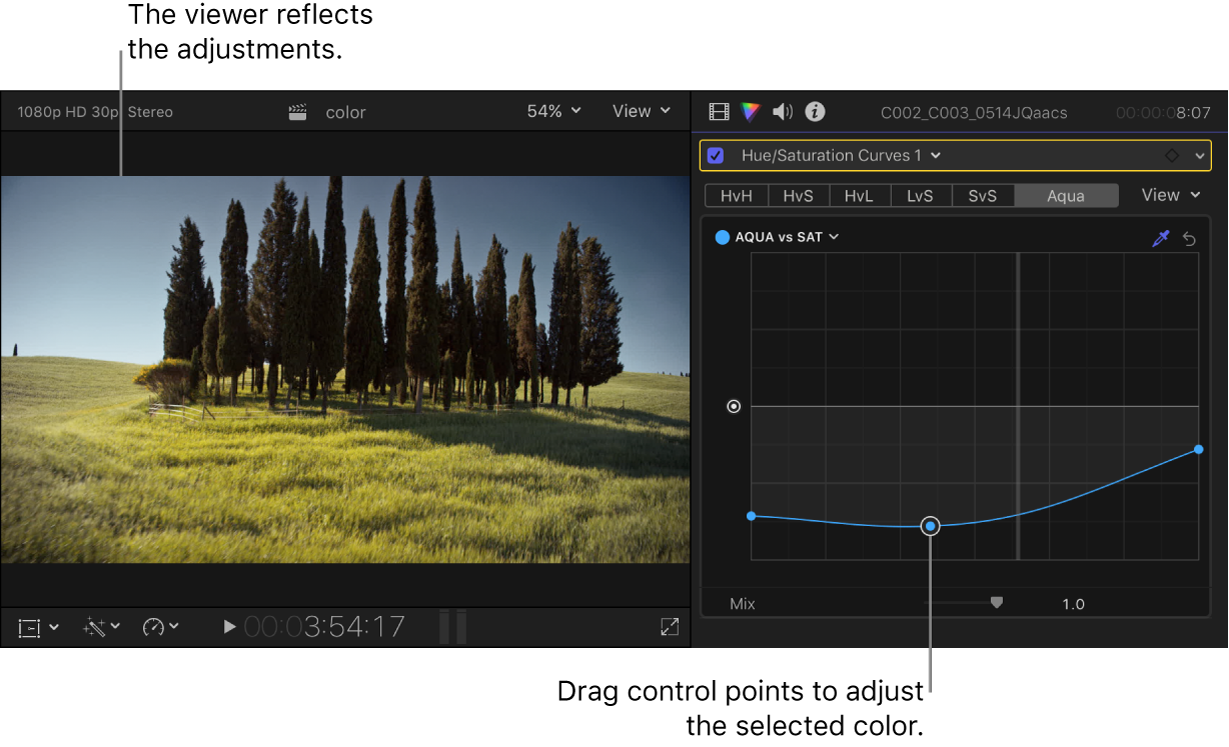
The curve color changes to the color you selected in the viewer. The name of the curve also changes to reflect the selection—for example, to “Aqua vs Sat.”
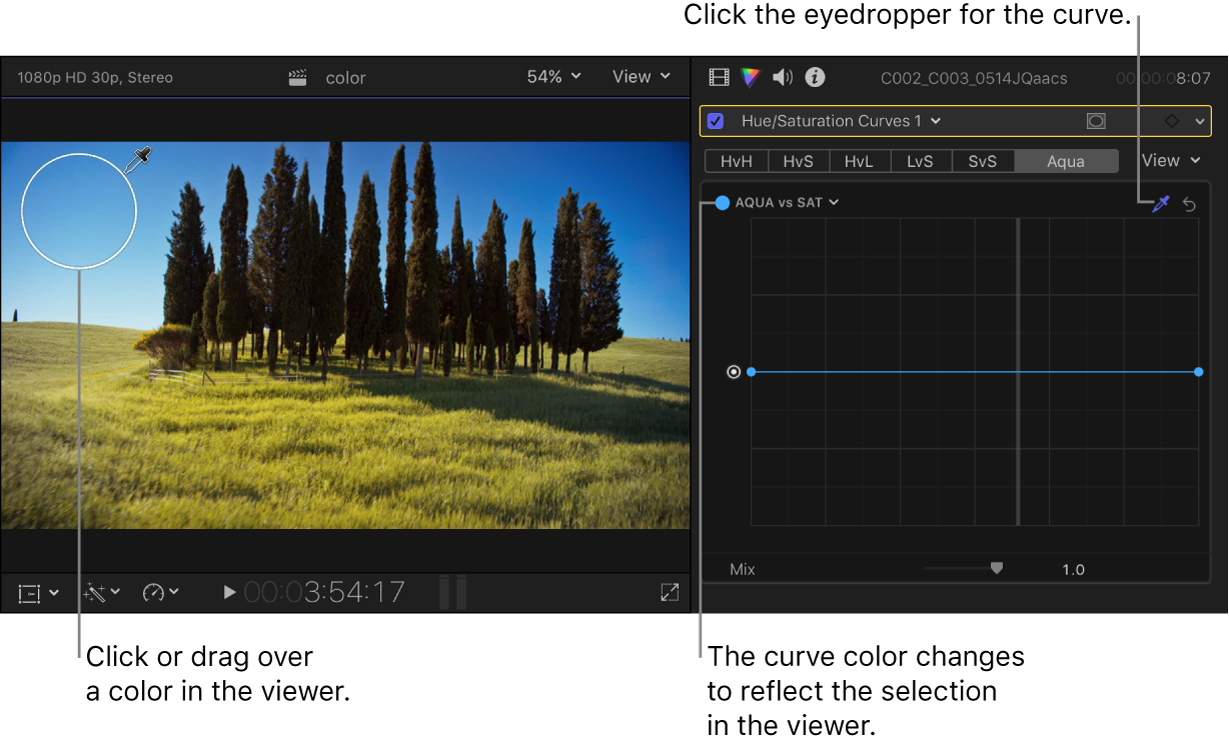
You can also change the color of a curve by clicking its name (at the top left of the curve) and then clicking or dragging in the color wheel to select a color.
Click the curve to add control points, then drag them up or down to increase or decrease the saturation of the selected color.
To make fine adjustments, hold down the Option key as you drag a control.
Use the left end of the curve to adjust shadows, the middle section to adjust midtones, and the right end of the curve to adjust highlights. Add or adjust control points as needed.
Tip: If you want to color correct the next or previous clip in the timeline, press Command-Right Arrow or Command-Left Arrow to move the playhead to the next or previous clip and select it. These shortcuts select clips in the same role only, so you can quickly move between video clips and skip over clips not suited for color correction (such as music or titles).
After you apply a color correction, you can copy it to another clip or group of clips. See Copy effects between clips in Final Cut Pro.
Download this guide: Apple Books | PDF