
Linear Phase EQ overview in MainStage
The high-quality Linear Phase EQ effect is similar to Channel EQ, sharing the same parameters and eight-band layout. See Channel EQ overview. You can copy settings between them. If you replace Channel EQ with Linear Phase EQ (or vice versa) in the same effect slot, the current settings are automatically transferred to the new EQ.
Linear Phase EQ uses a different underlying technology to Channel EQ that preserves the phase of the audio signal. Phase coherency is always maintained, even when you apply extreme EQ curves to the sharpest signal transients. This differs from Channel EQ, which can introduce phase shifts of the signal that can have an audible (and often desirable) effect on the sound.
A further difference between Channel EQ and Linear Phase EQ is that the latter uses a fixed amount of CPU resources, regardless of the number of active bands. Linear Phase EQ also introduces greater amounts of latency. See the Linear Phase EQ use, parameter, and Analyzer sections.
Note: Use the Linear Phase EQ where phase coherence between tracks is needed, such as multi microphone recordings. The Linear Phase does not introduce any phase shift to the signal which can also be beneficial in mastering, but it does impact on the onset of the transient. This is most evident when using steep cut filters, or high boosts/cuts of narrow filter bands.
To add Linear Phase EQ to your concert, choose Equalizers > Linear Phase EQ in a channel strip Audio Effect plug-in menu. See Add and remove plug-ins in MainStage.
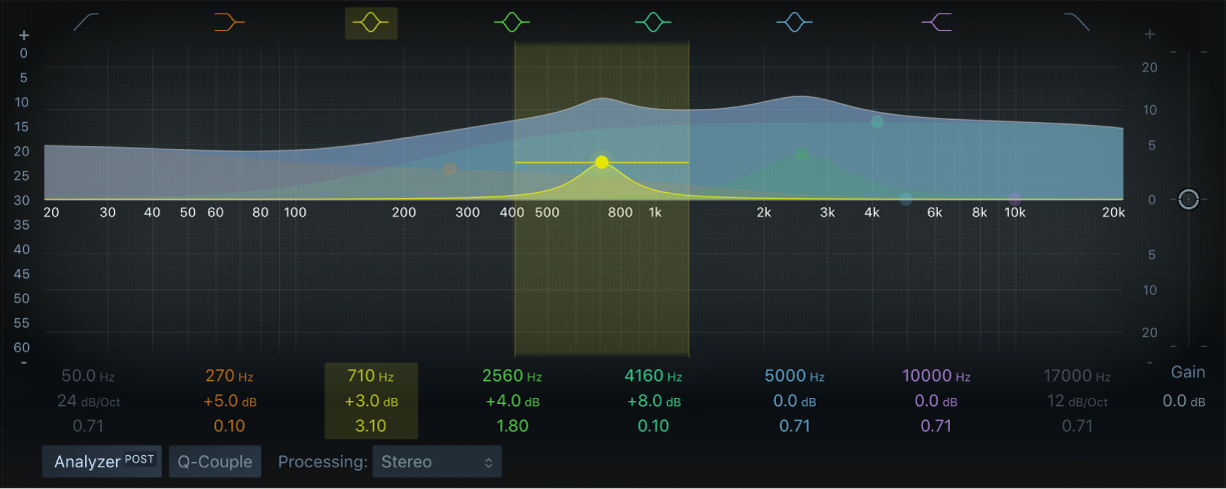
Use the Linear Phase EQ graphic display
The graphic display shows the current curve of each EQ band. The scale is shown in decibels. The color of each band matches the corresponding button above the display. Each band (and corresponding Frequency, Gain, and Q field) is highlighted as you move the pointer across it. Click a curve line segment, the (center frequency) control point, or anywhere in the space between the zero line and EQ curve to adjust the band.
Click the control point to select a band for editing. Once a band is selected, no other band control point that falls within the active area of the selected band can be selected.
Click the graphic display background (outside a band) to deselect the selected band.
Hold down Command while performing any of the following operations to limit dragging to vertical or horizontal movement.
Drag anywhere in the band to adjust gain and the center frequency.
Drag the vertical lines that encompass the selected band to adjust the Q (bandwidth) only. Two arrow icons are shown.
Use a two-finger vertical swipe with the trackpad, or a single-finger vertical swipe with the Magic Mouse, to adjust the Q value of the selected band.
Drag the horizontal line in the selected band to adjust the gain only. If Q-Coupling is enabled, both the gain and bandwidth are adjusted. Two arrow icons are shown.
Drag the intersection of vertical and horizontal lines in the selected band to adjust the gain and Q simultaneously. Four arrow icons are shown.
Drag the control point to adjust the center frequency only.
Note: Horizontally dragging the control point in band 1 and band 8 adjusts both the frequency and Q.
Hold down Option-Command to adjust the Q and center frequency simultaneously. A “Q” icon is shown at the pointer position.